Create HTML Editor styles
With a Microsoft Office SharePoint Server 2007 publishing site, content owners can create and update Web pages in the site by using only a Web browser. For example, a department manager can use a browser to post announcements and other information like that shown the following illustration directly to their Web site.
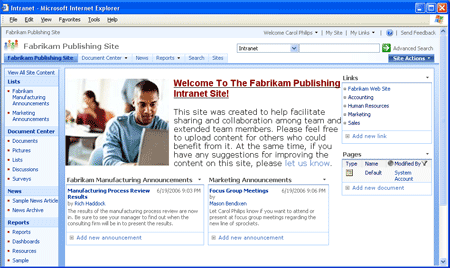
The developer or designer of a Web site can help content creators make the pages that they create look better by creating styles that can be applied to portions of the pages that are created from page layouts. Creating custom styles also helps standardize the look and feel of such pages. This article shows you how a Web developer or designer can use Microsoft Office SharePoint Designer 2007 to create custom styles that can be applied to publishing pages that are created or edited in the browser.
Important: This article applies only to sites that are located on a server running Office SharePoint Server 2007. In addition, publishing must be turned on in the top-level site in the site collection. Also, you must have authoring permissions for the top-level site in order to open and edit page layouts.
In this article
How is the HTML Editor used in a publishing site?
Creating custom styles for publishing pages requires an understanding of some key concepts in Office SharePoint Server 2007. Following is a quick review.
How do publishing pages relate to page layouts?
Page layouts are page templates that control how a page looks, what page fields and content fields are available, and exactly which elements (such as lists and libraries) should be present on the page. For example, you can set up one page layout for trip reports, another page layout for newsletter articles, and a third page layout for plan updates. Authorized users can then create new publishing pages that are based on these page layouts. Each page that they create follows a consistent format for the specific type of content it will contain. The users can create publishing pages in their browsers, where they have the option of selecting a page layout each time that they create the page.
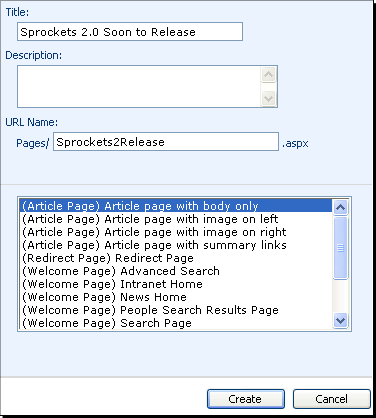
Page layouts can be edited in Office SharePoint Designer 2007. For more information, see the article Customize a publishing page layout.
Where do page layouts get their formatting?
Page layouts get their formatting from master pages, which are page templates that define areas of shared content (such as headers, footers, and left navigation) and that use style sheets to control the formatting of text, hyperlinks, cells, tables, and many other elements. Page layouts can also get their formatting from style sheets that are applied directly to them. For example, a page layout may get its initial formatting rules from a master page, but you can always attach additional style sheets to the page layout to more precisely define the formatting of the pages that are created from it. For example, the master page on which a page layout is based may specify that all normal text is in the Verdana font, but you can attach a style sheet to the page layout that specifies that all attached pages use Arial for the normal text font. All the formatting and markup on a publishing page — except for the content fields — comes directly from the page layout from which it was created.
How is content edited in publishing pages?
When you create a publishing page, you create it in the browser. After you create the page, you can edit it by browsing to it, clicking the Site Actions menu, and then clicking Edit Page.
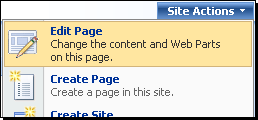
After the page opens, you can click Edit Content to open the HTML Editor to edit any rich text fields.

Note: Fields that do not contain rich text have their own editors — for example, a date field has its own editor.
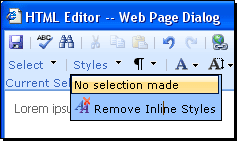
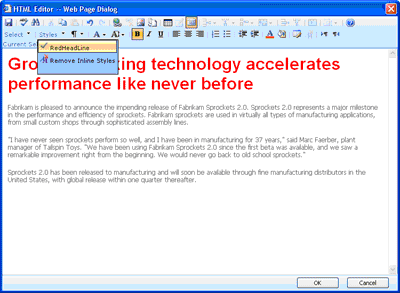
The HTML Editor opens so that you can add or edit content, manually change fonts and formatting, or choose from many other options. To apply a style to text, you select the text, click Styles, and then click the style that you want to apply.
Where does the HTML Editor get its styles?
The styles that are available in the HTML Editor come from two style sheets that are located in the _layouts directory of your site or subsite:
-
HtmlEditorCustomStyles.css defines the formatting for custom styles and is located at:
http://your_site/_layouts/1033/styles/HtmlEditorCustomStyles.css
-
HtmlEditorTableFormats.css defines the formatting for tables and is located at:
http://your_site/_layouts/1033/styles/HtmlEditorTableFormats.css
Because these style sheets are located in the protected _layouts directory in your site, you cannot modify them in Office SharePoint Designer 2007. However, you can override the styles in these style sheets by applying additional styles to the page layout that you use to create publishing pages.
Create styles for the HTML Editor
You can create new styles for the HTML Editor by opening the site in Office SharePoint Designer 2007 and then using the following procedures.
Locate and open the page layout
If you already created a page layout and now want to create new styles so that they are available for use in the HTML Editor in the browser, you begin by locating and then opening the page layout. You can open the page layout by double-clicking either the page layout itself or any publishing page that has been created from that page layout.
-
In Office SharePoint Designer 2007, open the site that contains the page layout that you want to modify.
-
In the Folder List, locate a page that uses the page layout to which you want to apply a new style, and then double-click the page.
Note: Publishing pages are stored in the Pages document library in the site. Double-clicking a publishing page is a quick way to find and open the page layout that the publishing page is attached to. If you already know the name of the page layout for which you want to create a new style, you can double-click the page layout instead of the page.
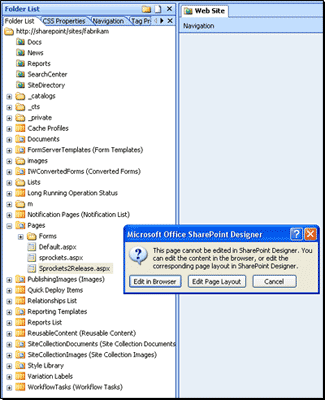
Because publishing pages can be edited only in the browser, a message asks if you want to edit the page in the browser or edit the underlying page layout.
-
Click Edit Page Layout.
The page layout opens.
Override an existing style
If you want to override an existing style, you can copy the existing style from HtmlEditorCustomStyles.css or HtmlEditorTableFormats.css into another style sheet that is used by the page and then modify the style. Because the style sheets in the _layouts directory are applied first, the styles on any other style sheets that are used by the page layout override the styles from HtmlEditorCustomStyles.css or HtmlEditorTableFormats.css.
-
In your Web browser, go to the location of the style sheet from which you want to copy one or more styles by typing one of the following locations in the Address bar in the browser:
http://your_site/_layouts/1033/styles/HtmlEditorCustomStyles.css
—or—
http://your_site/_layouts/1033/styles/HtmlEditorTableFormats.css
-
When you receive a message asking what you want to do with the file, click Open.
The style sheet opens in Office SharePoint Designer 2007.
-
Select the style that you want to modify, right-click it, and then click Copy on the shortcut menu.
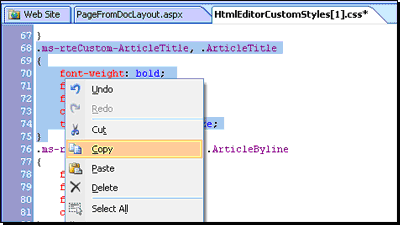
-
Still in Office SharePoint Designer 2007, open (or go back to) the page layout for which you want to override the style, and then click Options in the Manage Styles task pane.
Note: If the Manage Styles task pane is not visible, click Manage Styles on the Task Panes menu.
-
Make sure that Show Styles Used In Current Page is selected.
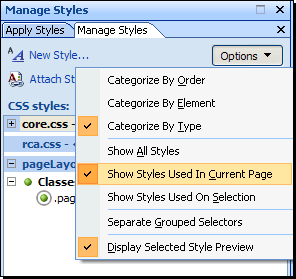
-
In the Manage Styles task pane, double-click one of the style sheets used in this page, such as pageLayout.css, to open it for editing.
Each style sheet that is applied to the current page appears as a section heading in the CSS styles list in the Manage Styles task pane. You can double-click the heading for any style sheet to edit that style sheet.
-
Scroll to the bottom of the style sheet, right-click where you want to paste the style, and then click Paste on the shortcut menu.
-
Edit the style however you want it.
Note: The CSS Properties task pane offers a more visual approach to editing the style. If this task pane is not visible, on the Task Panes menu, click CSS Properties.
-
To save the style sheet, on the File menu, click Save.
The next time that you use the HTML Editor to edit an article created from this page layout, the modified style is available for use and appears in the Styles list.

Create a new style
You can also create a new style and make it available in the Styles list in the HTML Editor. Because it is easier to start from an existing style than it is to type a new style, this section shows you how to do this by copying an existing style and then renaming it.
-
In your Web browser, go to the location of the style sheet from which you want to copy styles by typing one of the following locations in the Address bar in the browser:
http://your_site/_layouts/1033/styles/HtmlEditorCustomStyles.css
—or—
http://your_site/_layouts/1033/styles/HtmlEditorTableFormats.css
-
When you receive a message asking what you want to do with the file, click Open. The style sheet opens in Office SharePoint Designer 2007.
-
Select the style that you want to modify, right-click it, and then click Copy on the shortcut menu.

-
Still in Office SharePoint Designer 2007, open (or go back to) the page layout to which you want to add the new style, and then click Options in the Manage Styles task pane.
Note: If the Manage Styles task pane is not visible, click Task Panes and then click Manage Styles.
-
Make sure that Show Styles Used In Current Page is selected.

-
In the Manage Styles task pane, double-click one of the style sheets used in this page, such as pageLayout.css, to open it for editing.
Each style sheet that is applied to the current page appears as a section heading within the Css.styles list in the Manage Styles task pane. You can double-click the heading for any style sheet to edit that style sheet.
-
Scroll to the bottom of the style sheet, right-click where you want to paste the style, and then click Paste on the shortcut menu.
-
Edit the style however you want it.
You must change the name of the style if you do not want to override the existing style that you copied. For example, if you want your new style to be named redHeadline, change the following CSS code.
.ms-rteCustom-ArticleTitle, .ArticleTitle{font-weight: bold;font-family: Arial;font-size: 14pt;color: #8C0000;text-transform: capitalize;}
To the following.
.ms-rteCustom-redHeadline, .redHeadline{font-weight: bold;font-family: Arial;font-size: 14pt;color: #8C0000;text-transform: capitalize;}
Note: The CSS Properties task pane offers a more visual approach to editing the style. If this task pane is not visible, on the Task Panes menu, click CSS Properties.
-
To save the style sheet, on the File menu, click Save.
The next time that you use the HTML Editor to edit an article that was created from this page layout, the modified style is available for use and appears in the Styles list.
No comments:
Post a Comment