Assign a macro to a button
You can use a button (a form control) to run a macro that performs an action when a user clicks it. For example, you might use a button to automate the printing of a worksheet, the filtering of data, or the calculation of numbers.
After you create a macro, you can assign it to a button you click to run the macro. You can assign a macro to a button on the Quick Access Toolbar or to a button in your own personal group on the ribbon.
If you want a macro button to be available in other workbooks, assign it to a macro that was created in a personal workbook.
Add a macro button to the Quick Access Toolbar
-
Click File > Options > Quick Access Toolbar.
-
In the Choose commands from list, click Macros.

-
Select the macro you want to assign a button to.
-
Click Add to move the macro to the list of buttons on the Quick Access Toolbar.
-
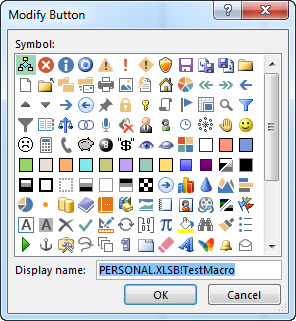
To replace the default macro icon with a different button for your macro, click Modify.
-
Under Symbol, select a button icon for your macro.

-
To use a friendlier name for the button, in the Display name box, enter the name you want.
You can enter a space in the button name.
-
Click OK twice.
The new button appears on the Quick Access Toolbar, where you can click it to run the macro.
Tip: When you save the workbook, buttons you assign to macros in the personal workbook will be available in every workbook you open.
Add a macro button to your own group on the ribbon
-
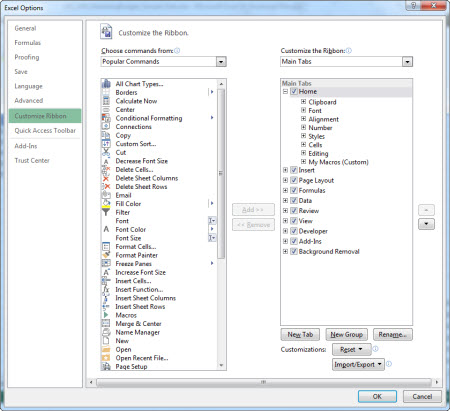
Click File > Options > Customize Ribbon.
-
Under Customize the Ribbon, in the Main Tabs list, check the Developer box if it is not already checked.

-
Pick the tab where you want to add your own group.
For example, pick Home, to add your group to the Home tab.
-
Select New Group.
That adds New Group (Custom) to the tab you picked.
-
To use a better name for your new group, click Rename, type the name you want in the Display name box, and then click OK.
You can enter a space in the name. For example, type My Macros.
-
To add a macro to the group, in the Choose commands from list, click Macros.
-
Select the macro you want to add to your new group, and then click Add. The macro is added to the My Macros group.
-
To use a friendlier name, click Rename, and then type the name you want in the Display name box.
You can enter a space in the name.
-
Under Symbol, select a button icon for your macro.
-
Click OK twice.
Your new group appears on the tab you picked, where you can click the button to run the macro.
Tip: When you save the workbook, buttons you assign to macros in the personal workbook will be available in every workbook you open.
Excel 2016 for Mac
-
On the Developer tab, in the Controls group, click Button.
If the Developer tab is not available
-
Go to Excel > Preferences... > Ribbon & Toolbar.
-
In the Customize the Ribbon section, under Main Tabs, check the Developer check box, and press OK.
-
-
Click the worksheet location where you want the upper-left corner of the button to appear.
-
In the Assign Macro dialog box, click the name of the macro that you want to assign to the button, and then click OK.
-
To resize the button, drag the sizing handles.
-
To specify the control properties of the button, Control+Click or right-click the button, and then click Format Control.
Excel 2011 for Mac
-
On the Developer tab, in the Forms Control group, click Button.
If the Developer tab is not available
-
On the right side of the ribbon, click
 , and then click Ribbon Preferences.
 -
Under Customize, select the Developer check box.
-
-
Click the worksheet location where you want the upper-left corner of the button to appear.
-
In the Assign Macro dialog box, click the name of the macro that you want to assign to the button, and then click OK.
-
To specify the control properties of the button, Control+Click or right-click the button, and then click Format Control.
No comments:
Post a Comment