Track changes in Word
When you want to see who's been making changes to your document, turn on the Track Changes feature.
Turn Track Changes on or off
-
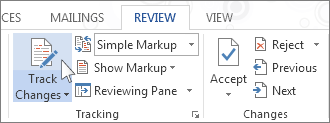
On the Review tab, in the Tracking group, choose Track Changes.
When you turn on Track Changes, Word marks up new changes made to the document.
When you turn off Track Changes, Word stops marking up new changes. Any changes that were already tracked remain marked up in the document until you remove them.
Show changes (revisions) in document
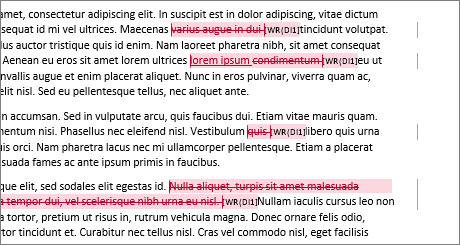
When you turn on Track Changes, Word marks up and shows any changes that anyone makes to the document.
-
On the Review tab, in the Tracking group, in the Simple Markup list, choose a view option.
-
Simple Markup is the default option, and indicates where changes are with a red line in the margin.

-
No Markup hides markup to show what the incorporated changes will look like.
Note: You can see the markup again by choosing Simple Markup or All Markup.
-
All Markup shows all edits with different colors of text and lines.
-
Original shows the document in its original form.
-
-
In the Show Markup list, choose the revisions you'd like to see—Comments, Ink, Insertions and Deletions, Formatting, Balloons, Specific people.
Keep Track Changes turned on
You can prevent someone else from turning off Track Changes by turning on Lock Tracking and adding a password. When Tracked Changes is locked, you can't turn off the feature, and you can't accept or reject the changes.
-
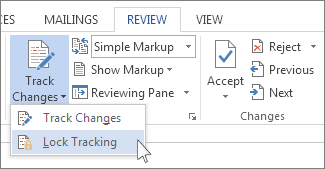
On the Review tab, in the Track Changes list, choose Lock Tracking.
-
Do one of the following:
-
In the Lock Tracking dialog box, enter a password, type it again in the Reenter to confirm box, and then choose OK.
Note: Adding a password is optional. It's not a security feature. It is intended, however, to discourage others from turning off Track Changes.
-
In the Lock Tracking dialog box, choose Cancel.
-
Turn off Lock Tracking
-
In the Track Changes list, choose Lock Tracking.
-
If you added a password, enter it when prompted, and then choose OK.
Note: Track Changes is still on, but you can accept and reject changes.
Remove tracked changes
The only way to remove tracked changes in a document is to accept or reject them. Choosing No Markup in the Display for Review box helps you see what the final document will look like—but it only hides tracked changes temporarily. The changes are not deleted, and they'll show up again the next time anyone opens the document. To delete the tracked changes permanently, accept or reject them.
Accept or delete a single tracked change
-
Open your document.
-
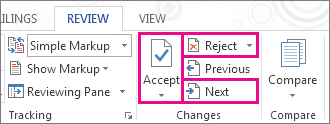
On the Review tab, in the Changes group, choose Next or Previous.
-
Choose Accept or Reject.
Accept or delete all tracked changes
-
Open your document.
-
On the Review tab, in the Changes group, do one of the following:
-
In the Accept list, choose Accept All Changes.
or
-
In the Reject list, choose Reject All Changes.
-
Word either accepts the change or removes it, and then moves to the next change.
View or delete comments
View comments
-
Word shows a balloon where someone's made a comment. To see a comment, choose the comment balloon.

-
To see the changes, click the line near the margin. That action switches Word into All Markup view.

Delete a single comment
-
Choose a comment, and on the Review tab, in the Comments group, choose Delete.
Delete all comments
-
On the Review tab, in the Comments group, in the Delete list, choose Delete All Comments in Document.
Tips: Before you share the final version of your document, it's a good idea to run Document Inspector. This tool checks for tracked changes and comments, hidden text, personal names in properties, and other information you might not want to share widely.
-
On the File tab, choose Info > Check for Issues > Inspect Document.
To learn more about comments, see Insert and delete comments.
What would you like to do?
Turn on Track Changes
-
On the Review tab, in the Tracking group, choose Track Changes.
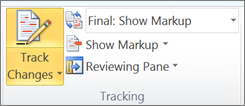
The Track Changes is highlighted, as shown in the following image.
Note: If the Track Changes feature is unavailable, you might have to turn off document protection. On the Review tab, in the Protect group, click Restrict Editing, and then click Stop Protection at the bottom of the Protect Document task pane. (You might need to know the document password.)
You also can add a track changes indicator to the status bar.
-
Right-click the status bar and choose Track Changes.

Note: You now can use the Track Changes indicator on the status bar to turn on or turn off Track Changes.
Turn off Track changes
When you turn off Track Changes, you can revise the document without marking what has changed. Turning off the feature, however, doesn't remove any changes that have already been tracked.
-
On the Review tab, in the Tracking group, choose Track Changes button.
The Track Changes button no longer is highlighted as shown in the following image.

Important: To remove tracked changes, use the Accept and Reject commands on the Review tab in the Changes group.
Work with comments
See the following topics for more information about working with comments and tracked changes:
What would you like to do?
Turn on Track changes
You can easily make and view tracked changes and comments while you work in a document. By default, Microsoft Office Word 2007 uses balloons to display deletions, comments, formatting changes, and content that has moved. If you want to see all your changes inline, you can change settings so that tracked changes and comments display the way you want.
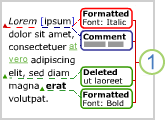
Balloons (1) show formatting changes, comments, and deletions.
Note: To prevent you from inadvertently distributing documents that contain tracked changes and comments, Word displays tracked changes and comments by default. Final Showing Markup is the default option in the Display for Review box.
-
Open the document that you want to revise.
-
On the Review tab, in the Tracking group, click the Track Changes button. The Track changes button becomes highlighted, as shown in the following figure.

-
Optional. Add a track changes indicator to the status bar. Right-click the status bar, and click Track Changes. Click the Track Changes indicator on the status bar to turn on or turn off track changes.

-
Make the changes that you want by inserting, deleting, moving, or formatting text or graphics. You can also add comments.
Note: If you use change tracking and then save your document as a Web page (.htm or .html), tracked changes will appear on your Web page.
Be aware that there are various ways to hide tracked changes or comments, but all the changes that were made while the Track Changes feature was turned on and all the comments that were inserted remain part of the document until they are accepted or rejected (or, in the case of comments, deleted).
Hiding tracked changes—for example, under Show Markup, clearing the check mark for Insertions and Deletions—doesn't delete existing tracked changes or comments from the document. Instead, hiding tracked changes enables you to view the document without having to wade through crossed-out text, underlining, and balloons.
Turn off Track Changes
-
On the Review tab, in the Tracking group, click the Track Changes button.
The Track Changes button is no longer highlighted, as shown in the following image.

If you customized the status bar to include a track changes indicator, clicking Track Changes in the Tracking group will also turn off the indicator in the status bar.
Note: Turning off change tracking does not eliminate the tracked changes in your document. To ensure that there are no more tracked changes in your document, be sure that all changes are showing, and then use the Accept or Reject commands for each change in the document.
Find hidden changes and comments
There are several ways to hide tracked changes and comments, which may lead you to think that they are not in the document. For example:
-
Display for Review box On the Review tab, in the Tracking group, the Display for Review box shows you what viewing mode you are in. It also provides additional options for viewing your document. If you click Final or Original, tracked changes and comments are hidden. To display them, select Final Showing Markup or Original Showing Markup.

-
Show Markup On the Review tab, in the Tracking group, you can use the Show Markup list to hide comments and tracked changes. Items that are marked with a check mark under Show Markup are displayed; items without a check mark are hidden. To display an item, such as Insertions and Deletions, click it on the Show Markup menu.

Show all changes (revisions) in document
The default in Word is to display deletions and comments in balloons in the margins of the document. However, you can change the display to show comments inline and all deletions as crossed out instead of inside balloons.
-
On the Review tab, in the Tracking group, click Balloons.

-
Click Show All Revisions Inline to show deletions as crossed out and comments inline.
There are several options available for changing how tracked changes (markup) is displayed.
-
You can change the color and other formatting that Word uses to mark changed text and graphics by clicking the arrow next to Track Changes and then clicking Change Tracking Options.
Note: While you can't assign specific colors for changes made by different reviewers, each reviewer's changes appear as a different color in the document so that you can track multiple reviewers.
-
You can view all changes, including deletions, inline instead of inside balloons that appear in the margins of your document. To show changes inline, in the Tracking group, click Balloons, and then click Show all revisions inline.
When you click Show all revisions inline, all the revisions and comments in the document appear inline.
-
To highlight the margin area where all balloons appear, under Show Markup, click Markup Area Highlight.
Show changes (revisions) by type of edit or by reviewer
-
On the Review tab, in the Tracking group, click the arrow next to Show Markup.

-
Do one of the following:
-
Select the type of change that you want to display.
Note: Even if you hide a type of markup by clearing it on the Show Markup menu, the markup automatically appears each time the document is opened by you or a reviewer.
-
Point to Reviewers, and then click to clear all check boxes except the ones next to the names of the reviewers whose changes and comments you want to show.
Note: To select or clear all check boxes for all reviewers in the list, click All Reviewers.
-
Show changes and comments for specific reviewers
You can use the Display for Review list, in the Tracking group, to view a document at various stages of the edit process. Each of the four options in the list provides a different view of the document. Final Showing Markup is the default when you open any document.

-
Final Showing Markup This view displays the final document with all tracked changes and comments showing. This is the default view for all documents opened in Word.
-
Final This view displays the document with all changes incorporated into the text and without tracked changes showing. However, any tracked changes or comments that have not been accepted, rejected, or deleted remain in the document.
-
Original Showing Markup This view displays the original text with tracked changes and comments.
-
Original This view displays the original document without tracked changes and comments showing. However, any tracked changes or comments in the document that have not been accepted, rejected, or deleted remain in the document.
Show changes for an editor or another reviewer
An editor or reviewer usually wants to view a document as it will appear after their changes are incorporated. This procedure gives an editor or reviewer the opportunity to see how the document will look with the changes.
-
On the Review tab, in the Display for Review box in the Tracking group, click Final Showing Markup.
Note: If you want to see comments and tracked changes in balloons, you must be in Print Layout view or Web Layout view.
View comments in document
The default in Word is to display deletions and comments in balloons in the margins of the document. However, you can change the display to show comments inline. Inline comments can be viewed when you rest your pointer on the comment indicator.
-
On the Review tab, in the Tracking group, click Balloons.

-
Click Show All Revisions Inline to show deletions as crossed out and comments inline.
-
Rest the pointer on a comment in the document. The comment appears in a ScreenTip.

To learn more about comments, see Insert and delete comments.
Check a document for tracked changes and comments
Office Word 2007 provides a feature called Document Inspector that allows you to check any document for tracked changes, comments, hidden text, and other personal information. To check a document:
-
Open the document you want to inspect for tracked changes and comments.
-
Click the Microsoft Office Button
 , point to Prepare, and then click Inspect Document.
 -
In the Document Inspector dialog box, click Inspect.
-
Review the inspection results. If Document Inspector finds comments and tracked changes, you are prompted to click Remove All next to Comments, Revisions, Versions, and Annotations.
-
Click Reinspect or Close.
Show tracked changes and comments when printing
Before you print the document, switch to Print Layout view and display the tracked changes and comments the way that you want them to appear in the printed document. You have several options.
-
Print showing all markup On the Review tab, in the Tracking group, click Show Markup.

Note: Clicking Show Markup displays or hides all markup in the document for selected reviewers. When you display all markup, all types of markup are selected on the Show Markup menu.
-
Print showing changes and comments by type or reviewer On the Review tab, in the Tracking group, click Show Markup, and then select the type of change that you want to display.

-
Print changes and comments for an editor or other reviewer On the Review tab, in the Tracking group, in the Display for Review box, click Final Showing Markup.

When the markup appears the way that you want it to, you are ready to print the document.
-
Click the Microsoft Office Button
 , and then click Print.
 -
In the Print dialog box, in the Print what box, click Document showing markup, and then click OK.
Notes:
-
By default, Microsoft Word chooses the zoom level and page orientation to best display the tracked changes in your printed document.
-
If balloons are turned on, the document will shrink to fit the balloons on the printed page. To make your printed page readable, you can turn off balloons by clicking Balloons in the Tracking group and then clicking Show all revisions inline. You can also set the page layout to landscape to print the balloons and the text in a more readable format. On the Page Layout tab, under Page Setup, click Orientation, and then click Landscape.
-
Change the layout for printing tracked changes
-
On the Review tab, in the Tracking group, click the arrow next to Track Changes, and then click Change Tracking Options.
-
Under Balloons, in the Paper orientation in printing list, click one of the following:
-
Auto When you select this option, Word decides the orientation that will provide the best layout for your document.
-
Preserve When you select this option, Word prints the document with the orientation that is specified in the Page Setup dialog box.
-
Force Landscape When you select this option, the orientation is landscape and the most room is allowed for balloons.
-
Print a list of changes made to a document
-
Click the Microsoft Office Button
 , and then click Print.
 -
In the Print what box, click List of markup.
Hide tracked changes and comments when printing
Hiding changes does not remove changes from the document. You must use the Accept and Reject commands in the Changes group to remove markup from your document.
-
Click the Microsoft Office Button
 , and then click Print.
 -
In the Print what box, click Document (instead of Document showing markup).
No comments:
Post a Comment