Create a secondary workflow
When a workflow that runs on one list adds or changes an item in a second list, you can create a second workflow that is triggered by that addition or change. This secondary workflow can manage the added or changed item, or take any other workflow action — including adding, changing, and deleting other items in any list.
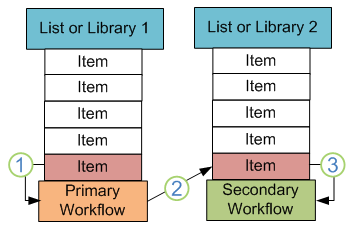
1. Addition or change of item in first list or library triggers primary workflow (primary workflow may also be started manually)
2. Primary workflow adds or changes item in second list or library
3. Addition or change of item in second list or library triggers secondary workflow
For example, suppose that each time a new document is added to your Documents for Review library, a workflow running on that library creates a task to review the document in your Tasks list. You can create a secondary workflow on the Tasks list that sets a value in the Due Date field of each of those new tasks. Having set the Due Date value, the secondary workflow can pause until the due date is reached. On the due date, the workflow can check whether the task is complete, and then take appropriate action.
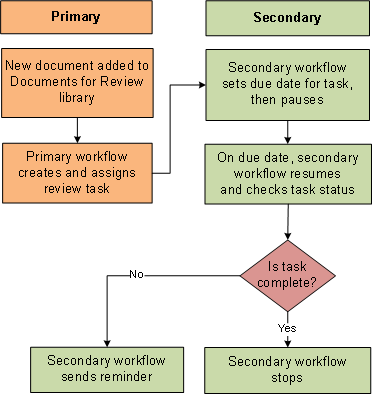
By effectively organizing multiple secondary workflows, you can create dependent processes that extend across several lists. Each secondary workflow continues to be triggered by changes in a single list; but by creating or changing items in other lists, it can activate one or more other workflows, powerfully extending the cumulative effect throughout your site.
Warning: Workflows that start automatically when an item is created or changed can run in infinite loops, which you want to avoid. For example, a workflow that starts when an item is changed should never change an item in the list that it is attached to. A workflow that starts when an item is created should never create an item in the list that it is attached to. This is also an issue with secondary workflows. For example, Workflow A is attached to List A, and Workflow B is attached to List B. Both workflows start automatically when a new item is created. Workflow A creates an item in List B, and Workflow B creates an item in List A. Such a scenario creates an infinite loop. A best practice is to know what workflows are already running on any lists or libraries where your workflow creates or changes items. Also, you can prevent some looping behaviors by using a condition that stops the loop. For example, if you configure a secondary workflow on the Tasks list to update the Due Date of the current task item whenever that item is changed, you can stop a loop from developing by including a condition that checks whether the Due Date is already set to the correct value. If it is, an action stops the workflow without making any changes to the item.
This article introduces the concept of secondary workflows and provides instructions for creating one. The example workflow in this article, which is created on the Tasks list, sets the due date value for each new task that is produced by a specific workflow running on the Shared Documents library, and then sends a reminder message if the task is not complete by its due date.
In this article
How can I use a secondary workflow?
There is no functional difference between a primary workflow and a secondary workflow. Any workflow can be considered "secondary" if it is started by the action of another workflow.
You can use secondary workflows for a wide variety of purposes, including:
-
Setting values for fields in items that are created by the primary workflow
-
Creating, changing, or deleting items in either the current list or another list
-
Sending reminder e-mail messages
Notes:
-
A secondary workflow that is designed in Office SharePoint Designer 2007 can only be triggered by the actions of another workflow that was also designed in Office SharePoint Designer 2007 — and not by one of the predefined workflows included with Microsoft Office SharePoint Server 2007, or by a custom workflow created in Visual Studio. Also note that even if a workflow was designed in Office SharePoint Designer 2007, its actions will still not trigger a secondary workflow if the user who started the workflow has signed in by using the system account. A workflow running under the system account cannot trigger a secondary workflow.
-
Only one instance of a workflow can run on any single list item at any one time. If you set up your secondary workflow to run on items whenever they are changed, and if one instance of the workflow is already running on an item and is currently paused, then other changes made to that item will not trigger the same workflow to run again. For example, if the first workflow instance pauses for 30 days, all instances of the same workflow will silently fail to start if triggered on the same list item during those 30 days. This is an issue for long-running workflows that start when an item is changed, but this is not an issue when the secondary workflow starts only when an item is created, which is how the example workflow in this article is configured.
-
Before using any pause action in a workflow, we recommend that you download a .NET 3.0 update and install it on your server. Find a link to where you can download this update in the See Also section.
-
What is the special relationship between secondary workflows and the Tasks list?
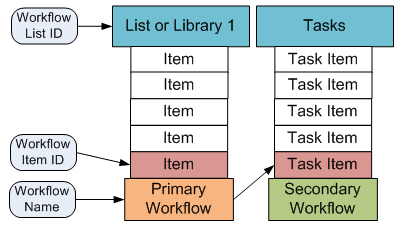
An item created in the Tasks list by one of the three workflow task actions retains three useful fields of information about its origins that are not "remembered" by workflow-created items in any other kind of list:
-
Workflow Item ID This is the unique identifier of the original item in relation to which the primary workflow created the current item in the Tasks list.
-
Workflow List ID This is the unique identifier of the list where that original item is located.
-
Workflow Name This is the unique identifier of the primary workflow that created the current item in the Tasks list.
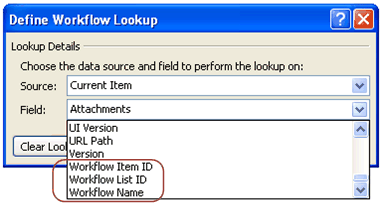
You will see these three fields in the Define Workflow Lookup dialog box whenever the lookup is being made against an item in the Tasks list. However, these three fields contain values only for task items that were created by one of the three workflow task actions.
You can use these three identifiers in a variety of ways, including:
-
Deciding which items to act upon The secondary workflow can begin by checking one or more of these fields for each new task item, and then using that information to decide whether to end immediately or to continue to run. For example, the secondary workflow can take further action only on tasks that were created by one or more specified primary workflows.
-
Inserting information in an e-mail message Using these fields, the secondary workflow can send an e-mail message that includes the identity of the original item, the list where that original item resides, or the workflow that created the current task item.
Secondary workflows running on other list and libraries (for example, Announcements and Calendar) do not have these capabilities, because they do not have access to these three fields.
The following table shows the formats of these three values.
| Field | Sample value |
| Workflow Item ID | 8 |
| Workflow Name | Document Review |
| Workflow List ID | {4FC00DC3-1880-4872-AC31-AA2389B201CA} |
Identify values for the three special fields
To locate the correct value for one of these fields:
-
Workflow Item ID In the browser, view the list where the item is located. If necessary, modify the view to include the ID column. Note that once the ID of an item is assigned, it is permanent and does not change, regardless of how many other items are added, changed, and deleted in that list.
-
Workflow Name For each workflow, this value is identical to the name specified for that workflow in the Workflow Designer. Note that because no two workflows in any site can have the same name, this value is always unique within the current site.
-
Workflow List ID To find this value for any list, view the list in the browser, and then, on the Settings menu, click either List Settings or Document Library Settings. The Workflow List ID appears in the query string of the URL and follows the "List=" text.
Why you need a secondary workflow for managing task due dates
The primary workflow that creates a task item pauses as soon as the task item has been created and assigned.
While the primary workflow is paused, it cannot set the Due Date value of the task item, check the completion status of the task when the due date arrives, or take appropriate action for task items that are not complete by their due dates.
A secondary workflow running on the Tasks list, however, can perform all of these functions while the primary workflow is still paused.
About the example workflow
The example secondary workflow that you create in the following procedures, which is configured to run on the Tasks list:
-
Checks each new task item to see which primary workflow created it, and only continues if that primary workflow is the one specified.
Tip: It is a best practice to make this the first step of your workflow, both to avoid making changes to task items created by other workflows, and so that performance is minimally affected.
-
If the primary workflow is the one specified, sets the Due Date value for the task item, and then pauses until the due date arrives.
Note: Once the workflow pauses, it does not resume until the due date that was set when the pause began is reached. If the due date is changed while the workflow is paused, this change has no effect on the workflow.
-
On the due date, checks the Completed value for the task item, and then takes one of two actions:
-
If the value is Yes The workflow logs an appropriate message to the workflow history and ends.
-
If the value is No The workflow sends an e-mail message to the person to whom the task item is assigned, reminding them that the task is due.
-
The example workflow includes suggested uses for all three of the special task item fields.
The example procedures in this article assume that there is already a primary workflow named Document Review that runs whenever a document is added to the Shared Documents library, and that this primary workflow creates a simple to-do item named Review Document in the Tasks list and assigns that task to one or more participants. To create this primary workflow, see the steps in the article Assign a to-do item in a workflow.
Step 1: Decide whether to continue running on current task
If you run multiple workflows in your site, each of which creates items in the Tasks list, you may want to calculate the due dates differentially, depending on which workflow created each task. Alternatively, you can choose to run a secondary workflow on all task items where the original, triggering item is located in a specified list or library.
The secondary workflow in this example starts and runs on every new item in the Tasks list, but the very first thing it does is to check the Workflow Name value of the new task item. It then uses this information to decide whether to stop at once or to continue. In this section, you will configure this first step.
-
On the File menu, point to New, and then click Workflow.
-
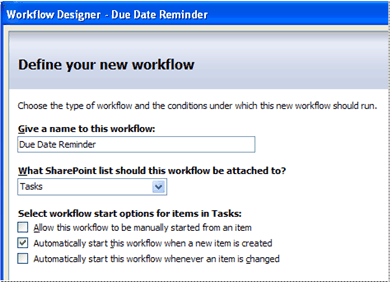
On the first page of the Workflow Designer, give the secondary workflow a name, and then indicate that the workflow should be attached to the Tasks list and started only when a new item is created in that list.
-
Click Next.
-
On the next page, give the first step of the workflow a name — in this example, Check Primary Workflow.
-
Click Conditions, and then click Compare Tasks field.
-
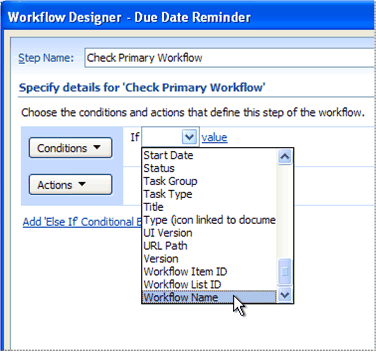
In the condition, click field and then, in the list, scroll down and click Workflow Name.
-
In the condition, click equals and then, in the list, click not equals.
-
In the condition, click value and then, in the box, type the name of the primary workflow (Document Review in this example), and then press ENTER.
-
Click Actions and then, in the list, click Stop Workflow.
If this action does not appear in the list, click More Actions to see the full list.
-
In the action, click this message.
-
In the box, type a message to be logged to the Workflow History list, and then press ENTER.
Your first workflow step should now look like the one in the following illustration.
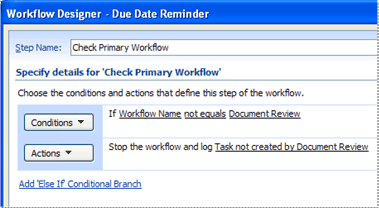
Now your secondary workflow will proceed to the second step only if the task item was created by the Document Review workflow.
You could also use the Workflow List ID field to configure the workflow to proceed to the second step only on task items created by all workflows running on a specified list; but if anyone else can create workflows on the same list, it might be difficult to keep track of just who wants which workflows to run on their task items. It is usually a best practice to associate a secondary workflow on the Tasks list with only those task items created by one or more specified primary workflows.
In the second step, you will set a due date for the task item, and then pause the secondary workflow until that due date arrives.
Step 2: Set Due Date value and then pause
After the secondary workflow confirms that the task item is one created by the Document Review workflow, you want the workflow to calculate a value for the item's Due Date field and then to pause until that due date arrives. You will configure these actions here, in the second step of the workflow.
-
In the Workflow Designer, under Workflow Steps, click Add workflow step.
-
On the next page, give the second step of the workflow a name — in this example, Set Due Date and Pause.
-
Click Actions, and then click Add Time to Date.
If this action does not appear in the list, click More Actions to see the full list.
-
To set the due date for each task item to be one week from the date that the item was created, do the following:
-
In the action, click 0 and then, in the box, replace the 0 with a 7, and finally press ENTER.
-
Click minutes and then, in the list, click days.
-
Click date, and then click Display data binding
 .
. -
In the Define Workflow Lookup dialog box, choose the following options:
-
Source: Current Item
-
Field: Created
-
-
Click OK.
-
Click Variable and then, in the list, click Create a new variable.
-
In the Edit Variable dialog box, type a name for the new variable (Due Date in this example), make sure that the type is Date/Time, and then click OK.
Your second step should now look like the one in the following illustration.
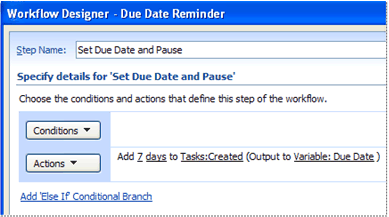
Now you have a variable named Due Date that is calculated by adding seven days to the date on which the task was created and assigned.
-
-
Click Actions again to add a second action, and then click Set Field in Current Item.
If this action does not appear in the list, click More Actions to see the full list.
-
In the action, click field and then, in the list, click Due Date.
-
Click value, and then click Display data binding
 .
. -
In the Define Workflow Lookup dialog box, choose the following options:
-
Source: Workflow Data
-
Field: Variable: Due Date
-
-
Click OK.
Your second step should now look like the one in the following illustration.
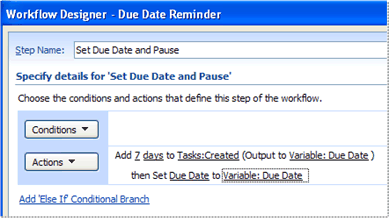
Now the due date of the item is set to be seven days after the item was created and assigned.
-
Click Actions to add a third action, and then click Pause Until Date.
If this action does not appear in the list, click More Actions to see the full list.
-
In the action, click this time, and then click Display data binding

-
In the Define Workflow Lookup dialog box, choose the following options:
-
Source: Current Item
-
Field: Due Date
-
-
Click OK.
Your second step should now look like the one in the following illustration.
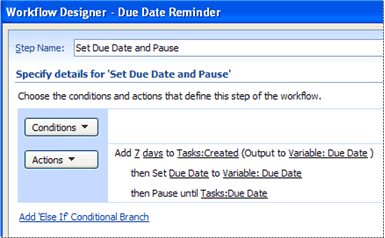
Now the workflow will pause until the due date of the item.
When that date arrives, the workflow will check whether the task item is marked as completed and, if not, send a reminder to the person the task is assigned to. You will configure these actions in the next step.
Step 3: Check task status and continue accordingly
In the third and final step of the example workflow, the due date is reached and the workflow continues, first checking the value in the Completed field for the task item, and then taking appropriate action based on whether or not the item is already marked as complete.
-
In the Workflow Designer, under Workflow Steps, click Add workflow step.
-
On the next page, give the third step of the workflow a name — in this example, Check Status and Send Reminder.
-
Click Conditions, and then click Compare Tasks field.
-
In the condition, click field and then, in the list, click Completed.
-
In the condition, click value and then, in the list, click Yes.
-
Click Actions and then, in the list, click Log to History List.
If this action does not appear in the list, click More Actions to see the full list.
In the action, click this message.
-
In the box, type a message to be logged to the workflow history, and then press ENTER.
Your third workflow step should now look like the one in the following illustration.
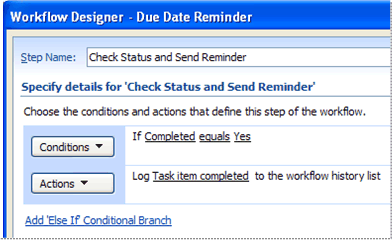
Now the workflow will end if the task is already complete.
-
Click Add 'Else If' Conditional Branch.
-
In the added branch, click Actions and then, in the list, click Send an Email.
If this action does not appear in the list, click More Actions to see the full list.
-
In the action, click this message.
-
In the Define E-mail Message dialog box, click the address book button at the end of the To box.
-
In the Select Users dialog box, to address the e-mail message to the person the task is assigned to, double-click Workflow Lookup in the Or select from existing Users and Groups list.
-
In the Define Workflow Lookup dialog box, choose the following options:
-
Source: Current Item
-
Field: Assigned To
-
-
Click OK, and then click OK again.
-
Type a subject line for the message, and then the message body text, using the Display data binding
 and Add Lookup to Body buttons to add variable Workflow Lookup information if you want.
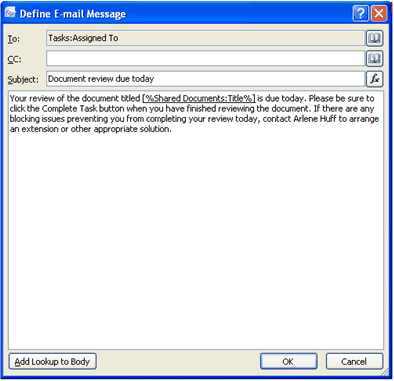
In the example message body text, we have included the title of the document to be reviewed by using the workflow lookup that is shown in the following illustration.
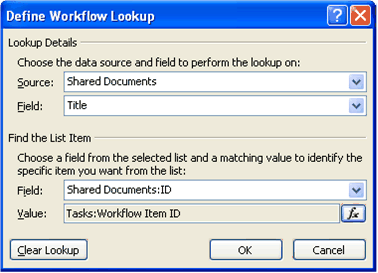
This lookup says, "Go to the Title field (or column) in the Shared Documents library. Then go to the item (or row) whose ID matches the ID of the original item in relation to which the primary workflow created the current item in the Tasks list."
To put this in simpler terms, this lookup says, "Go get the Title for the item whose primary workflow created the current task item that this secondary workflow is running on."
-
When your e-mail message is how you want it, click OK.
Your third step should now look like the one in the following illustration.
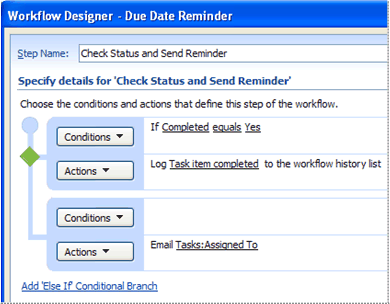
Having sent the reminder e-mail, the secondary workflow can now stop. Alternatively, you can add steps to reset the Due Date value for the task item by a specified number of additional days, to pause until the new due date is reached, and then once again to check whether the task has been completed. If not, a second e-mail reminder can be sent, or some other action can be taken, including the sending of e-mail notifications to other participants.
Quick reference: A summary of the steps
For quick reference, here is a summary of the steps presented in the three preceding sections:
-
Create a workflow attached to the Tasks list that starts automatically when a new item is created.
-
Add the Compare Tasks field condition:
-
For the first link, click Workflow Name.
-
For the second link, click not equals.
-
For the third link, enter the name of the primary workflow whose tasks you want the secondary workflow to run on.
-
-
Add the Stop Workflow action. Click the link; then type a message to be logged to the workflow history.
-
Add a new workflow step.
-
Add the Add Time to Date action:
-
For the first link, enter the number of days that you want the workflow to wait before sending a task reminder.
-
For the second link, click days.
-
For the third link, click Display data binding
 . In the Define Workflow Lookup dialog box, choose the following options:
Source: Workflow Data
Field: Variable: Due Date
-
For the fourth link, click Create a new variable, and create a variable named Due Date of the type Date/Time.
-
-
Add the Set Field in Current Item action:
-
For the first link, click Due Date.
-
For the second link, click Display data binding
 . In the Define Workflow Lookup dialog box, choose the following options:
Source: Workflow Data
Field: Variable: Due Date
-
-
Add the Pause Until Date action:
-
For the link, click Display data binding
 . In the Define Workflow Lookup dialog box, choose the following options:
Source: Current Item
Field: Due Date
-
-
Add a new workflow step.
-
Add the Compare Tasks field condition:
-
For the first link, click Completed.
-
For the second link, leave equals.
-
For the third link, click Yes.
-
-
Add the Log to History List action. Click the link; then type a message to be logged to the workflow history.
-
Click Add 'Else If' Conditional Branch.
-
Add the Send an Email action. In the action, click this message.
-
In the Define E-mail Message dialog box, do the following:
-
Click the Address Book button at the end of the To box.
-
In the Or select from existing Users and Groups list, double-click Workflow Lookup.
-
In the Define Workflow Lookup dialog box, choose the following options:
Source: Current Item
Field: Assigned To
-
-
Add a subject line and message body, using lookups if you want.
For example, use the following lookup to include the title of the document to be reviewed.

Another example: Use the document Title as the task Title
You may sometimes want to use variable information to name new tasks that are created by your workflows. For example, you can have your secondary workflow substitute the original document's title for the task name that is assigned by the primary workflow.
In this example, you begin by specifying an easy-to-remember task Title in the primary workflow (for example, ABC123). Next, you add a condition to a secondary workflow that runs on the Tasks list.
The step in the following illustration uses the Compare Tasks field condition to evaluate the title of the task. If the task title equals the easy-to-remember task name that you gave the task in the primary workflow, the secondary workflow will use the Update List Item action to reset the task's Title value by looking up the Title value of the original document in Shared Documents.
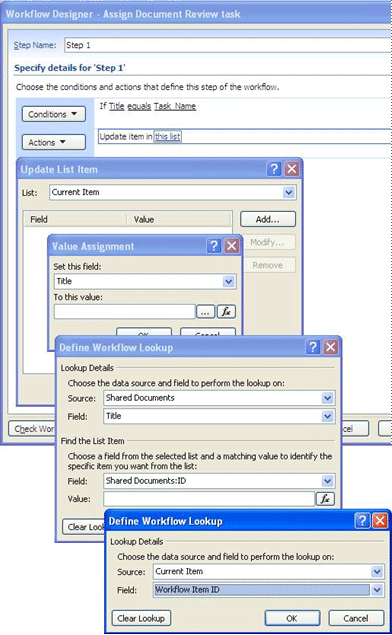
This lookup instructs the workflow to get the Title from Shared Documents for the item that triggered the primary workflow that created this task item. The secondary workflow looks up this item by using the Workflow Item ID.
This comment has been removed by the author.
ReplyDeleteThanks for sharing the information. To know more Content Workflow
ReplyDelete