Change a content type for a list or library
Once you have added a content type to a list or library, you can customize the content type for use in that location so that only the items in the list or library are affected by those changes. You can, for example, add specific document templates or workflows to a list or library content type, or modify the columns in a content type for any given list or library. It is important to note, however, that any items created before changing the content type will not inherit the new changes. For example, if you update the template associated with a list or library content type, the new template is not applied to any previously created documents. Only new items created from the changed content type will be affected. Additionally, any changes that you make to a content type for a list or library apply only to the instance of that content type that has been added to the list or library. The parent site content type from which the content type was created is not updated with the changes.
What do you want to do?
Add a document template to a library content type
You can associate a document template only with a document content type (any content type that is derived from the document parent site content type). By associating a document template with a content type, you can help ensure that when authors create new documents of this content type, the documents are all based on the same template.
For example, your organization can use a particular document template for legal contracts. If you associate this document template with the content type that your organization uses for legal contracts, any new legal contracts that are created by using this content type are all based on this legal contract document template.
-
If the library is not already open, click its name on the Quick Launch.
If the name of your library does not appear, click View All Site Content, and then click the name of your library.
-
On the Ribbon, click the Library tab and then click Library Settings.

-
Under Content Types, click the name of the content type that you want to change.
Note: If the document library has not been set up to allow multiple content types, the Content Types section does not appear on the Customize page for the library.
-
Under General Settings, click Advanced Settings.
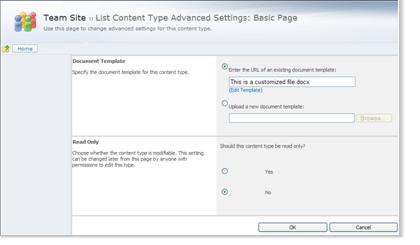
The List Content Type Advanced Settings page appears.
-
To provide the URL for an existing document template, in the Document Template section, type the URL for the location of the document template that you want to use.
Note: You can use a URL that is relative to a location on a site or resource folder. Document templates are stored in either the default site resource location http://Server Name/Site/Document Library Name/Forms/Content Type Name/ or the location could be a resource list or library location that has been set up specifically to store document templates.
The following table provides examples of the types of URLs that you can use. The examples assume the existence of the default document template resource folder (the folder that contains the files for site content types) located at http://Server Name/Site/Document Library Name/Forms/Content Type Name/, and that the document template is named Docname.doc.
| URL type | Example |
| Relative path to the site | Server Name/Site/Library Name/Forms/Docname.doc |
| Relative path to the resource folder | Docname.doc |
-
If you want to upload the document template that you want to use, in the Document Templates section, click Upload a new document template, and then click Browse. In the Choose File dialog box, browse to the location of the file that you want to use, select it, and then click Open.
Note: When uploading a new document template, the template is automatically stored in the default document template resource folder located at http://Server Name/Site/Document Library Name/Forms/Content Type Name/
-
After adding the document template to the library content type, click OK.
Add a column to a content type
You can specify the properties or metadata that you want to collect for an item of a specific content type by adding columns to that content type. For example, your organization might want to track a specific set of metadata for all of its purchase orders, such as account number, project number, and project manager. If you add columns for account number, project number, and project manager to the purchase order content type, users are prompted to provide this metadata for items of this content type.
If you have a list or library that contains items of multiple content types, you can collect unique metadata for items of each content type by adding columns directly to the relevant content type instead of to the list or library itself.
-
If the list or library is not already open, click its name on the Quick Launch.
If the name of your list or library does not appear, click View All Site Content, and then click the name of your list or library.
-
If you are working with a list, click the List tab on the Ribbon, and then click List Settings
 . Alternatively, if you are working with a library, click the Library tab on the Ribbon, and then click Library Settings
  .
. -
Under Content Types, click the name of the content type that you want to change.
Note: If the document library has not been set up to allow multiple content types, the Content Types section does not appear on the Customize page for the library.
-
Under Columns, click Add from existing site or list columns.
-
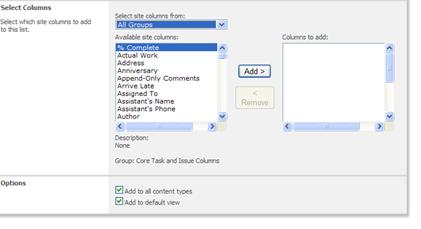
In the Select Columns section, under Select columns from, click the arrow to select the column group from which you want to add a column.
-
Under Available columns, click the column that you want to add, and then click Add to move the column to the Columns to add list.
-
To add additional columns, repeat steps 5 and 6.
-
If the list or library is set up for multiple content types, you can choose to add these columns to all content types associated with the list or library by selecting the Add to all content types checkbox. You also have the option to display the added columns in the default view of the list or library by selecting the Add to default view check box.
-
Click OK.
Change the order of columns for a content type
You can change the order in which columns appear for a content type. For example, you may want to have users fill out information for a library or list item in a particular order, or perhaps you want to match the order in which data is entered to another form from which the data is derived.
-
If the list or library is not already open, click its name on the Quick Launch.
If the name of your list or library does not appear, click View All Site Content, and then click the name of your list or library.
-
If you are working with a list, click the List tab on the Ribbon, and then click List Settings
 . Alternatively, if you are working with a library, click the Library tab on the Ribbon, and then click Library Settings
  .
. -
Under Content Types, click the name of the content type that you want to change.
Note: If the list or library is not set up to allow multiple content types, the Content Types section does not appear on the Customize page for the list or library.
-
Under Columns, click Column ordering.
-
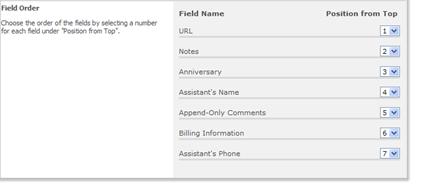
In the Field Order section, click the arrow next to the columns that you want to reorder in the Position from Top column, and then select the order number that you want.
-
Click OK.
Make a column required for a content type
If you make columns required for a content type, users are prompted to provide metadata (column values) when they create new items of this content type.
-
If the list or library is not already open, click its name on the Quick Launch.
If the name of your list or library does not appear, click View All Site Content, and then click the name of your list or library.
-
If you are working with a list, click the List tab on the Ribbon, and then click List Settings
 . Alternatively, if you are working with a library, click the Library tab on the Ribbon, and then click Library Settings
  .
. -
Under Content Types, click the name of the content type that you want to change.
Note: If the list or library is not set up to allow multiple content types, the Content Types section does not appear on the Customize page for the list or library.
-
Under Columns, click the name of the column that you want to make required.
-
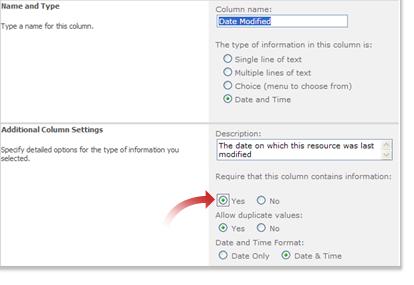
In the Additional Column Settings section, select the Yes option under Require that this column contains information.
-
Click OK.
Add a workflow to a content type
Workflows make it possible to specify a business process for items and documents in a site. Organizations can use workflows to automate and manage certain common business processes, such as document approval or review. By adding a workflow to a content type, you can help ensure that all items of that content type are subject to consistent and similar business processes. If a workflow has been added to a content type, that workflow can be started on individual items of that content type.
-
If the list or library is not already open, click its name on the Quick Launch.
If the name of your list or library does not appear, click View All Site Content, and then click the name of your list or library.
-
If you are working with a list, click the List tab on the Ribbon, and then click List Settings
 . Alternatively, if you are working with a library, click the Library tab on the Ribbon, and then click Library Settings
  .
. -
Under Content Types, click the name of the content type to which you want to add a workflow.
Note: If the list or library is not set up to allow multiple content types, the Content Types section does not appear on the Customize page for the list or library.
-
Under Settings, click Workflow Settings.
The Workflow Settings page appears.
-
Click Add a workflow.
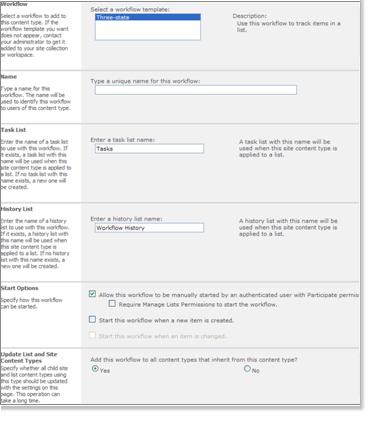
The Add a Workflow page appears.
-
On the Add a Workflow page, in the Workflow section, click the workflow template that you want to use.
Note: You can add a workflow to a content type for a list or library only if a workflow has been deployed for your site or workspace. If workflows do not appear to be available, contact your administrator.
-
In the Name section, type a unique name for the workflow.
-
In the Tasks List section, specify a task list to use with this workflow. Depending on how you plan to use your Tasks list, you can choose from several different options:
-
Use the default Tasks list, or you can create a new one by selecting New task list. If you use the default Tasks list, workflow participants will be able to find and view their workflow tasks easily by using the My Tasks view of the Tasks list.
-
Create a new tasks list if the tasks for this workflow will involve or reveal sensitive or confidential data that you want to keep separate from the general Tasks list.
-
Create a new tasks list if your organization will have numerous workflows or if workflows will involve numerous tasks. In this instance, you might want to create tasks lists for each workflow.
-
-
In the History List section, select a history list to use with this workflow. The History list displays all of the events that occur during each instance of the workflow.
You can use the default History list if it exists, or you can create a new one. If your organization will have numerous workflows, you might want to create a separate history list for each workflow.
-
In the Start Options section, specify how, when, or by whom a workflow can be started.
-
Click Next.
-
On the Customize Workflow page, select any additional options that you want, and then click OK.
-
Specific options may not be available if they are not supported by the workflow template that you selected.
-
The option Start this workflow to approve publishing a major version of an item is available only if support for major and minor versioning is enabled for the library and if the workflow template that you selected can be used for content approval.
-
-
Click OK.
To learn more about customizing workflows, see the links under See Also.
Make a content type read-only
If you want to prevent other people from making changes to a content type that has been added to a list or library, you can make the list content type read-only. If you make a list content type read-only, this prevents the list content type from inheriting any changes that are made to its parent site content type.
-
If the list or library for which you want to change a content type is not already open, click its name under Lists or Documents on the Quick Launch.
-
If you are working with a list, click the List tab on the Ribbon, and then click List Settings
 . Alternatively, if you are working with a library, click the Library tab on the Ribbon, and then click Library Settings
  .
. -
Under Content Types, click the name of the content type that you want to make read-only.
Note: If the document library has not been set up to allow multiple content types, the Content Types section does not appear on the Customize page for the library.
-
Under Settings, click Advanced settings.
-
In the Read Only section, under Should this content type be read only?, click Yes and then click OK.
No comments:
Post a Comment