Move or copy a folder, file, or link in a document library
Part of managing your SharePoint documents is storing them in specific folders or libraries. Depending on the version of SharePoint you're using, you can copy or move content between folders in a library, between libraries, and even between libraries in other sites and subsites with the right permissions. You can also copy files and folders between OneDrive for Business and SharePoint sites.
Copy files, folders, or links to another folder, library, site, or subsite in SharePoint Online
Note: Move to and Copy to are not available in Classic experience of SharePoint Online.
Note: Links are only available in SharePoint Online.
-
Select the items that you want to copy, and then click Copy to. Or, choose More
 >Copy to for the item.
-
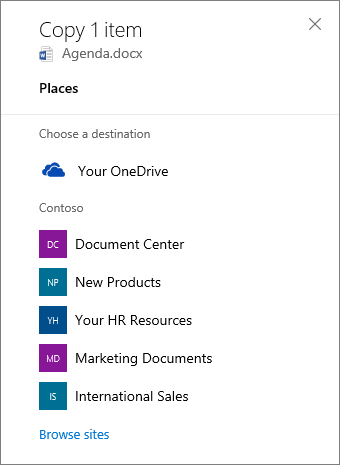
Under Choose a destination, select the location where you want a copy of the files, folders, or links to go. If you're copying to a different site or subsite and don't see it listed, click Browse sites to see the full list of sites that you can copy to.
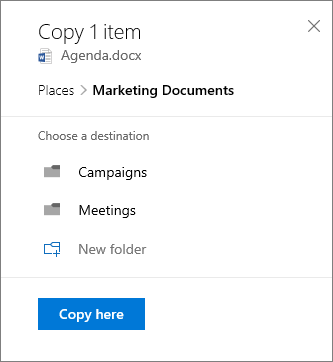
To create a new folder to copy the files to, select a location in the folder hierarchy and click New folder.
-
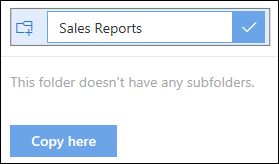
Type the name of the new folder in the text box.
-
Click the check mark, and then click Copy here.
Limitations of the Copy to command
The Copy to command has the following limitations:
-
50MB file limit Currently, the size of files and folders you can copy at one time is limited to 50MB.
-
Custom script setting must be set for personal sites Unless the custom script setting for personal sites in your organization is set, the Copy to command restricts copying to within your current library. For more info, see Turn scripting capabilities on or off.
-
When you use Copy to, with documents that are versioned, only the latest version is copied. The history of the document isn't copied. To copy earlier versions, restore an earlier version and then copy. For more info on versioning, see Enable and configure versioning for a list or library
Move files, folders, or links to a different folder in the same SharePoint Online document library
Note: Move to is not available in Classic experience of SharePoint Online.
-
Select the items you want to move.
-
In the main menu at the top of the page, click Move to. If you don't see Move to, click the ellipses (...) on the main menu, and then click Move to.

-
In the Choose a destination pane, select the new location in the document library where you want the files to go and click Move here.
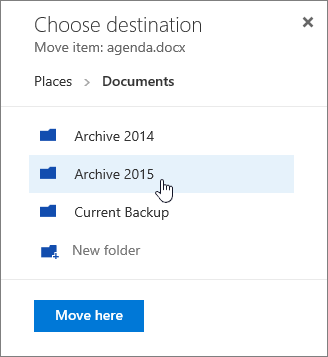
In the Choose destination pane, you can also click New folder to add a new folder to the document library and move the item to the new folder. Type the name of the new folder in the text box, click the check mark, and then click Move here.
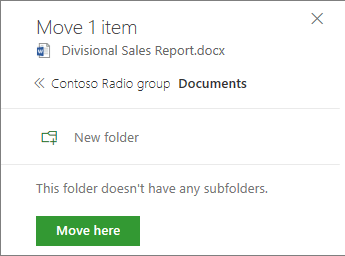
Note: When you use move to, the history of the document is copied to the new destination. For more info on versioning, see Enable and configure versioning for a list or library
Copy a file to a different library in SharePoint Server 2016 or SharePoint Server 2013
SharePoint Server 2016 and 2013 provide the Send to option for copying to another library or location. Send to copies one file at a time to another library. Send to doesn't provide the option to copy folders. The destination copy will have a connection to the original file.
Note: Send to copies the published version of a document. For more info on versions, see How does versioning work in a list or library?.
-
In a document library, click to the left of the file name to select a file.

-
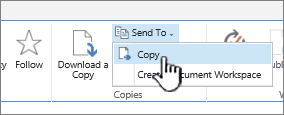
In the ribbon, click Files > Send To in the Copies section. The option is available when one, and only one, file is selected.
-
Select Copy or Other Location.
-
Do one of the following:
-
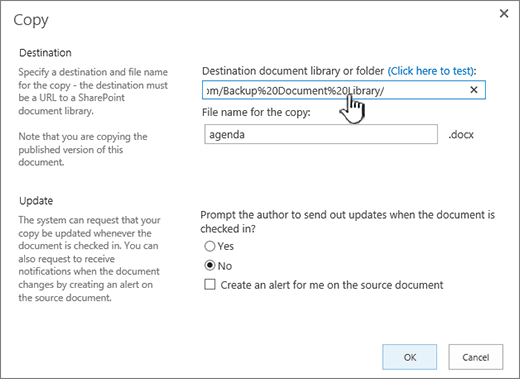
When the Destination document library or folder field appears, it should have the base URL of your site. If so, go to the end of it and type in the name of the library you want to copy the file to.
-
If the library you want to send your file to is in the Quick Launch bar, right click the name of the library, and pick Copy shortcut.
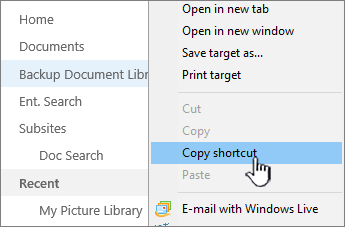
Paste the destination library URL into the Destination document library or folder field in the Copy dialog box.
-
If you can't get the previous methods to work, try this workaround:
Open the document library you want to send the files to, and copy the address from the address bar. You may need to edit the URL to remove extra characters.
Paste the URL into NotePad, and remove the content after the name of the library you want to copy to as shown in this illustration.

1. The base URL for the library.
2. The name of the library, with %20 characters replacing spaces in the name.
3. Extra content not needed. Delete this part.
Note: Some URLs exceed 255 characters, and can't be used. If you can, use the Quick Launch bar or add the name of the library to the base URL in the Destination field to get your shortcut, as the address bar can contain additional content.
-
-
Check the destination URL with (Click here to test). The destination library will open in another tab or window. You can leave it open to check your copy later, or close it.
-
If you want the copy to have another file name, type it into the optional File name for the copy field.
-
Optionally, you can also choose to ask the author to send out updates when the file is checked in, or set up an alert on the source document. For more on alerts, see Create an alert
-
Click OK when you're done. Click OK on the Copy Progress page to start the copy.
-
If the copy was successful, click Done. If it failed, note the error and correct it.
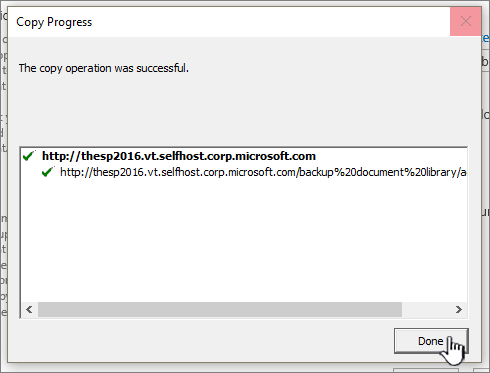
-
Check to be sure your file copied to the new destination successfully. If you want to delete the source copy, you need to unlink the copy, then delete it.
Update copies from the Manage Copies page in SharePoint Server 2016 or SharePoint Server 2013
If a file was copied to one or more different libraries, you can update all of the different copies from one location on the Manage Copies page, which is accessible from any copy of an item.
-
If a library that contains a copy that you want to update is not already open, click its name on the Quick Launch.
If the name of your library does not appear, click Settings
 , Site content, and then click the name of your library.
 -
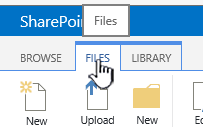
Click to the left of the name of the file you want to update to select it, and then click the Files tab.
-
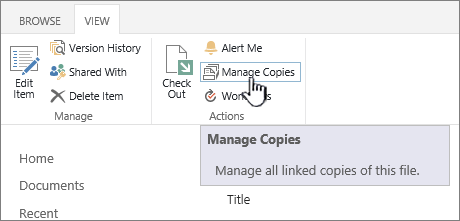
In the ribbon, click Manage Copies.
-
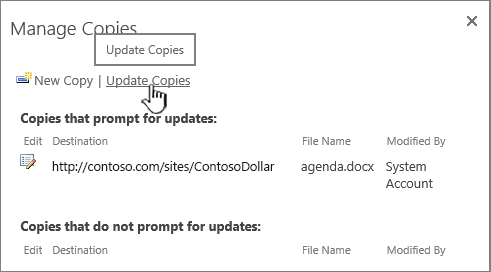
To update all copies that already prompt for updates, click Update Copies.
-
In the Destinations section, under Copies, select the copies that you want to update, and then click OK.
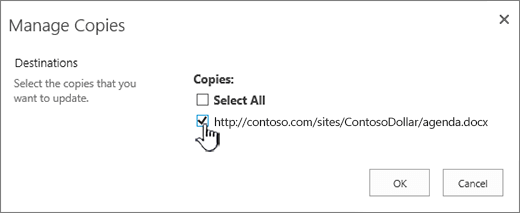
Note: If you want to update copies that are listed on the Manage Copies page under Copies that do not prompt for updates, first you must change the update settings for these copies. For more information about how to do this, see Change the settings for a copy to make it prompt for updates.
Change the settings for a copy to make it prompt for updates in SharePoint Server 2016 or SharePoint Server 2013
If you created a copy of a file by using the Send To command and you did not choose to be prompted for updates, this copy cannot receive updates from the source file. You can change this setting and make the copy available for updates.
-
If the library that contains a copy that you want to update is not already open, click its name on the Quick Launch.
If the name of your library does not appear, click Settings
 , click Site contents, and then click the name of your library.
 -
Click to the left of the name of the file you want to update to select it, and then click the Files tab.

-
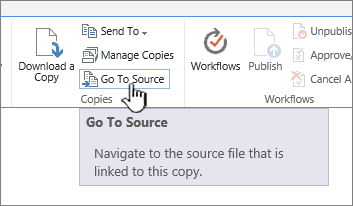
In the Copies section of the ribbon, click Go To Source.
-
In the ribbon, click Manage Copies.

-
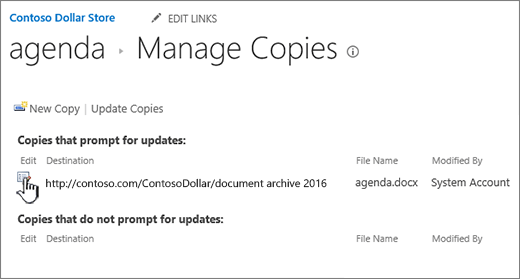
Click Edit next to the item.
-
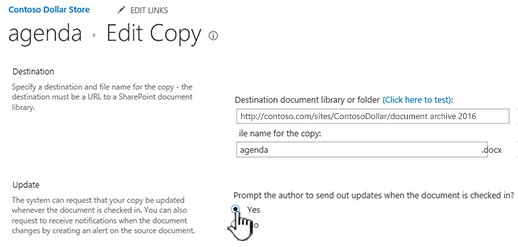
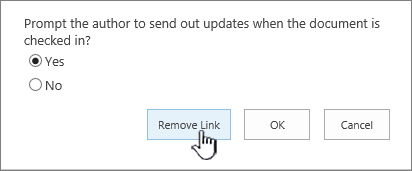
Click Yes under Prompt the author to send out updates when the document is checked in? in the Update section.
-
Click OK.
Unlink a copy from its source, and delete it in SharePoint Server 2016 or SharePoint Server 2013
If you want to completely delete an item that is a copy of another item, first you must ensure that this item is removed from the source file's list of items to update. Otherwise, the item may be recreated whenever someone chooses to update any existing copies of the source file. It is also recommended that you unlink the copy from its source file. After you have completely unlinked the source file and its copy, you can delete the copy.
-
If the library that contains a copy that you want to update is not already open, click its name on the Quick Launch.
If the name of your library does not appear, click Settings
 , click Site contents, and then click the name of your library.
 -
Click to the left of the name of the file you want to update to select it, and then click the Files tab.

-
In the Copies section of the ribbon, click Go To Source.

-
In the ribbon, click Manage Copies.

-
Click Edit next to the item.

-
Click Remove Link.
-
In the confirmation dialog, click OK.
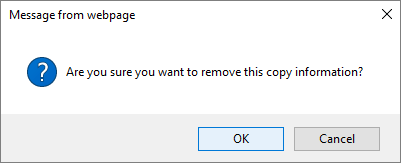
This action removes the copy from the list of copies that can be updated from the source file.
-
Return to the library that contains the copy that you want to unlink from the source file.
-
Right-click name of the copy that you want to unlink, and then click Properties.
-
At the top of the page, click Unlink, and then click OK.

This action removes the copy's link to its parent source file.
-
To delete, right-click the name of the copy, click Delete, and then click OK.
Use the Send To command in SharePoint Server 2010 or SharePoint Server 2007
When a file is copied using Send To, the copy maintains a relationship with its source file, and you can choose to update this copy with any changes that are made to the source file. Additionally, if the copy and its source file share common columns or fields, these columns or fields are also updated when the copy is updated.
The Send to command makes it easier to maintain files across libraries and sites in an organization because when files are copied by using the Send To command, the server tracks the relationship between the source file and all of its copies. Users can view and manage all copies of an item centrally from the Manage Copies page, where they can see which copies prompt for updates, change update settings for copies, update the copies, or create new copies.
Notes:
-
By default, you can use the Send To command to copy files to libraries within a site collection. If you copy files from a client computer that has a program that is compatible with SharePoint, such as Word, and a browser that supports Microsoft ActiveX Controls, such as Internet Explorer, you can use the Send To command to copy files not only between libraries within a site collection, but also between different Web applications. If you copy files from the browser of a client computer that does not support ActiveX Controls, you will be able to copy files only to libraries within site collections that share the same domain name as the source library. Microsoft Edge, Mozilla FireFox, and Google Chrome do not support ActiveX Controls.
-
If you need to copy files to a site that either has forms authentication enabled or is a secure site (for example, a site with a URL that begins with https://), you must add the copy destination to the list of trusted sites in your browser.
Copy a file to a predefined destination in SharePoint Server 2010 or SharePoint Server 2007
If a Send To destination is already specified for your library, you can copy files from this library to another library by using the Send To command.
-
If the library that contains the file that you want to copy to another destination is not already open, click its name on the Quick Launch.
If the name of your library does not appear, click Site Actions
 , click View All Site Content, and then click the name of your library.
 -
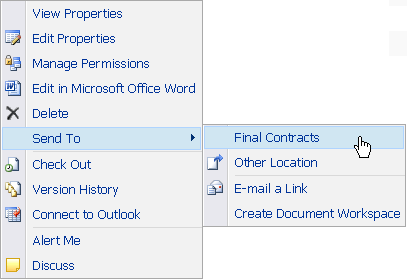
Point to the name of the file that you want to copy, click the arrow that appears, point to Send To, and then click the name of the destination to which you want to copy the document or item.
Note: If you do not see the name of a Send To destination, it could mean that a Send To destination is not specified for this library or that you do not have the Contribute permission level for the destination library.
-
If you want to rename the copy of the file, in the Destination section, under File name for the copy, type a new name.
-
In the Update section, do either of the following:
-
If you want to be prompted to update any copies when new versions of the source file are checked in from the browser, click Yes.
If you select this option, the copy that you create will be marked as a copy that prompts for updates, and it will be updated whenever you choose to update existing copies of a source file.
Note: If you check in files from a program that is compatible with Windows SharePoint Services 3.0, such as Microsoft Office Word 2007, you will not be prompted to update copies in the client program.
-
If you want to be alerted when the source file is updated, select the Create an alert for me on the source document check box.
Note: You will not receive e-mail alerts when the source file is updated unless e-mail is enabled on the server. If you are not sure if e-mail is enabled on the server, contact your server administrator.
-
-
-
Click OK.
Copy a file to a destination that you specify in SharePoint Server 2010 or SharePoint Server 2007
You can use the Send To command to copy a file to a library that you specify. You must have the Contribute permission level for the library to which you want to copy the document.
-
Make note of the URL for the SharePoint library to which you want to copy the file.
-
If the library that contains the file you want to copy to another location is not already open, click its name on the Quick Launch.
If the name of your library does not appear, click Site Actions
 , click View All Site Content, and then click the name of your library.
 -
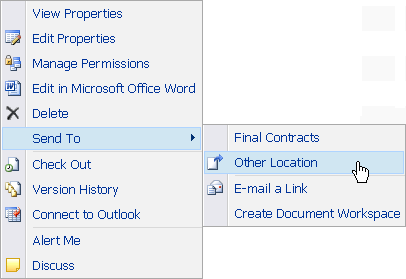
Point to the name of the file that you want to copy, click the arrow that appears, point to Send To, and then click Other Location.
-
Do one of the following:
-
When the Destination document library or folder field appears, it should have the base URL of your site. If so, go to the end of it and type in the name of the library you want to copy the file to. For example, to copy to a specific document library or to a folder within a document library type either: http://servername/sitename/libraryname or http://servername/sitename/libraryname/foldername.
-
If the library you want to send your file to is in the Quick Launch bar, right click the name of the library, and pick Copy Shortcut.

Paste the destination library URL into the Destination document library or folder field in the Copy dialog box.
-
If you can't get the previous methods to work, try this.
Open the document library you want to send the files to, and copy the address from the address bar. You may need to edit the URL to remove extra characters. To do this, try this workaround:
Important: Do not copy and paste the URL for the destination SharePoint library directly from the browser into this text box because this version of the URL will contain extra characters that will prevent you from being able to copy a file successfully to the destination library.
Paste the URL into NotePad, and remove the content after the name of the library you want to copy to as shown in this illustration.

1. The base URL for the library.
2. The name of the library, with %20 characters replacing spaces in the name.
3. Extra content not needed. Delete this part.
Note: Some URLs exceed 255 characters, and can't be used. If you can, use the Quick Launch bar or add the name of the library to the base URL in the Destination field to get your shortcut, as the address bar can contain additional content.
-
-
If you want to rename the copy of the document, under File name for the copy, type a new name.
-
In the Update section, do either of the following:
-
If you want to be prompted to update any copies when new versions of the source file are checked in from the browser, click Yes.
If you select this option, the copy that you create will be marked as a copy that prompts for updates, and it will be updated whenever you choose to update existing copies of a source file.
Note: If you check in files from a program that is compatible with Windows SharePoint Services 3.0, such as Microsoft Office Word 2007, you will not be prompted to update copies in the client program.
-
If you want to be alerted when the source file is updated, select the Create an alert for me on the source document check box.
Note: You will not receive e-mail alerts when the source file is updated unless e-mail is enabled on the server. If you are not sure if e-mail is enabled on the server, contact your server administrator.
-
-
-
Click OK.
Updating copies of a file in SharePoint Server 2010 or SharePoint Server 2007
There are two ways that you can update copies of an item:
-
From a source file, you can use the Send To command to update existing copies of an item.
-
From any copy of an item, you can go to the Manage Copies page and view all existing copies and then select which ones you want to update.
Update copies from the source file
-
If the library that contains the file for which you want to update copies is not already open, click its name on the Quick Launch.
If the name of your library does not appear, click Site Actions
 , click View All Site Content, and then click the name of your library.
 -
Point to the name of the file, click the arrow that appears, point to Send To, and then click Existing Copies.
Note: The Existing Copies command appears only if you chose to be prompted for updates when you initially used the Send To command to copy this source file to another location.
-
In the Destinations section, under Copies, select the check boxes for the copies that you want to update, and then click OK.
Update copies from the Manage Copies page in SharePoint Server 2010 or SharePoint Server 2007
If a file was copied to one or more different libraries, you can update all of the different copies from one location on the Manage Copies page, which is accessible from any copy of an item.
-
If a library that contains a copy that you want to update is not already open, click its name on the Quick Launch.
If the name of your library does not appear, click Site Actions
 , click View All Site Content, and then click the name of your library.
 -
Point to the name of the copy that you want to update, click the arrow that appears, and then click Go to Source Item.
-
Click Manage Copies.
-
To update all copies that already prompt for updates, click Update Copies.
-
In the Destinations section, under Copies, select the copies that you want to update, and then click OK.
Note: If you want to update copies that are listed on the Manage Copies page under Copies that do not prompt for updates, first you must change the update settings for these copies. For more information about how to do this, see Change the settings for a copy to make it prompt for updates.
Change the settings for a copy to make it prompt for updates in SharePoint Server 2010 or SharePoint Server 2007
If you created a copy of a file by using the Send To command and you did not choose to be prompted for updates, this copy cannot receive updates from the source file. You can change this setting and make the copy available for updates.
-
If the library that contains a copy that you want to update is not already open, click its name on the Quick Launch.
If the name of your library does not appear, click Site Actions
 , click View All Site Content, and then click the name of your library.
 -
Point to the name of the copy that you want to update, click the arrow that appears, and then click Go to Source Item.
-
Click Manage Copies.
-
Click Edit next to the item, and then click Yes under Prompt the author to send out updates when the document is checked in? in the Update section.
-
Click OK.
Unlink and delete a copy in SharePoint Server 2010 or SharePoint Server 2007
If you want to completely delete an item that is a copy of another item, first you must ensure that this item is removed from the source file's list of items to update. Otherwise, the item may be recreated whenever someone chooses to update any existing copies of the source file. It is also recommended that you unlink the copy from its source file. After you have completely unlinked the source file and its copy, you can delete the copy.
-
To completely remove any links between a source file and its copy, unlink the source file and its copy in both of the following ways:
-
Unlink a copy from its source so that the copy no longer retains its connection to a source file. If you do this, the source file retains a connection to the copy, and the copy can still be updated if someone chooses to update existing copies of the source file.
-
Remove the link to a copy from the source file so that the source file no longer updates the copy.
-
In the library that contains the copy that you want to unlink from a source file, point to the name of the copy, click the arrow that appears, and then click Go to Source Item.
-
Click Manage Copies.
-
Click Edit next to the copy that you want to unlink from the source file.
-
Click Remove Link, and then click OK.
This action removes the copy from the list of copies that can be updated from the source file.
-
Return to the library that contains the copy that you want to unlink from the source file.
-
Point to the name of the copy that you want to unlink, click the arrow that appears, and then click View Properties.
-
At the top of the page, click Unlink, and then click OK.
This action removes the copy's link to its parent source file.
-
-
To delete a file, in the library that contains the copy that you want to delete, point to the name of the copy, click the arrow that appears, click Delete, and then click OK.
If you're not sure which version of SharePoint you're using, see Which version of SharePoint am I using?.
Moving or copying files outside SharePoint using File Explorer
Managing files and folders can sometimes be easier when you work outside SharePoint using Windows File Explorer. Open with Explorer only works with Internet Explorer, but you can to copy and move multiple files and folders between folder as you would on your desktop.
For more information, see Open in Explorer or View with File Explorer in SharePoint
You can sync either or both your source and destination libraries and work between them as well. For more info, see Get started syncing SharePoint sites with the new OneDrive sync client.
To learn how to upload files, see Upload a folder or files to a document library.
Create folders, add files, or add links to a document library
-
To create new folders in SharePoint, see Create a folder in a document library
-
To upload a folder or files to a document library, see Upload a folder or files to a document library
-
Links are only supported in SharePoint Online document libraries. To create one, see Add a link in a document library
Leave us a comment
Updated Feb 27, 2017 thanks to customer feedback.
Was this article helpful? If so, please let us know at the bottom of this page. Let us know what was confusing or missing. Please include the version of SharePoint, OS, and browser you're using. We'll use your feedback to double-check the facts, add info, and update this article.
No comments:
Post a Comment