Add an XML Web service as a data source
This article shows you how to add an XML Web service as a data source, how to test the data source connection, and then how to display the information returned by the Web service by creating a Data View on your site.
Important: If your site resides on a server running Windows SharePoint Services, the default settings on the server require that your server administrator first edit the Web.config file on the server before you can connect to an XML Web service, as described in the section Test the data source connection. If your site resides on a server running Microsoft Office SharePoint Server 2007, you can connect to an XML Web service without making any changes on the server.
In this article
What is a Web service?
A Web service is software designed to support interoperable program-to-program interactions over a network. In the context of Microsoft Office SharePoint Designer 2007, a Web service is a service that returns XML data in response to remote procedure call–type queries. With Office SharePoint Designer 2007, you can interact with existing Web services by including an XML Web Service data source control on your Web pages. Typically you do this by configuring an XML Web Service as a data source and then by creating Data Views of that data, as shown in this article.
Web services are used in a range of application-integration and data-sharing scenarios because they provide interoperability between software components that can reside on different platforms or in different companies. A Web service performs a specific task, in which information is requested by the client computer and returned by the Web service in the form of XML. Some common examples of XML Web services are currency converters, mortgage calculators, and stock quote reports.
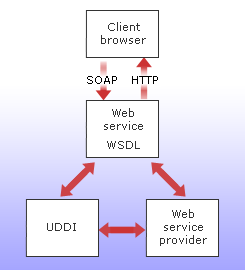
XML Web services are made possible by SOAP, a standards-based protocol that is used for exchanging information in XML format over a computer network. Each Web service includes a Web Service Description Language (WSDL) file that contains information about the XML Web service and its capabilities. Web service providers can register their Web services by using Universal Description Discovery and Integration (UDDI), a specification for publishing and locating information about Web services. Interested users can search the UDDI registry for Web services that they might find helpful. After a Web service is added to a Web site, the information about that Web service is displayed by using Hypertext Transfer Protocol (HTTP).

To add a Web service to the Data Source Library, you must know the URL for the WSDL description of the Web service. This URL often ends in either ?WSDL or .wsdl. Once you have the URL for the WSDL description, you can add the Web service to your Data Source Library.
Windows SharePoint Services 3.0 provides Web services for interacting with almost any aspect of each server, site, list, library, survey, or Web page that is based on Windows SharePoint Services 3.0. Microsoft Office SharePoint Server 2007 provides the same Web services as Windows SharePoint Services 3.0, plus an additional set of Web services. In the following procedures, you use the Web service named Webs. The Webs Web service provides methods for working with SharePoint sites and subsites. For example, you can use this Web service to query for and display the titles and URLs of all sites within the current site collection, the titles and URLs of all sites directly beneath the current site, or the URL of the parent site for the specified page URL.
You can find links to more information about the Web services provided by Windows SharePoint Services 3.0 and Office SharePoint Server 2007 in the See Also section.
Add an XML Web service to the Data Source Library
To help you administer and maintain your SharePoint site, you want to create a Data View that displays the names and URLs of all subsites in the current site collection. By connecting to the Web service in Windows SharePoint Services named Webs and using it as a data source, you can quickly retrieve this data and create a view of it.
-
If the Data Source Library is not visible, on the Task Panes menu, click Data Source Library.
-
In the Data Source Library task pane, under XML Web services, click Connect to a Web service.
If the XML Web Services heading is collapsed, click the plus sign (+) to expand it.
-
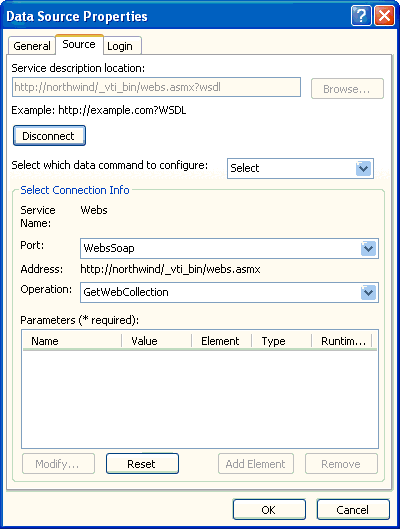
In the Data Source Properties dialog box, in the Service description location box on the Source tab, type the URL for the Web service, or click Browse to locate and select the WSDL file.
For this example, type http://your server name/_vti_bin/Webs.asmx?WSDL, where your server name is the name of your server.
-
Click Connect Now.
After the connection is established, the Connect Now button changes to a Disconnect button, and the other options on the tab become available.

-
In the Select which data command to configure list, there are four options:
-
The Select command retrieves information from the Web service. You can then display the information on your site by creating a Data View.
-
The Insert, Update, and Delete commands also retrieve information from the Web service. However, you cannot create a Data View that displays or modifies information that is retrieved by using these command. You can only use a Data View to display information that is retrieved by using the Select command.
For this example, click the Select command because you want to create a Data View of the data that is returned by the Web service.
Under Select Connection Info, you can see that the Service Name is Webs and that the Address is http://your server name/_vti_bin/Webs.asmx.
-
-
In the Port list, click the application protocol that you want to use for accessing the Web service.
The options in this list are supplied by the Web service as compatible protocols, and they will change from Web service to Web service.
To follow the example, click WebsSoap.
-
In the Operation list, click the operation that you want the Web service to do. The options in the list are defined by the Web service as operations that it can perform.
For the Web service named Webs that is used in the example, the following operations are available:
-
To return the titles and URLs of all sites within the current site collection, click GetWebCollection.
-
To return the collection of list template definitions for the current site, click GetWeb.
-
To return the properties of a site (for example, name, description, and theme), click GetListTemplates.
-
To return the titles and URLs of all sites directly beneath the current site, click GetAllSubWebCollection.
-
To return the URL of the parent site for the specified page URL, click WebURLFromPageURL.
-
To return the content types used in the current site, click GetContentTypes.
For this example, click GetWebCollection.
-
-
The Parameters list displays the names of any parameters that the Web service requires or accepts. To configure the permanent or default value of any parameter, click it, and then click Modify.
Required parameters are identified with an asterisk (*). The Webs Web service does not require any parameters.
-
Click OK.
The XML Web service is now listed in the Data Source Library.

Test the data source connection
Now that you have created a data source connection that appears in the Data Source Library, you want to make sure that the connection is working properly. To test the data source connection:
-
In the Data Source Library, click the data source, and then click Show Data. The Data Source Details task pane opens.
If the Data Source Details task pane displays data from the data source, the data source connection is working properly. You are ready to create a Data View of this data. Skip to the next section.
If the Data Source Details task pane does not display data from the data source, but instead the task pane either is blank or displays an error message, the data source connection is not working properly. This issue may occur if your server is running Windows SharePoint Services, the server is behind a proxy server or firewall, and the proxy server settings are not specified in the Web.config file for the virtual server.
To resolve this issue, contact your server administrator and ask him or her to perform the following procedure. The server administrator must edit the Web.config file to include the proxy server settings for the virtual server where your site resides. In a server farm environment, the server administrator must edit the Web.config file for each virtual server in every front-end Web server in the server farm.
Note: Changing the default proxy server setting enables server-to-server communication but does not in any way affect inbound connections or access permissions to your server.
Configure the Web.config file on the server
To configure the Web.config file, follow these steps on the server running Windows SharePoint Services:
-
Start a text editor such as Notepad.
-
Locate and open the Web.config file for the virtual server where you want to allow users to create connections to XML Web service and server-side script data sources.
The Web.config folder is located in the content area of your server — for example, the default path is \Inetpub\wwwroot\wss\VirtualDirectories\80.
-
Do one of the following:
-
If you are running Windows SharePoint Services 3.0 Copy and paste the following lines into the Web.config file anywhere at the level directly below the <configuration> node.
<system.net>
<defaultProxy>
<proxy autoDetect="true" />
</defaultProxy>
</system.net>
-
If you are running Microsoft Windows SharePoint Services 2.0 Copy and paste the following lines into the Web.config file anywhere at the level directly below the <configuration> node. Change <ProxyServer> to the name of your proxy server and <Port> to the port that you are using.
<system.net>
<defaultProxy>
<proxy proxyaddress="http://<ProxyServer>:<Port>" bypassonlocal = "true"/>
</defaultProxy>
</system.net>
-
-
Save the Web.config file, and then exit the text editor.
-
Reset Microsoft Internet Information Services (IIS) to apply your changes. Alternatively, you can reset after the next step to apply your changes to multiple virtual servers at one time. To reset IIS, open a command line window and type iisreset at the command prompt.
-
Repeat steps 1 through 5 for each virtual server where you want to allow users to create connections to XML Web service and server-side script data sources.
Create a Data View of the XML Web service data source
Now that you have added a Web service to your Data Source Library, you can create a Data View that displays the data retrieved from the Web service.
You can quickly create a Data View simply by dragging the data source onto a page. When you drag a data source onto a page, the result is a default view of the data, in which the first five fields in your data source appear in each row in a basic table. If the first five fields appear with the corresponding data, the data source is configured properly.
Data Views are based on Microsoft ASP.NET 2.0 technology. To create a Data View, you must start with an ASP.NET page (.aspx file).
-
On the File menu, point to New, and then click ASPX.
A new page with a FORM tag opens.

-
If the Data Source Library isn't visible, on the Task Panes menu, click Data Source Library.
-
In the Data Source Library task pane, locate your data source — in this example, Webs on your server, where your server is the name of your server — and then drag it onto the page.
A Data View containing all titles and URLs of all sites within the current site collection is now displayed on your page, and the Data Source Details task pane opens.
For more information about Data Views, see Create a Data View.
nice
ReplyDeleteThis comment has been removed by the author.
ReplyDelete