Add, edit, delete or restore user accounts in Office 365 operated by 21Vianet - Admin Help
As the Office 365 admin, you need to create a user account for everyone in your organization who uses Office 365 services. When you create or edit a user account, you can also assign licenses to the user and set a user's administrative permissions. At the end of adding user accounts, your team members will have an Office 365 license, logon credentials, and an Office 365 mailbox. You can also delete an account if it is no longer needed and restore deleted accounts.
Note: The following instructions are for Office 365 for Business operated by 21Vianet in China. If your service looks different from the steps below, you may have Office 365 for Small Business operated by 21Vianet in China. See these instructions instead.
What would you like to do?
Add a user account
We're rolling out changes to the Office 365 admin center every month to a selection of users. Which version of the admin center do you see?
| If you see this, follow the steps: | If you see this, follow the steps: |
Add a user account in the Office 365 admin center preview
-
Go to the Office 365 Admin center.
-
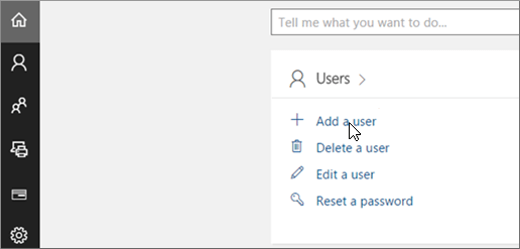
On the Home page, choose Add a user.
-
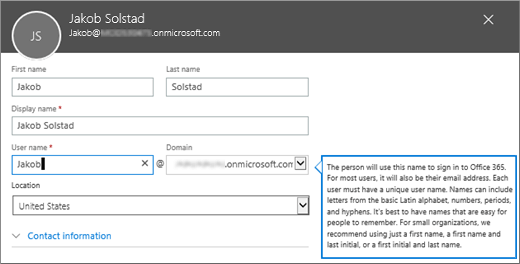
Type the user's name and choose the appropriate domain. For example, if the user's name is Jakob, and his domain is contoso.com, he'll sign in to Office 365 by typing jakob@contoso.com.
-
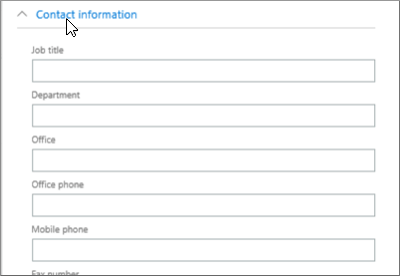
To enter optional contact information for this person, such as mobile phone and address, expand the Contact information section, and enter the info.
-
In the Password section, the default is for Office 365 to autogenerate a new temporary password for the person. However, if you want to create a different initial password for the person, choose Let me create the password and then type a strong password twice that meets the guidelines shown in the following figure.

Since the initial password is always temporary, the person will need to change it within 90 days. However, if you want the person to change the password when they first sign on to Office 365, choose Make this user change their password when they first sign in.
-
Because you are the admin, you'll get a copy of the user's temporary password. If you want the this new Office 365 user to get a copy of this email, in the Enter the new password to the following recipients box, be sure to enter an email address that the person currently has access to. Don't send the email to their new Office 365 email address because they won't be able to get it.
-
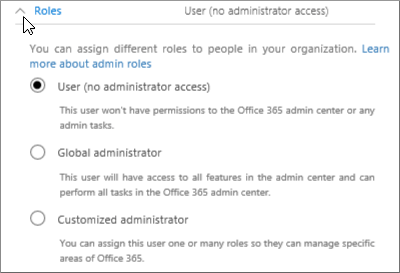
If you want to assign the user admin privileges, expand the Roles section and choose Global admin. The person will be able to buy more licenses, reset passwords, and do everything else an admin can do in the Office 365 admin center.
-
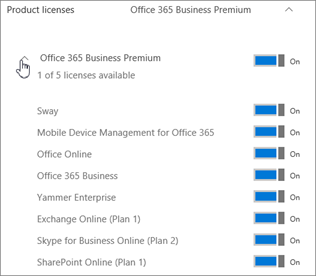
Expand the Product licenses section to see the licenses that are assigned to this person. And, you can further expand the license to see all the services included in the license. You can turn off specific services if you don't want to use them in your business.
-
Choose Save. You'll see a confirmation that the user account and password was created.
-
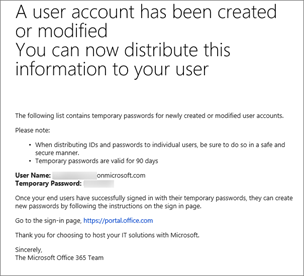
Everyone who you designated to get an email notification will get an email from Microsoft Online Services Team. It will look like this:

The email will contain the person's Office 365 user ID and password so they can sign in to Office 365. It will look something like this:
-
After you've added people to Office 365, you need to tell them about their Office 365 sign in information. Use your normal process for communicating new passwords.
Add a user account in the O365 Admin center
-
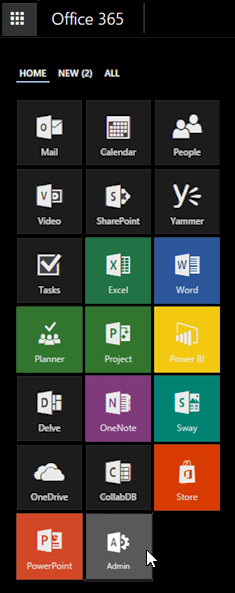
Select the app launcher icon
 in the upper-left and choose Admin.
-
Choose Users > Active Users. Choose
 as shown in the following figure.
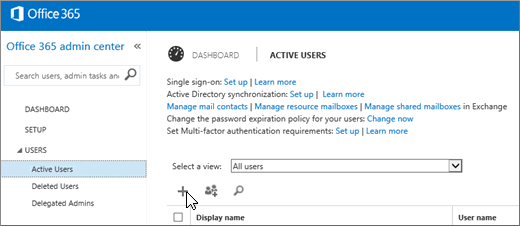
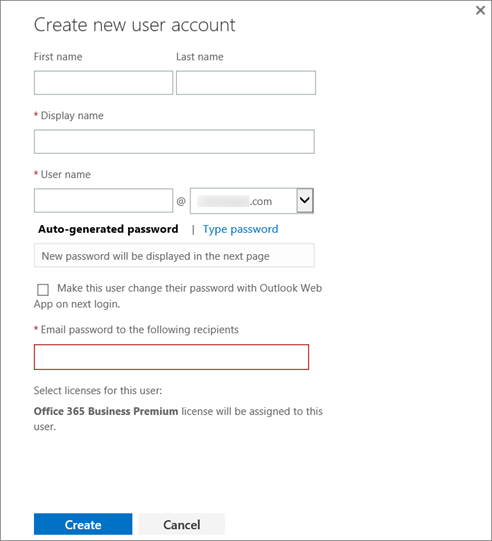
Then the Create a new user account page is displayed, as shown in the following figure.
-
On the Create new user account page, enter a display name and a user name. The user name is what the person will use to sign in to Office 365.
-
If you have more than one domain, be sure to select the right one for the user in the drop down, as shown in the following figure.

-
By default, Office 365 autogenerates a new temporary password for the user. However, if you want to create a different initial password for the user, choose Type password and then type a strong password twice that meets the guidelines shown in the following figure.

Since the initial password is always temporary, the user will need to change it within 90 days. However, if you want the user to change the password when they first sign on to Office 365, choose Make this user change their password with Outlook Web App on next login. When the user signs into Office 365 for the first time, they will be prompted to change their password.
-
In the Email password to the following recipients box, type the email addresses of the people who you want to get a copy of this user's account information.
If you want the this new Office 365 user to get a copy of this email, be sure to enter an email address that the user currently has access to. Don't send the email to their new Office 365 email address because they won't be able to get it.
By default your email address is added because you're the admin, but you can remove it if you want. You can enter up to 5 email addresses separated by semi-colons, as shown in the following figure.

-
(Optional) If you don't have enough licenses to assign this new user a license, you will see the option to Buy more licenses, as shown in the following figure.
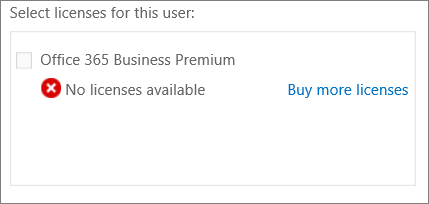
If you choose Buy more licenses, another instance of the Office 365 admin portal opens for you to make your purchase. After you buy more licenses, close that instance of the Office 365 admin portal, and start the process of adding a new account from the beginning.
-
Choose Create to create the account.
At this point, an email from the 21Vianet service team is sent to the email addresses you specified.
If you want to add several users at once, see Add multiple users with a CSV file.
Edit or change a user account in Office 365
If the user that you are trying to edit is synchronized with your Active Directory service, an error message appears. You'll be unable to edit the user using this procedure. To edit the user, use your local Active Directory management tools.
Use this procedure to edit a single user's information.
-
Select the app launcher icon
 in the upper-left and choose Admin.
 -
Go to Users > Active Users.
-
On the Active users page, click the user that you want to edit, and then click Edit
 .
.Important: If you block a user from having sign-in access to Office 365, it will take about an hour to take effect on all that user's devices and clients. Also, make sure that you remove or disable the user from your on-premises Blackberry Enterprise Service, or BlackBerry Business Cloud Services. You should also disable any Blackberry devices for the user. Refer to the Blackberry Business Cloud Services Administration Guide if you need specific steps on how to disable the user.
-
Complete your changes, and then click Save.
Edit or change multiple users in Office 365
Important: If the users that you want to edit are synchronized with your Active Directory service, you won't be able to complete this procedure; the changes won't be applied on the Results page. To edit multiple users, use your local Active Directory management tools.
Use this procedure to edit user information for multiple users.
-
Select the app launcher icon
 in the upper-left and choose Admin.
 -
Go to Users > Active Users.
-
On the Active users page, click the users that you want to edit, and then click Edit
 .
.Important: If you block a user from having sign-in access to Office 365, it will take about an hour to take effect on all that user's devices and clients.
-
When you're done, click Save.
Some changes may take time to apply across multiple services.
Delete users
To delete the account for one or more users
-
Select the app launcher icon
 in the upper-left and choose Admin.
 -
Go to Users > Active Users.
-
Choose the names of the users that you want to delete.
-
If you are using O365 Admin Preview, choose More at the top of the page, then Delete User. Otherwise, just select DELETE
 .
.
When you delete a user account, the account becomes inactive. However, for approximately 30 days after you have deleted it, you can restore the account and the associated data.
Note: If your organization synchronizes user accounts to Office 365 from a local Active Directory environment, you must delete and restore those user accounts in your local Active Directory service. You can't delete or restore them in Office 365. For more information about synchronizing user accounts to Active Directory, see Activate synced users.
Restore Users
Restore one or more users
When you restore a user account within 30 days after deleting it, the user account and all associated data are restored. The user can sign in with the same work or school account. Their mailbox will be fully restored, and they'll have access to all services they previously accessed.
Before you restore a user account, make sure there are Office 365 licenses available that you can assign to the account. Also, when you restore an account, you may encounter conflicts with user names or proxy addresses, which you can resolve.
To restore one or more users
-
Select the app launcher icon
 in the upper-left and choose Admin.
 -
Go to Users > Deleted users.
-
On the Deleted users page, choose the name(s) of the users that you want to restore, and then select Restore or Restore users.
-
If the user is successfully restored, clickClose in the confirmation box.
Restore a user that has a user name conflict
A user name conflict occurs when an admin deletes a user account, creates a new user account with the same user name (either for the same user or another user with a similar name), and later tries to restore the deleted account.
To resolve a user name conflict, you can either replace the active user account with the one that you are restoring or assign a different user name to the account that you are restoring so that there aren't two accounts with the same user name.
To restore a user that has a user name conflict
-
Select the app launcher icon
 in the upper-left and choose Admin.
 -
Go to Users > Deleted users.
-
On the Deleted users page, choose the names of the users that you want to restore, and then select Restore users.
If two or more users fail to be restored, an error message advises you that the restore operation failed for some users. View the log to see which users were not restored, and then restore the failed accounts one at a time.
-
On the User name conflict page, do one of the following:
-
If you want to keep the restored account and the conflicting active account, select Change the user name of the user you want to restore, type a new user name, and then select the appropriate domain name.
-
If you want to remove the active account and replace it with the account that you are restoring, select Replace active user with this deleted user.
-
-
Select Submit.
-
Review the results, and then select Finish.
Restore a user that has a proxy address conflict
A proxy address conflict occurs when an admin deletes a user account that contains a proxy address, assigns the same proxy address to another account, and then tries to restore the deleted account.
To restore a user that has a proxy address conflict
-
Select the app launcher icon
 in the upper-left and choose Admin.
 -
Go to Users > Deleted users.
-
On the Deleted users page, check the names of the users that you want to restore, and then select Restore users.
-
On the Resolve proxy address conflict page, if you want to restore the user account and delete the proxy addresses attached to that account, select Submit.
If a user account contains more than one error that prevents you from restoring it, the Resolve proxy address conflict page displays a Next button instead of a Submit button. Select Next to resolve the error on the next page.
-
Review the results, and then select Finish.
If two or more users fail to be restored, an error message advises you that the restore operation failed for some users. View the log to see which users were not restored, and then restore the failed accounts one at a time.
Microsoft Office Tutorials: Add, Edit, Delete Or Restore User Accounts In Office 365 Operated By 21Vianet - Admin Help >>>>> Download Now
ReplyDelete>>>>> Download Full
Microsoft Office Tutorials: Add, Edit, Delete Or Restore User Accounts In Office 365 Operated By 21Vianet - Admin Help >>>>> Download LINK
>>>>> Download Now
Microsoft Office Tutorials: Add, Edit, Delete Or Restore User Accounts In Office 365 Operated By 21Vianet - Admin Help >>>>> Download Full
>>>>> Download LINK gu