View your team's work with Team Planner
Project managers struggle with seeing clearly and quickly what their team is doing at any given point in the project schedule. Project managers also struggle with finding a quick and painless way to do something about problems that they discover.
Note: Team Planner is a feature available only with Project Professional.
Welcome to the Team Planner, a new feature for Project Professional 2010 that gives project managers greater visibility into, and control over, their team's work.
What do you want to do?
View team work
-
On the Ribbon, click the View tab.
-
In the Resource Views group, click Team Planner.
The Team Planner appears. One row is displayed for each resource in the project. On the left, resource names appear. All of the tasks that a resource is assigned to appear on the same row on the right. Resource tasks that don't have a start date or end date also appear on the left next to the resource name.
Tasks that are not assigned to anyone appear at the bottom.
Tip: If you use agile project management as your organization's project scheduling methodology, use the unassigned tasks as your "backlog" of tasks that are waiting to be assigned to resources in future sprints.

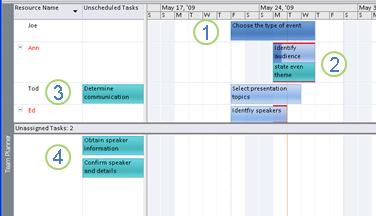
1. A completed task This task is a completed task with 100 percent actual work. It cannot be moved using Team Planner.
2. Two tasks assigned to same person The top task is automatically scheduled and partially completed (indicated by the color change on the bar). The bottom task is manually scheduled. Both are scheduled at the same time to the same person. The resulting overallocation is indicated by red lines. Either of these tasks can be moved to a different time in the schedule (or to a different person) to resolve the overallocation.
3. An unscheduled task This task is assigned to a specific person, but it doesn't have enough scheduling information to become a scheduled task. In order for a task to be scheduled (and thus move to the right side of the view), it has to have at least two of the schedule settings set. For example, if the duration and start date is set (but no finsish date), the finish date will be automatically set and it will become a scheduled task. Similarly, if it has a start date and end date set (but no duration), it will also become a scheduled task. If only the start date is set, it will remain un unschedule task.
4. An unassigned task This task has not been assigned to anyone. It can be assigned by dragging it to a person's schedule in the right section. To keep the task unscheduled but assigned to a person, drag it vertically to a person's name in the upper, left section.
Tip: The color of the task gives you useful information about its scheduling state. For example, portions of bar that are dark blue indicate actual work. Green tasks are manually scheduled. Learn how to customize the bar colors
Move a task to a different time in the schedule
There are different reasons why you would want to move a task. Someone might be assigned too much work. Or perhaps you want to reassign work to a different person. Or maybe you'll discover that no one is working on an important task. Team Planner will handle all of these problems, and much more.
Using Team Planner, rescheduling a task is as simple as dragging it somewhere else.
-
On the Ribbon, click the View tab.
-
In the Resource Views group, click Team Planner.

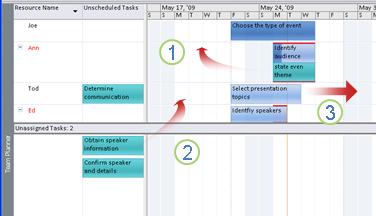
1. Moving a task vertically to resolve an overallocation Before the task was moved, this resource was working on two tasks at the same time.
2. Moving a task vertically to assign new work to a person Work that is not assigned to a person can be assigned to someone by dragging the dropping.
3. Moving a task horizontally
A task can be scheduled to worked on at a later time in a person's schedule.
Here are other ways you can use the Team Planner.
| To do this | Take this action |
| View nonworking time | A person's nonworking time will appear as gray vertical bars. Double-click the vertical bars to see more details about the nonworking time. |
| Rollup task information to see less or more detail | To get a higher level of detail about task and project information, rollup information on Team Planner. Click the Format tab. In the Format group, select the level of detail by clicking Rollup, and then an outline level. When tasks are rolled-up, the highest-level task will appear as a single bar. |
| Select multiple items | Hold down CTRL while clicking multiple resource or task names. You can also drag the mouse over multiple items to select them. |
| Move items using the keyboard | You can navigate through items in Team Planner using the arrows keys. To move a highlighted task, use CTRL + arrow. To scroll the view, use ALT + arrow. |
| Move items beyond the window | Dragging a task to the edge of the Team Planner will automatically cause the view to scroll. In this way, you can drag a task further into the future (or past) without having to release the mouse button. |
| Get quick information about tasks | Hover over a task to read important and useful information about how it is being schedule. You'll find that the old familiar tooltips have been greatly expanded to help you make important scheduling decisions. |
Fine-tune your schedule using the Team Planner view
Assuming you've read other sections in this article, you are now fairly familiar with how to move tasks on the Team Planner. This section covers other things you can do on the Team Planner to get more done in less time.
Most things you can do in the Gantt Chart and other views you can do in the Team Planner, as well. You'll find that the Team Planner is a more straightforward way of fine-tuning how your tasks are scheduled.
| To do this | Take this action |
| Change how tasks are scheduled | To change a task from being automatically scheduled to manually scheduled, right click a task, and then click Auto Scheduled or Manually Scheduled. |
| Resolve overwork problems automatically | On the Format tab, click Prevent Overallocations. When this setting is on, if moving one task would create a conflict with another, then the second task will be automatically moved to prevent any overallocations. |
| Inactivate a task | Right click on the task bar to inactivate a task. Inactivating a task doesn't delete it from the project, even though the task will disappear from the Team Planner. It does prevent the task from having actuals reported on it. |
| Reassign a task | The easiest way to reassign a task is by dragging it to another person. You can also right click on a task, and then click Reassign To. This is especially useful if you want to maintain the same dates. |
| Change task information | To change the name of the task or other properties (like constraint type outline code, deadline dates, or task type), double-click the task. You can also double-click the resource name to view and change resource information. |
| Split the view | For advanced project managers who are comfortable with the traditional split (or combination) view, you can show more details in a separate bottom pane. Click the Task tab, and then in the Properties group, select Display Task Details. The bottom pain will display detailed information about the selected task and resources assigned to the task. Note: You cannot use a timescaled view, such as the Resource Usage or Task Usage views, along with Team Planner in a combination view. to view a timescaled view along with Team Planner, open a new window, and then arrange the windows horizontally. To do this, on the View tab, in the Window group, click New Window, and then click Arrange All. |
Customize the Team Planner
You can change the way the Team Planner appears to suit your needs and to make the view more attractive.
-
On the Ribbon, click the View tab.
-
In the Resource Views group, click Team Planner.
-
Do one of the following actions.
| To do this | Take this action |
| Change the color of the Team Planner bars | Click the Format tab. In the Styles group, pick the bar type you want to change, and then click either Border Color or Fill Color. Individual bars can also be modified |
| Expand the height of rows to show more text | Click the Format tab. In the Format group, select a number of lines using the Text Lines list. |
| View more or less detail | Use the Zoom Slider in the lower right part of the Project window to change the how much time is displayed in the right side of the view. |
| Change the appearance of nonworking time | Right click in a blank area of the right side of the view (not on a task), and then click Nonworking Time. |
| Group, filter, or sort quickly | Click the down arrow on the Resource Name column, and click Sort, Group, Filters for defined or custom filters. |
| Hide unnecessary columns | You can hide the columns for unscheduled and unassigned tasks. Click the Format tab. In the Show/Hide group, select the type of column you want to show or hide from view. |
| Change the size of the sections in the Team Planner | Drag the vertical and horizontal borders between the sections to change the size of the sections. |
Tip: If you've customized the Team Planner considerably, you can save a version of the customized view into a separate view. On the Resource Views Group, click the bottom half of the Team Planner button, and then click Save View.
No comments:
Post a Comment