Create a Scrolling Effect in PowerPoint 2007
By Glenna Shaw
In this article, Glenna Shaw discusses ways that you can scroll through a large image or document on a PowerPoint slide, moving forward or backward or stopping dynamically. Depending on the object that you inserted into your presentation there are a number of ways to accomplish this effect, including using add-ins or features in PowerPoint.
Word document, Web page, or large image
Word document
If your object is a Word document, simply embed the document in your presentation.
-
Click on Insert, Object, Create from File, and browse to your Word document, select it, click OK and OK again.
-
Set the Action Settings by clicking on Insert, Action and set the Object Action on the Mouse Click tab to Edit.
-
Set the fill color to white by clicking on Home, Shape Fill and choosing White.
When you click on the document during your presentation it will automatically open in Word. To return to your presentation, simply close Word.
If you don't want to show the Word editor, then save your document as a single web page by clicking on the Office button, clicking Save As, and then clicking Other File Formats. In the Save as type box, click Single File Web Page, (*.mht, *.mhtml) with your desired name and file location. Then follow the directions below for the LiveWeb add-in.
Web page or large image
If your object is a web page, http://skp.mvps.org/liveweb.htm (created by PowerPoint MVP Shyam Pillai) from http://skp.mvps.org/liveweb.htm and follow the directions. If you won't have internet connectivity then save the web page to your hard drive (from Internet Explorer) by clicking on File, Save As, and then in the Save as type box: Web Archive, single file (*.mht) with your desired name and file location.
-
From within Internet Explorer, click on File, Open, Browse to your newly created MHT file, select it and click Open, OK.
-
Highlight the entire address line and click CTRL-C to copy it.
-
Open PowerPoint and run the LiveWeb add-in wizard. When prompted for your web page address, click in the box and hit CTRL-V to paste your file address, for example: C:\Documents and Settings\Glenna\My Documents\MVP\Scroll\Create pan and zoom effects in PowerPoint - PowerPoint - Microsoft Office Online.mht. Complete the rest of the wizard.
Note: Without an internet connection, links on the page will not work.
If your object is a large image, and you want to use LiveWeb, you'll have to do some work on it up front since LiveWeb will display the entire image just as if you had inserted it on a slide regularly.
-
Open Word; change the view by clicking on View, Web Layout.
-
Insert your picture and click on Format. Click on the arrow in the lower right corner of the Size Ribbon to open the Size dialog window.
| |
| Size group on the Format tab under Picture Tools |
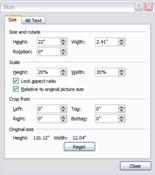 |
| Size dialog box |
-
Click the Reset button. Save your file as an *.mht file and enter the file location as the web address as described above.
Note: This is only effective for images less than 30 inches (or so) long or wide. If your image is larger, you'll need to use a web editor like Front Page. Additional options are to convert the image to a VRML file (3D) or PDF file and insert that file name as the web address.
Note: Your browser must have the plug-ins to display these types of files.
Go Native
So why wouldn't you use the easier methods described above? One word: Distribution. If you're going to distribute your presentation for viewing by others, they may not have the LiveWeb add-in or they may only have the PowerPoint viewer. In this case, you're limited to using features that are only available in the PowerPoint viewer. Fortunately PowerPoint gives you the features to do this with a little thought.
In this section
Change the slide layout
Add your picture
Make changes to the picture
Create your "faux scrollbar"
Create the remaining images
Test the continuity of your images
Set up the effects to scroll the image
Add slide transitions for odd numbered slides
Add slide transitions for even numbered slides
Set Action Settings
Delete "extra" Action Buttons
Add Title slide
Change the slide layout
Begin with a blank presentation and a blank slide, change the slide layout by clicking on Home, Layout and choose the Blank layout.
Add your picture
In order to use this method, your object must be a picture, so you'll need to convert it either using Microsoft Office or a 3rd party software.
Make changes to the picture
Make the following changes to your picture:
| |
| Format tab under Picture Tools |
For Left/Right Scrolling:
-
Set your height to 7.5 in the Size Ribbon by clicking on Format and changing the value for height to 7.5, click on Align, and align the picture to the middle and left of the slide.
-
In the Size ribbon, click on the cropping tool and crop off the right side of your picture until it's even with the right side of the slide. Your picture size should now be 7.5' X 10'.
-
Click anywhere outside the image to close the cropping tool.
For Up/Down Scrolling:
-
Set your width to 10 in the Size Ribbon by clicking on Format and changing the value for width to 10, click on Align, and align the picture to the center and top of the slide.
-
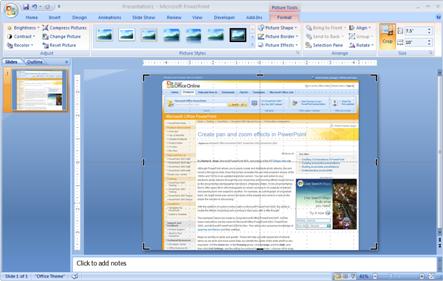
In the Size ribbon, click on the cropping tool and crop off the bottom of your picture until it's even with the bottom of the slide (shown below).
| |
| Picture with bottom cropped |
-
Your picture size should now be 7.5' X 10'.
-
Click anywhere outside the image to close the cropping tool.
Create your "faux scrollbar"
For Left/Right Scrolling:
-
Insert a very skinny rectangle along the bottom of the slide. Click on Home, click on the rectangle in the Drawing ribbon and draw the rectangle on your slide.
-
Double click on the rectangle and using the Formatting ribbon, set the size to .25 inches height and 10 inches wide.
-
Align the rectangle to the center and bottom of the slide.
-
Set the Shape Fill to White and the Shape Outline to No Outline.
-
Set the Shape Effects to Shadow, Inner, Inside Center.
-
Insert an action button by clicking on Home, scroll through the drawing shapes until you see the Action Buttons, click on the Action Button shape for Action Button: Back or Previous and draw it on your slide. Leave the action setting for Hyperlink to Previous Slide for now.
-
Double click on the Action Button and using the Formatting Ribbon, set the size to .25' X .25', Align left and bottom of the slide, change the Shape Fill to a Light color, change the Shape Outline to Weight ¼ pt.
-
Repeat this process to add an Action Button for Action Button: Forward or Next except align it right and bottom of the slide and leave the action setting for Hyperlink to Next Slide.
For Up/Down Scrolling:
-
Insert a very skinny rectangle along the right of the slide. Click on Home, click on the rectangle in the Drawing ribbon and draw the rectangle on your slide.
-
Double click on the rectangle and using the Formatting ribbon, set the size to .25 inches height and 10 inches wide.
-
Align the rectangle to the right and middle of the slide.
-
Set the Shape Fill to White and the Shape Outline to No Outline.
-
Set the Shape Effects to Shadow, Inner, Inside Center.
-
Insert an action button by clicking on Home, scroll through the drawing shapes until you see the Action Buttons, click on the Action Button shape for Action Button: Back or Previous and draw it on your slide. Leave the action setting for Hyperlink to Previous Slide for now.
-
Double click on the Action Button and using the Formatting Ribbon, set the size to .25' X .25', Align top and right of the slide, rotate the shape Right 90˚, change the Shape Fill to a Light color, change the Shape Outline to Weight ¼ pt.
-
Repeat this process to add an Action Button for Action Button: Forward or Next except align it right and bottom of the slide and leave the action setting for Hyperlink to Next Slide.
Example of a completed faux scrollbar for up/down scrolling is shown below.
| |
| Example of a completed faux scrollbar for up/down scrolling |
Create the remaining images
-
Click on Home, click on the drop down arrow for New Slide, click on Duplicate Selected Slides.
-
Change your viewing window size to 30% or so by clicking on the minus sign (-) in the lower right corner of the PowerPoint window.
For left/right scrolling:
-
Use the left arrow key to move your picture until the right side is lined up with the left side of the slide. Your picture will be completely off the slide.
-
Click on the Cropping Tool and expand the right side of your picture until it's even with the right side of the slide.
-
Crop off the left side of the picture until it's even with the left side of the slide. You should now have the next section of your picture.
-
Make sure your picture is 7.5' X 10' and aligned middle and center of the slide.
Note: Your faux scrollbar should remain on top of your picture.
-
Repeat this process until all sections of your original picture are on slides.
Note: You may have "white space" left on the last slide.
For up/down scrolling:
-
Use the up arrow key to move your picture until the bottom is lined up with the top of the slide. Your picture will be completely off the slide.
-
Click on the Cropping Tool and expand the bottom of your picture until it's even with the bottom of the slide.
-
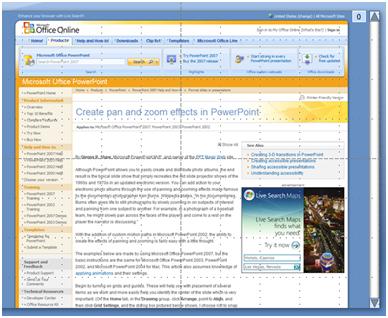
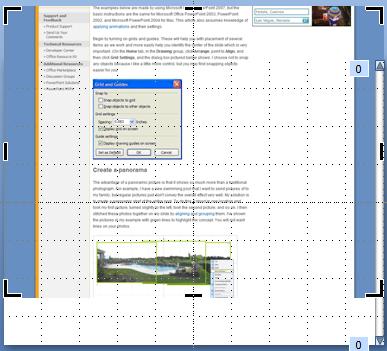
Crop off the top of the picture until it's even with the top of the slide (the picture below shows these steps partially done). You should now have the next section of your picture.
-
Make sure your picture is 7.5' X 10' and aligned middle and center of the slide.
Note: Your faux scrollbar should remain on top of your picture.
-
Repeat this process until all sections of your original picture are on slides.
Note: You may have "white space" left on the last slide.
| |
| Picture showing up/down scroll bar steps |
Test the continuity of your images
Once you've completed your slides us the Page Up and Page Down keys to scroll through your slides. Make any adjustments if needed.
Set up the effects to scroll the image
-
Go to the first slide and click on Home, click on the drop down arrow for New Slide, click on Duplicate Selected Slide.
-
Repeat for each slide except the last slide.
Your slideshow should now have the same image on slides 1 & 2, the same image on slides 3 & 4, etc. If your duplicated slides aren't in this order, rearrange them so they are.
-
Change to the Slide Sorter View by clicking on View, Slide Sorter.
Add slide transitions for odd numbered slides
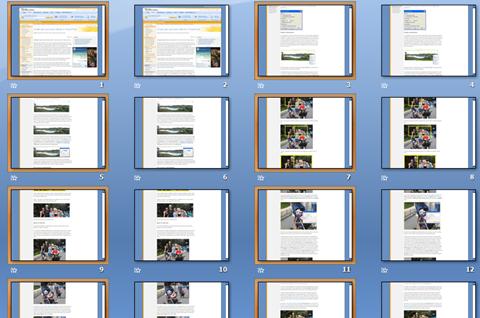
Hold down the CTRL key, click on all the ODD numbered slides to select them (see example below).
| |
| Slide Sorter view with odd numbered slides selected |
For Scrolling Left/Right:
-
Click on Animations, click on the drop down arrow for Slide Transitions, and under Push and Cover, choose Push Left.
-
Set the Transition Speed to Fast.
-
Uncheck the box for Advance Slide On Mouse Click.
For Scrolling Up/Down:
-
Click on Animations, click on the drop down arrow for Slide Transitions, and under Push and Cover, choose Push Up.
-
Set the Transition Speed to Fast.
-
Uncheck the box for Advance Slide On Mouse Click.
Click anywhere except a slide to deselect all the slides.
Add slide transitions for even numbered slides
Hold down the CTRL key click on all the EVEN numbered slides to select them.
For Scrolling Left/Right:
-
Click on Animations, click on the drop down arrow for Slide Transitions, and under Push and Cover, choose Push Right.
-
Set the Transition Speed to Fast.
-
Uncheck the box for Advance Slide On Mouse Click.
For Scrolling Up/Down:
-
Click on Animations, click on the drop down arrow for Slide Transitions, and under Push and Cover, choose Push Down.
-
Set the Transition Speed to Fast.
-
Uncheck the box for Advance Slide On Mouse Click.
Change back to regular view by clicking on View, Normal View.
Set Action Settings
On the first slide
-
Go to the first slide and click on Insert.
-
Click on the Forward/Next Action Button to select it.
-
Click on Action on the ribbon.
-
Change the action from Hyperlink to Next Slide to Hyperlink to Slide 3 (next odd numbered slide).
-
Repeat this pattern: Forward/Next Action Button on Slide 3 should hyperlink to Slide 5, etc until all odd slides are set.
On the fourth slide
-
Go to the fourth slide and click on Insert.
-
Click on the Back/Previous Action Button to select it.
-
Click on Action on the ribbon.
-
Change the action from Hyperlink to Previous Slide to Hyperlink to Slide 2 (previous even numbered slide).
-
Repeat this pattern: Back/Previous Action Button on Slide 6 should hyperlink to Slide 4, etc until all even number slides are set.
Delete "extra" Action Buttons
On the first slide
-
Go to the first slide and click on the Back/Previous Action Button to select it.
-
Hit the delete key.
-
Repeat on Slide 2.
-
Go to the last slide, click on Forward/Next Action Button to select it.
Run your slideshow and text your scrolling pictures forward and back to make sure it runs correctly. Make any adjustments as needed.
Set up a custom show
Now set up this section of your presentation as a custom show.
-
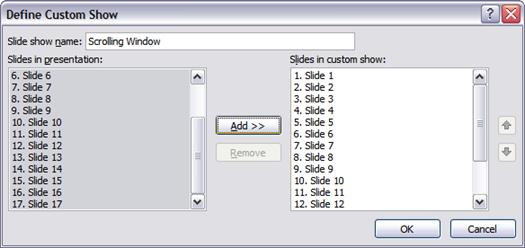
Click on Slideshow, Custom Slideshow, Custom Shows, New.
-
Enter a name for your scrolling window custom show.
-
Holding down the Shift key, click on Slide 1 in the left pane, scroll down and click on the last slide in the left pane. All your slides should be selected.
-
Click on the Add Button.
| |
| Define Custom Show dialog box |
-
Click OK and then click Close.
Add Title slide
-
Go to Slide 1.
-
Click on Home, New Slide, Title Slide.
-
In the Slides pane on the left, drag this new slide to be before the current slide 1.
-
Go to the new Title slide, add a shape to it, and then click on the shape to select it.
-
Click on Insert, Action.
-
Set the Mouse click action to Hyperlink to Custom Show, choose your custom show and check the box for Show and Return.
-
Click OK twice.
Continue to insert slides to complete your slideshow. Your scrolling slides should be at the end. To avoid running into them at the end of your presentation, insert a blank slide right before the first scrolling slide and set the background to black. See example below.
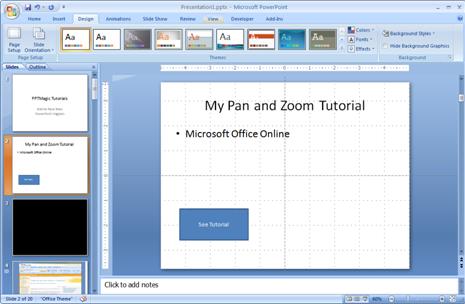 |
| Picture of a blank slide with a black background |
When you run your presentation, you can click on the shape to run the scrolling custom show.
Click on the action buttons to scroll left/right or up/down.
Hit the ESC key to exit the custom show and return to your slideshow.
Run the remainder of your presentation and hit the ESC key when the black slide is displayed to end your presentation.
| | Glenna Shaw is a Most Valued Professional (MVP) for PowerPoint and the owner of the PPT Magic Web site. She holds a Certificate in Accessible Information Technology and is a Certified Project Management Professional with the federal government. |



Microsoft Office Tutorials: Create A Scrolling Effect In Powerpoint 2007 >>>>> Download Now
ReplyDelete>>>>> Download Full
Microsoft Office Tutorials: Create A Scrolling Effect In Powerpoint 2007 >>>>> Download LINK
>>>>> Download Now
Microsoft Office Tutorials: Create A Scrolling Effect In Powerpoint 2007 >>>>> Download Full
>>>>> Download LINK iD