Create a contact group or distribution list in Outlook
Use a contact group (formerly called a "distribution list") to send an email to multiple people—a project team, a committee, or even just a group of friends—without having to add each name each time you want to write them. To create contact group:

For information about contact groups in for Mac, see Create a contact group in Outlook for Mac.
-
On the Navigation bar, click People.
-
For Outlook 2013:

-
For Outlook 2016:

-
-
Under My Contacts, pick where you want to add the contact group. For this example, click Contacts.
-
Click Home > New Contact Group.
-
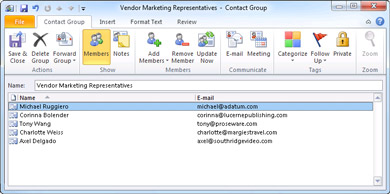
On the Contact Group tab, in the Name box, type a name for the group.
-
Click Add Members, and then add people from your address book or contacts list.

Note: To add someone who is not in your address book or contacts, create or add a person as a contact.
-
Click Save and Close.
To learn how to use your new contact group, see Send an email message to a contact group.
See also
Create a contact group from a list of names in an email message
In Outlook 2010, there is no maximum number of names that you can include in a contact group.
What do you want to do?
Create a contact group
-
Create a contact group with new names or names in the Address Book
-
In Contacts, on the Home tab, in the New group, click New Contact Group.

-
In the Name box, type a name for the contact group.
-
On the Contact Group tab, in the Members group, click Add Members, and then click From Outlook Contacts, From Address Book or New Email Contact.
-
If you are adding a new email contact, enter the information for the person in the Add New Member dialog box.
If you are adding a member from Outlook Contacts or an Address Book, do the following:
-
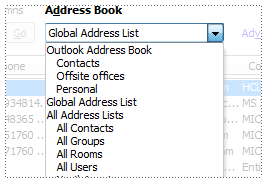
In the Address Book drop-down list, click the address book that contains the email addresses that you want to include in your contact group.
-
In the list of names, click the names that you want, and then click Members. You can add names from different address books to the same contact group.
-
-
Do this for each person whom you want to add to the contact group, and then click OK.
The contact group is saved in your Contacts folder under the name that you give it.
-
-
Create a contact group by copying names from an email message
-
In the message that you want to copy the names from, click the names in the To or Cc box.
-
Right-click your selection, and then click Copy.
-
In Mail, on the Home tab, in the New group, click New Items, then click More Items, and then click Contact Group.
-
In the Name box, type a name for the contact group.
-
On the Contact Group tab, in the Members group, click Add Members, and then click either From Outlook Contacts or From Address Book.
-
At the bottom of the Select Members dialog box, in the Members box, right-click, and then click Paste.
-
Note: A member doesn't have to be in your Address Book to be added to the contact group. The member's name and email address are included when you copy and paste from the original email message.
Add a contact group received from someone
When you receive a message that includes a contact group that you want to use, you can save it to your Contacts.
-
Open the message that contains the contact group.
-
In the To or Cc box, right-click the contact group, and then click Add to Outlook Contacts.
Add or delete a name in a contact group
Show me the names in a contact group
Do one of the following:
-
View the names in the Address Book
-
In a new message, click To.
-
In the Address Book drop-down list, click the address book that contains the contact group that you want information about.
Tip: Not seeing the right contact group? You might need to add an address book first.
-
Browse for the name of the contact group, or type it in the Search box.
-
In the Name list, right-click the contact group that you want, and then click Properties.
-
-
View the names in the header of a message or meeting request
-
In the To box, click the plus sign (+) next to the name of the contact group.
Note: After the list is expanded, you can't collapse the list again in that message.
-
-
In Contacts, open the contact group.
Note: In list views, contact groups are marked with the contact group
 icon.
icon. -
Do one or more of the following:
-
Add an address from an address book or a contacts folder
-
On the Contact Group tab, in the Members group, click Add Members, and then click From Outlook Contacts or From Address Book.
-
In the Address Book drop-down list, click the address book that contains the email addresses that you want in your contact group.
-
Browse for the name that you want, or type it in the Search box.
-
In the Name list, click the name, and then click Members. Do this for each person whom you want to add to the contact group, and then click OK.
-
-
Add an address that is not in a contacts folder or an address book
-
On the Contact Group tab, in the Members group, click Add Members, and then click New E-mail Contact.
-
Type the information for the email address, and then click OK.
-
-
Remove a name
-
In the list of names, click the name that you want to remove, and then on the Contact Group tab, in the Members group, click Remove Member.
-
-
See also
What do you want to do?
Create a distribution list
Distribution lists are stored by default in your Contacts folder. If you use a Microsoft Exchange account, your Global Address List can contain global distribution lists, which are available to everyone who uses that network. The personal distribution lists that you create in your Contacts folder are available only to you, but you can share them by sending them to others.
How many names can I include in a distribution list?
| The maximum number of names that you can include in a distribution list depends on the size of the contact files (for each contact) themselves. There are no hard and fast rules but in general, a distribution list can contain between 50-70 names and e-mail addresses. A maximum number of e-mail addresses, with minimum contact file size, is approximately 125, and this can include other distribution lists. For more information see the Knowledge Base article on the maximum size for distribution lists. |
Do one of the following:
-
Create a distribution list by using names in the Address Book
-
On the File menu, point to New, and then click Distribution List.
-
In the Name box, type the name of your distribution list. (For example, "Political Friends.")
-
On the Distribution List tab, click Select Members.
-
In the Address Book drop-down list, click the address book that contains the e-mail addresses you want to include in your distribution list.

-
In the Search box, type a name that you want to include. When the name you're searching for appears in the list below, click it, and then click Members.
-
Do this for each person whom you want to add to the distribution list, and then click OK.
If you want to add a longer description of the distribution list, on the Distribution List tab, click Notes, and then type the text.
The distribution list is saved in your Contacts folder under the name that you give it.
-
-
Create a distribution list by copying names from an e-mail message
-
In the message that you want to copy the names from, select the names in the To or Cc box.
-
Right-click your selection, and then click Copy on the shortcut menu.
-
Click the Microsoft Office Button
 , and under Create New Outlook Item, click Distribution list.
 -
On the Distribution List tab, in the Members group, click Select Members.
-
At the bottom of the Select Members dialog box, in the Members box, right-click and then click Paste on the shortcut menu.
Note: A member does not need to be in your Address Book in order to be added to the distribution list. The member's name and e-mail address will be included when you copy and paste from the original e-mail message.
-
Click OK.
-
In the Name box, type a name for the distribution list.
-
On the Distribution List tab, in the Actions group, click Save & Close.
-
Add a distribution list received from someone else to your Contacts
Distribution lists are stored by default in your Contacts folder. When you receive a distribution list from someone else, you can save it to your Contacts.
-
Open the message that contains the distribution list.
-
In the header of the message, right-click the distribution list, and then click Add to Outlook Contacts on the shortcut menu.
Add or delete a name in a distribution list
You edit a distribution list by adding or deleting names.
Show me the names in a distribution list
Do one of the following:
-
View the names in the Address Book
-
In a new message, click To.
-
In the Address Book drop-down list, click the address book that contains the distribution list that you want information about.
-
In the Search box, type the name of the distribution list.
-
In the Name list, right-click the distribution list, and then click Properties on the shortcut menu.
Why don't I see the Name list in the Address Book?
You may have used the More columns search option the last time that you used the Address Book. To restore the name list view, click Name only next to Search.
-
View the names in the header of a message or meeting request
-
In the To box, click the plus sign (+) next to the name of the distribution list.
Note: After the list is expanded, you cannot collapse the list again. Distribution lists in the E-mail field of a contact cannot be expanded
-
-
In Contacts, open the distribution list.
Note: In list views, distribution lists are marked with
 .
. -
Do one or more of the following:
-
Add an address from an address book or a contacts folder
-
On the Distribution List tab, click Select Members.
-
In the Address Book drop-down list, click the address book that contains the e-mail addresses you want in your distribution list.
-
In the Search box, type a name you want to include.
-
In the Name list, click the name, and then click Members. Do this for each person whom you want to add to the distribution list, and then click OK.
Why don't I see the Name list in the Address Book?
You may have used the More columns search option the last time that you used the Address Book. To restore the name list view, click Name only next to Search.
-
-
Add an address that is not in a contacts folder or an address book
-
On the Distribution List tab, click Add New.
-
Type the information for the e-mail address, and then click OK.
-
-
Delete a name
-
Click the name, and then click Remove.
-
-
No comments:
Post a Comment