Create and print notes pages
You can create notes pages as you build your presentation. You may want to print them and review them as you deliver your presentation.
A Green Idea... 
However, before printing notes pages, consider viewing your notes in Presenter View instead. You can view your notes as you deliver your presentation on a second monitor to conserve paper and printer ink. For more information, see View your speaker notes privately, while delivering a presentation on multiple monitors.
Create notes pages
Use the notes pane in Normal view to write notes about your slides. To get to Normal view, on the View tab, in the Presentation Views group, click Normal.

You can type and format your notes as you work in Normal view, but to see how your notes pages will print and to see the full effect of any text formatting, such as font colors, switch to Notes Page view. You can also check and change the headers and footers of your notes in Notes Page view.
Each notes page shows a slide thumbnail, together with the notes that accompany that slide. In Notes Page view, you can embellish your notes with charts, pictures, tables, or other illustrations.
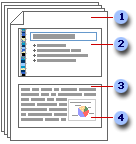
(The following numbers correspond to the numbers in the illustration.)
-
Notes pages include your notes and each slide in the presentation.
-
Each slide prints on its own notes page.
-
Your notes accompany the slide.
-
You can add data, such as charts or pictures, to your notes pages.
As you add notes, keep the following in mind:
-
The changes, additions, and deletions that you make on a notes page apply only to that notes page and to the note text in Normal view.
-
If you want to enlarge, reposition, or format the slide image area or notes area, make your changes in Notes Page view.
-
You can't draw or put pictures in the notes pane in Normal view. Switch to Notes Page view and draw or add the picture there.
-
Pictures and objects that you add in Notes Page view appear on your printed notes page, but not on your screen in Normal view.
Create more space for your notes
A default notes page consists of a slide thumbnail on the top half of the page and an equally sized section for notes on the lower half of the page.
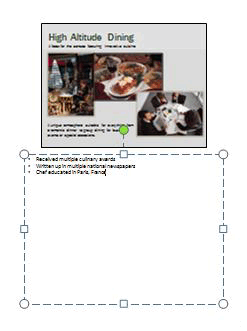
If a half page isn't enough space for your notes, you can add more room.
To add more space on a single notes page:
-
In Normal view, in the pane that contains the Outline and Slides tabs, click the Slides tab, and then click the slide to which you want to add more space for notes.
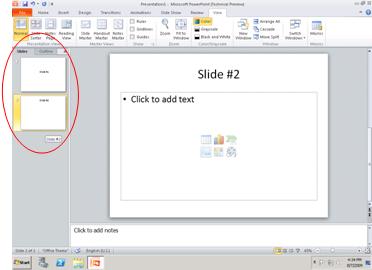
-
On the View menu, in the Presentation Views group, click Notes Page.
-
Do one of the following:
-
To delete the slide thumbnail, on the notes page, click the slide, and then press DELETE.
-
To decrease the size of the slide thumbnail on the notes page, drag a sizing handle on the slide thumbnail.
-
-
On the top border of the notes placeholder, drag the sizing handle to enlarge the notes placeholder to as much of the page as you need.
Add art or formatting to all notes pages
To add art, such as a shape or picture, or to format all the notes pages in your presentation, change the Notes Master. For example, to put a company logo or other piece of art on all notes pages, add the art to the Notes Master. Or, if you want to change the font style for all notes, change the style on the Notes Master. You can change the look and position of the slide area, notes area, headers, footers, page numbers, and date.
Print notes pages with slide thumbnails
You can print your notes pages with a slide thumbnail to hand out to your audience or to help you prepare for your presentation.
Note: You can print only one slide thumbnail with notes per printed page.
-
Open the presentation for which you want to print notes pages with slide thumbnails.
-
Click the File tab.
-
On the left side of the File tab, click Print.
-
Under Settings, click the arrow next to Full Page Slides, and then under Print Layout, click Notes Pages.
-
To specify the page orientation, click the arrow next to Portrait Orientation, and then click Portrait Orientation or Landscape Orientation in the list.
-
If you want to print your notes and slide thumbnails in color, select a color printer. Click the arrow next to Color, and then click Color in the list.
-
Click Print.
Print notes pages without slide thumbnails
Note: You can print only one notes page per printed page.
-
Open the presentation for which you want to print notes pages without slide thumbnails.
-
Open each slide in Notes Page view. To get to Notes Page view, on the View menu, in the Presentation Views group, click Notes Page.
-
Delete the slide thumbnail from each of the notes pages. To delete the slide thumbnail, on the notes page, click the slide thumbnail, and then press DELETE.
-
Click the File tab.
-
On the left side of the File tab, click Print.
-
Under Settings, click the arrow next to Full Page Slides, and then under Print Layout, click Notes Pages.
-
To specify the page orientation, click the arrow next to Portrait Orientation, and then click Portrait Orientation or Landscape Orientation in the list.
-
If you want to print your notes and slide thumbnails in color, select a color printer. Click the arrow next to Color, and then click Color in the list.
-
Click Print.
Create notes pages
Use the notes pane in Normal view to write notes about your slides.
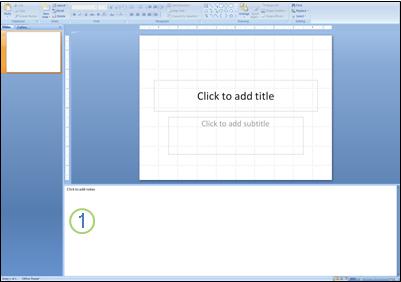
1. Notes pane in Normal view
You can type and format your notes as you work in Normal view, but to see how your notes pages will print and to see the full effect of any text formatting, such as font colors, switch to Notes Page view. You can also check and change the headers and footers of your notes in Notes Page view.
Each notes page shows a slide thumbnail, along with the notes that go with that slide. In Notes Page view, you can embellish your notes with charts, pictures, tables, or other illustrations. For more information about adding an effect, picture, or WordArt to your notes pages, see Add an effect, text box, WordArt, picture, or shape to notes pages.

1. Notes pages include your notes and each slide in the presentation.
2. Each slide prints on its own notes page.
3. Your notes accompany the slide.
4. You can add data, such as charts or pictures, to your notes pages.
Pictures and objects that you add in Notes Page view appear on your printed notes page, but not on your screen in Normal view. If you save your presentation as a Web page, pictures and objects do not appear when you display your presentation in the Web browser, although your notes do.
The changes, additions, and deletions that you make on a notes page apply only to that notes page and to the note text in Normal view.
If you want to enlarge, reposition, or format the slide image area or notes area, make your changes in Notes Page view.
You can't draw or place pictures in the notes pane in Normal view. Switch to Notes Page view and draw or add the picture there. To add an effect, picture, or WordArt to your notes pages, see Add an effect, text box, WordArt, picture, or shape to notes pages.
Create more space for your notes
A default notes page consists of a slide thumbnail on the top half of the page and an equally sized section for notes on the lower half of the page.

If half of a page isn't enough space for your notes, do one of the following to add more room for your notes:
-
To add more space on a single notes page, do the following:
-
In Normal view, in the pane that contains the Outline and Slides tabs, on the Slides tab, click the slide to which you want to add more space for notes.
-
On the View menu, in the Presentation Views group, click Notes Page.
-
Do one of the following:
-
To delete the slide thumbnail, on the notes page, click the slide, and then press Delete.
-
To decrease the size of the slide thumbnail on the notes page, drag a sizing handle on the slide thumbnail.
-
-
On the top border of the notes placeholder, drag the sizing handle to enlarge the notes placeholder to as much of the page as you need.
-
-
If you need more than one page for your notes, do the following:
-
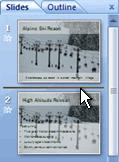
In Normal view, in the pane that contains the Outline and Slides tabs, on the Slides tab, click the space after the slide that you want to add more notes to.
-
On the Home tab, in the Slides group, click New Slide, and then click Custom Layout.
-
In Normal view, in the pane that contains the Outline and Slides tabs, on the Slides tab, right-click the slide that you just added, and then click Hide Slide.
Notes:
-
In the Slides tab, the hidden slide icon
 appears with the slide number inside, next to the slide thumbnail that you hid.
 -
Hidden slides do not appear in your presentation unless you unhide them by right-clicking the slide thumbnail again, and then clicking Hide Slide again.
-
-
On the View menu, in the Presentation Views group, click Notes Page.
-
On the notes page, click the slide, and then press Delete.
-
Drag the sizing handle on the top border of the notes placeholder to encompass the whole page.
Note: After you have filled up the notes for your visible slides, you will need to open your hidden slides in Notes Page view and resume typing your notes.
-
To add more hidden slides to act as additional notes pages, repeat steps 1 through 6.
-
Add art or formatting to all notes pages
To add art, such as a shape or picture or to format all of the notes pages in your presentation, change the Notes master. For example, to put a company logo or other piece of art on all of your notes pages, add the art to the Notes Master. Or, if you want to change the font style for all notes, change the style on the Notes Master. You can change the look and position of the slide area, notes area, headers, footers, page numbers, and date.
Display notes pages on a Web page
If you save your presentation as a Web page, your notes are automatically displayed unless you choose to hide them. The slide titles become a table of contents in the presentation, and your slide notes appear beneath each slide. Your notes can fill the role of the speaker, giving your audience the background and details that a speaker would provide during a live presentation.
If you don't want your notes to be displayed on the Web page, you can turn them off before you save the file as a Web page.
Print notes pages with slide thumbnails
You can print your notes pages with a slide thumbnail to hand out to your audience or to help you prepare for your presentation. When you print this way, you can print only one slide thumbnail per page.
-
Open the presentation for which you want to print notes pages with slide thumbnails.
-
Click the Microsoft Office Button
 , click the arrow next to Print, and then click Print Preview.
 -
In the Page Setup group, click the arrow under the Print What box, and then click Notes Pages.
-
To specify the page orientation, click the arrow under Orientation, and then click Portrait or Landscape.
-
To set headers and footers, click Options, and then click Header and Footer.
-
Click Print.
Note: If you want to print your notes and slide thumbnails in color, select a color printer. Click the Microsoft Office Button
 , click the arrow next to Print, and then click Print Preview. Under Print, click Options, point to Color/Grayscale, and then click Color.
Print notes pages without slide thumbnails
-
Open the presentation for which you want to print notes pages without slide thumbnails.
-
Open up each slide in Notes Page view.
-
Delete the slide thumbnail from each of the notes pages.
-
Click the Microsoft Office Button
 , click the arrow next to Print, and then click Print Preview.
 -
In the Page Setup group, click the arrow under the Print What box, and then click Notes Pages.
-
To specify the page orientation, click the arrow under Orientation, and then click Portrait or Landscape.
-
To set headers and footers, click Options, and then click Header and Footer.
-
Click Print.
No comments:
Post a Comment