Business Information, Design Checker, and Commercial Print Settings
The Backstage view of Microsoft Publisher 2010 includes information about the Business Information, Design Checker, and Commercial Print Settings for your publication. You can create, view and edit the business information set for your publication. You can run the Design Checker to see potential problems and fixes for your publication. You can view and set the color model, font embedding and substitution, and color registration settings for taking your publication to a commercial printer. The current Business Information and color model information for your publication are displayed on the Info tab of the Backstage view.
In this article
Business Information
Business information sets are customized groups of information, about either an individual or an organization that can be used to quickly fill in appropriate places in publications, such as business cards and flyers.
The business information set can include components such as an individual's name, job position or title, organization name, address, phone and fax numbers, e-mail address, tagline or motto, and logo. You can create as many different business information sets as you want.
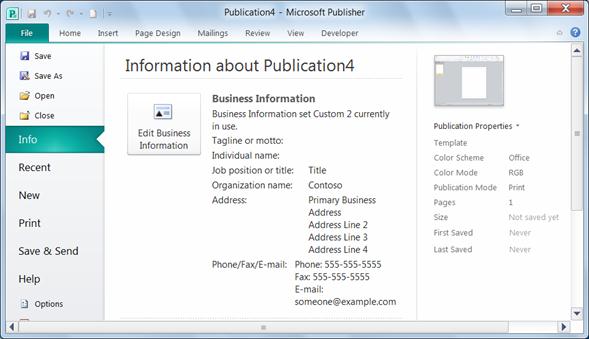
When you create a publication, the business information set that you have used most recently is used to populate the new publication. The current Business Information for your publication is displayed on the Info tab of the Backstage view.

Create a business information set
-
Click the File tab.
-
Choose Info and then select Edit Business Information.
Note: If you don't already have a Business Information set you will go directly to step 4.
-
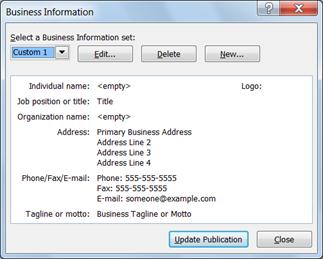
In the Business Information dialog, click New.

-
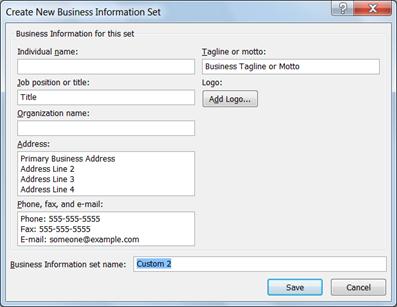
In the Create New Business Information Set dialog, enter the information you want, in the Business information set name text box enter a name, and click Save.

-
If you want to immediately use the new information set in your publication, click Update Publication in the Business Information dialog that comes up right after you click the Save button.
Edit or delete a business information set
-
Click the File tab.
-
Choose Info and then select Edit Business Information.
-
In the Business Information dialog select the information set you want to edit or delete.
-
To edit the information set, click Edit and then in the Edit Business Information Set edit the fields you want to change and click Save.
-
To delete the information set click Delete and then Yes.
Design Checker
The Design Checker task pane will list all of the design problems that are detected in your publication, such as design elements that are partially off the page, overflow text in a story, or a picture that is scaled disproportionately. In some cases, you will have the option of choosing an automatic fix for these problems. In other cases, you will have to fix the problem manually.
-
Click the File tab.
-
Choose Info and then select Run Design Checker.
For more information on Design Checker please see: Design Checker.
Commercial Print Settings
Offset printing requires that a professional press operator set up and run the print job. Generally, every ink that is needed to print the publication requires more setup for the operator and increases the cost. The number of inks that you need depends on the color model that you choose. The current color model information for your publication is displayed on the Info tab of the Backstage view

Color models
When you set up color printing for your publication, you can choose from the following color models. Check with your commercial printer to find the preferred color model.:
-
Any color (RGB)
-
Single color
-
Spot colors
-
Process colors (CMYK)
-
Process plus spot colors
Any color (RGB)
If you print by using a digital color printer (such as a color desktop printer), you use the RGB (Red, Green, Blue) color model. When you print a few copies, this is the least expensive color model to print. RGB colors have the highest degree of variability of any color model, however, which makes it difficult to match colors between print jobs.
Single color
If you print by using one color, everything in your publication is printed as a tint of a single ink, which is usually black. This is the least expensive color model to print on an offset press because it requires only one ink.
Spot colors
If you print by using a spot color, everything in your publication is printed as a tint of a single ink — usually black — and a tint of one additional color, the spot color, which is usually used as an accent. Publisher offers the option of using Pantone® colors for spot color jobs.
This color model requires a minimum of two inks and can increase the cost of printing on an offset press with each ink that you add.
Note: In some cases, printing spot colors may be more expensive than using process colors. This is commonly the case for short-run jobs.
Process colors
If you use this color model, your publication is printed in full color by combining varying percentages of the process-color inks cyan, magenta, yellow, and black, which are typically shortened to CMYK (Cyan, Magenta, Yellow, Key). Although you can combine these four inks to get almost a full range of colors, you can't get some colors. For example, the CMYK color model can't produce metallic colors or colors that are highly saturated.
Process-color printing always requires setting up the press with the four CMYK inks. It also requires skill on the part of the press operator to line up the impression of one ink with the others, which is called registration. These requirements make process-color printing more expensive than spot-color printing.
Process plus spot colors
This color model is the most expensive to print because it combines process-color printing (four inks) with one or more spot-color inks. You use this color model only if you want both full color plus a highly saturated or metallic color that can't be produced by using CMYK.
Choose a color model
When you choose a color model in Publisher, the Color Picker displays only those colors that are available in the color model that you choose. For example, if you set your color model to Single Color, you can choose only line, fill, and text colors that you can make with that single ink color. If you set the color model to Spot Colors, you can choose only line, fill, and text colors that can be made by using your spot color inks.
To choose the color model for your publication, do the following:
-
Click the File tab.
-
Choose Info, select Commercial Print Settings, and then click Choose Color Model.
-
In the Color Model dialog box, under Define all colors as, click the color model that you want to use.

-
If you choose either Spot colors or Process colors plus spot colors, you can click the New Ink button to choose additional spot color inks.
-
Click OK.
Manage embedded fonts
Embedding the fonts in your publication is one of the best ways to ensure that a font is always available, even if you move the publication to a new computer or take it to a commercial printing service.
You can embed only TrueType fonts, and then only if their licensing allows embedding. All of the TrueType fonts that are included in Publisher allow embedding.
Embedded fonts increase the file size of your publication, so you may want to limit the number of fonts that you embed. You can choose to embed all fonts (with or without system fonts), only certain individual fonts, or subsets of certain fonts.
Note: Publisher embeds TrueType fonts by default when you use the Pack and Go Wizard to prepare your publication to take to a commercial printing service. You do not need to select this in the Fonts dialog box before you run the wizard.
Embed all TrueType fonts
When you embed the fonts in your publication, common system fonts are not included in the embedded fonts because they are likely to be installed on most other computers. You can choose whether to embed the system fonts. (For example, you may choose to embed them when you know that someone working with your publication does not have access to them.)
-
Click the File tab.
-
Choose Info, select Commercial Print Settings, and then clickManage Embedded Fonts.
-
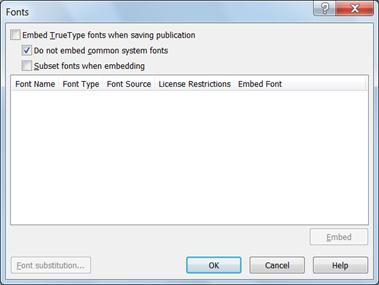
In the Fonts dialog box, select the Embed TrueType fonts when saving publication check box.
-
To embed system fonts, clear the Do not embed common system fonts check box.

Note: If Publisher notifies you that you used fonts that cannot be embedded, click OK. Check with your commercial printing service to make sure the service has access to the fonts that were not embedded. If the printing service does not have access to these fonts, you will need to discuss using substitute fonts in your publication.
Registration Settings
Registration is the process of printing overlapping colors on a single image. This process can create gaps between the colors. Trapping is a means of overlapping adjacent colors to avoid gaps during printing caused by poor color registration. Consult with your commercial print operator regarding the use of registration settings.
For more information on trapping, please see About Trapping for Print.
Fantastic Post! Lot of information is helpful in some or the other way. Keep updating
ReplyDeletebest commercial printers for sale