Insert or draw a table
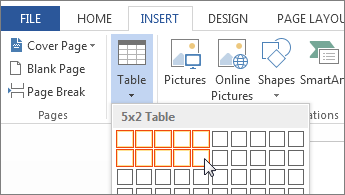
To quickly insert a basic table, click Insert > Table and move the cursor over the grid until you highlight the number of columns and rows you want.

Click and the table appears in the document. If you need to make adjustments, you can add table rows and columns, delete table rows and columns, or merge table cells into one cell.
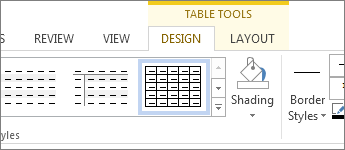
When you click in the table, the Table Tools appear.

Use Table Tools to choose different colors, table styles, add a border to a table or remove borders from a table. You can even insert a formula to provide the sum for a column or row of numbers in a table.
If you already have text in your document that would look better as a table, Word can convert the text to a table.

Insert larger tables or tables with custom widths
Note: Applies to desktop versions of Word only. Does not apply to Word Online.
For larger tables and for more control over the columns, use the Insert Table command.

This way you can create a table with more than ten columns and eight rows, as well as set the column width behavior.
-
Click Insert > Table > Insert Table.
-
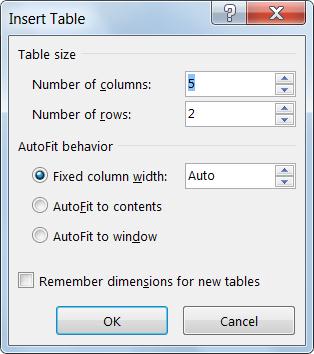
Set the number of columns and rows

-
In the AutoFit behavior section you have three options for setting how wide your columns are:
-
Fixed column width: You can let Word automatically set the column width with Auto, or you can set a specific width for all of your columns.
-
AutoFit to contents: This will create very narrow columns that will expand as you add content.
-
AutoFit to window: This automatically changes the width of the entire table to fit the size of your document.
-
-
If you want each table you create to look like the table you're creating, check Remember dimensions for new tables.
Design your own table by drawing
Note: Applies to desktop versions of Word only. Does not apply to Word Online.
If you want more control over the shape of your table's columns and rows or something other than a basic grid, the Draw Table tool helps you draw exactly what you want.

You can even draw diagonal lines and cells within cells.
-
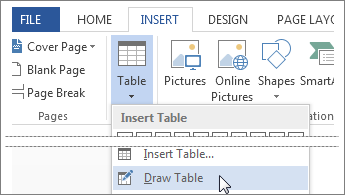
Click Insert > Table > Draw Table. The pointer changes to a pencil.
-
Draw a rectangle to make the table's borders. Then draw lines for columns and rows inside the rectangle.

-
To erase a line:
-
In Word 2013 and Word 2016: Click the Table Tools Layout tab.
-
In Word 2007 and Word 2010: Click the Table Tools Design tab.
Click Eraser, and then click the line that you want to erase.

-
-
If you want to distribute all of the rows and columns evenly, on the Table Tools Layout tab, in the Cell Size group, click Distribute Rows or Distribute Columns.
Microsoft Office Tutorials: Insert Or Draw A Table >>>>> Download Now
ReplyDelete>>>>> Download Full
Microsoft Office Tutorials: Insert Or Draw A Table >>>>> Download LINK
>>>>> Download Now
Microsoft Office Tutorials: Insert Or Draw A Table >>>>> Download Full
>>>>> Download LINK Md