Add a background picture (or watermark) to slides
Using a faint graphic as a watermark in the background of your slides is a great way to display your company logo or other meaningful image. Adjust the brightness or transparency (depending on your version of PowerPoint) to make a background image appear faintly enough to be visible but not interfere with the primary content on top of it.

You can add the background picture to multiple slides at once (by using Slide Master view), or to individual slides. The procedure is the same, except for the starting point, as explained in step 1.
-
Do you want to watermark individual slides, or do you want to systematically watermark multiple slides? Follow the appropriate sub-step:
-
To add a background picture to an individual slide or slides In Normal view, in the thumbnail pane on the left, select a slide. (To select more than one, click one slide, and then press and hold Ctrl while you click the other slides.)
-
To systematically add a background picture to multiple slides or all slides On the ribbon, click View > Slide Master. In the thumbnail pane on the left, select the slide layouts that you want to add a picture watermark to. (To select multiple layouts, click one, and then press and hold Ctrl while you click the others.)
-
-
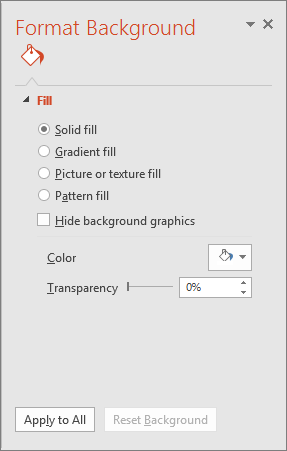
Right-click your selection in the thumbnail pane, and then select Format Background.

-
In the Format Background pane on the right, select Picture or Texture Fill, and then, under Insert picture from, do one of the following:
-
Select File, choose the picture that you want, and then select Insert to insert a picture from your device.
-
Select Clipboard to insert a picture you've copied to the clipboard.
-
Select Online and type a description in the search box of the type of image you want to choose a picture from an online resource.
The selected image is sized to fill the entire slide background. It can't be resized as simply as a foreground picture can, but you can use the Offset settings to adjust its placement. Or you can use the Tile the picture as texture option to repeat the image horizontally and vertically throughout the background.
-
-
Once you've inserted a picture, go to the Format Background pane and slide the Transparency bar to set the transparency percentage.
-
(Optional) If you were to decide that you want the watermark to appear on all slides in the presentation rather than just the slides or layouts you initially selected, in the Format Background pane, click Apply to all.
-
Save your presentation (File > Save).
-
If you're working in Slide Master view, select Close Master View when you're done making changes.
Need more help?
(The key steps for making the image a background image are the last three steps—6, 7, 8.)
-
Click the slide that you want to add a watermark to.
To add a watermark to all of the slides in a blank presentation, go to View > Slide Master.

Tip: If your completed presentation contains one or more master slides, you might not want to apply the background to the master slides and risk unwanted changes to your presentation. The safe alternative is to add the background to one slide at a time.
-
Select the Insert tab on the ribbon and do one of the following.
-
To use a picture as a watermark, select Picture, choose the picture that you want, and then click Insert.
-
To paste a picture that you copied, select Clipboard.
-
-
To adjust the size of the picture, right-click the image on the slide, and then click Size and Position on the shortcut menu.
-
In the Size pane, under Scale, increase or decrease the settings in the Height and Width boxes.
-
To maintain proportional height and width of the picture or clip art when scaling, select the Lock aspect ratio check box.
-
To center your image on the slide, select the Scale relative to original picture size check box.
-
-
To move the picture or clip art on the slide, click the Position tab, and then enter the settings for the positions that you want in the Horizontal and Vertical boxes.
-
Under Picture Tools, on the Format tab, in the Adjust group, click Color, and then under Recolor, click the color fade that you want.

Tip: If you don't see the Picture Tools or Format tabs, make sure that you've selected the image.
-
Under Picture Tools, go to Format > Correction >Picture Corrections Options, and then under Brightness and Contrast, select the brightness percentage that you want.


-
To send the watermark to the back of the slide, go to Format > Picture Tools, click the arrow next to Send Backward, and then click Send to Back.
(The key steps for making the image a background image are the last three steps—6, 7, 8.)
Add a picture or clip art as a slide background
-
Click the slide that you want to add a watermark to.
To add a watermark to all of the slides in a blank presentation, on the View tab, in the Presentations Views group, click Slide Master.

If your completed presentation contains one or more master slides, you might not want to apply the background to the master slides and risk unwanted changes to your presentation. The safe alternative is to add the background to one slide at a time.
-
On the Insert tab, in the Illustrations group, do one of the following.

-
To use a picture as a watermark, click Picture, locate the picture that you want, and then click Insert.
-
To use clip art as a watermark, click Clip Art. In the Clip Art task pane, in the Search for box, either type a word or phrase that describes the clip that you want, or type all or part of the file name of the clip, and then click Go.
When you search for clip art and pictures online, you'll be directed to Bing. You're responsible for respecting copyright, and the license filter in Bing can help you choose which images to use.
In the Search text box, type a word or phrase that describes the clip that you want, or type all or part of the file name of the clip.
-
-
To adjust the size of the picture or clip art, right-click the picture or clip art on the slide, and then click Size and Position on the shortcut menu.
-
On the Size tab, under Scale, increase or decrease the settings in the Height and Width boxes.
To maintain proportional height and width of the picture or clip art when scaling, select the Lock aspect ratio check box.
To center your picture or clip art on the slide, select the Scale relative to original picture size check box.
-
To move the picture or clip art on the slide, click the Position tab, and then enter the settings for the positions that you want in the Horizontal and Vertical boxes.
-
Under Picture Tools, on the Format tab, in the Adjust group, click Recolor, and then under Light Variations, click the color fade that you want.

-
Under Picture Tools, on the Format tab, in the Adjust group, click Brightness, and then click the brightness percentage that you want.

At this point, you can drag the watermark anywhere on the background of slides that already contain text, or you can add text to one or more slides and then drag the watermark onto the backgrounds of the slides.

-
When you finish editing and positioning the watermark and are satisfied with its appearance, to send the watermark to the back of the slide, under Picture Tools, on the Format tab, in the Arrange group, click Send to Back.
Add a SmartArt graphic as a slide background
-
Right-click the SmartArt graphic, and then click Copy. (Before beginning this procedure, you should have created the SmartArt graphic that you want to use for a slide background.)
-
Click the slide that you want to add a background SmartArt graphic to.
To select multiple slides, click a slide, and then press and hold CTRL while you click the other slides.
-
On the Design tab, in the Background group, click Background Styles, and then click Format Background.

-
Click Picture or texture fill, and then click Clipboard.
-
To center, stretch, or shrink your SmartArt graphic in the background, adjust the Stretch options.
-
To specify how much you can see through the SmartArt graphic, move the Transparency slider or enter a number in the box next to the slider.
-
Do one of the following:
-
To use the SmartArt graphic as a background for the slides that you selected, click Close.
-
To use the SmartArt graphic as a background for all of the slides in your presentation, click Apply to All.
-


This comment has been removed by the author.
ReplyDelete