Monday, November 30, 2020

Video insert excel data in powerpoint

Your browser does not support video.

Try it!

In PowerPoint, you can embed tables and worksheets from Excel in your presentation slides.

  1. In Excel, click and drag to highlight the cells you want to copy.

  2. Right-click the copied cells and select Copy.

  3. In your PowerPoint presentation, right-click and select the Paste Options you want:

    • Use Destination Styles – Choose to edit your copied cells like a PowerPoint table, but with PowerPoint's color scheme and fonts.

    • Keep Source Formatting – Choose to keep your table editable in PowerPoint while maintaining the same source formatting from Excel.

    • Embed – Choose to keep a copy of your table in PowerPoint in case you want to edit the data, which will open in Excel.

      Note: If you're working with a large Excel file, it'll inflate your PowerPoint presentation to a big size. You may also unintentionally be giving more access to your Excel file than you intend to.

    • Picture – Choose to paste your table as a picture to get the same benefits as embedding except you can format your cells like a picture and add effects to it. You won't be able to edit data once it's been pasted though.

    • Keep Text Only – Choose to paste your table as straight text and to do all formatting in PowerPoint.

  4. If you pasted as a picture, on the Picture Tools Format tab, select the quick picture style you want to use. Adjust the table to your liking.

Want more?

Insert Excel data in PowerPoint

Copy an Excel chart to another Office program

Create a uml activity diagram

A UML activity diagram in Visio looks like a flow chart. The flow of control is triggered by the completion of actions (or activities) within the system. The flow may be sequential, concurrent, or branched, indicated by shapes such as swimlanes, forks, and joins.

Use an activity diagram to describe how several activities are coordinated to provide a service or other end result. Activity diagrams can show how the events in a use case relate to one another, or how a collection of use cases coordinate to represent a business workflow.

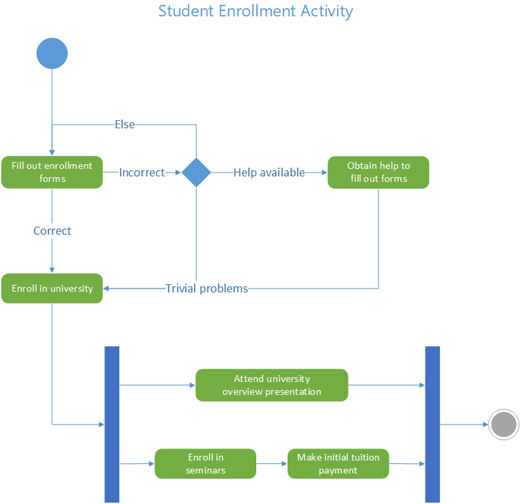
A sample of a UML activity diagram showing the flow of control for student enrollment at university.

If you want to represent a flow in response to external events instead, use a state machine diagram.

Start an activity diagram

  1. Start Visio. Or if you have a file open already, click File > New.

  2. In the Search box, type UML activity.

  3. Select the UML Activity diagram.

  4. In the dialog box, select either Metric Units or US Units.

  5. Select Create.

  6. The diagram opens. You should see the Shapes window next to the diagram. If you don't see it, go to View > Task Panes and make sure that Shapes is selected. If you still don't see it, click the Expand the Shapes window button on the left.

  7. On the View tab, make sure the check box next to Connection Points is selected. This option makes connection points appear when you start connecting shapes.

  8. You can now insert swimlanes and build the activity control flow in the diagram.

Design your diagram

  • If you want to indicate responsibility in the activity diagram, drag a Swimlane shape onto the page for each class, person, or organizational unit you want to represent. To do that:

    1. Drag a Swimlane shape onto the drawing page.

      Swimlane shape.

    2. Double-click each label on the shape to change the default name.

    3. Repeat steps a and b until you've added all the partitions or organizational units you need.

    4. Drag the side selection handles on the swimlane shapes to make the lanes the size you want.

  • Use the Initial node and Final node shapes to represent initial and final pseudo states.

    Initial node.   Final node.

  • Add an Action shape for each action or activity state you want to represent.

    Action shape.

  • Use a Decision shape with guard conditions to indicate a possible transition from an action state.

    Decision shape.

  • Use the Fork node to represent the forking of one action state into multiple parallel states.

    Fork node.

  • Use the Join node to represent the synchronization of multiple action states into one state.

    Join node.

Start an activity diagram

  1. Open Visio for the web and search for UML Activity or scroll down in the Gallery to the UML Activity row.

  2. Start with a blank UML activity template or a UML activity starter diagram. Select Create on the one you want to use.

    You can now insert swimlanes and build the activity control in the diagram.

Design your diagram

  • If you want to indicate responsibility in the activity diagram, drag a Swimlane shape onto the page for each class, person, or organizational unit you want to represent. To do that:

    1. Drag a Swimlane shape onto the drawing page.

      Swimlane shape.

    2. Double-click each label on the shape to change the default name.

    3. Repeat steps a and b until you've added all the partitions or organizational units you need.

    4. Drag the side selection handles on the swimlane shapes to make the lanes the size you want.

  • Use the Initial node and Final node shapes to represent initial and final pseudo states.

    Initial node.   Final node.

  • Add an Action shape for each action or activity state you want to represent.

    Action shape.

  • Use a Decision shape with guard conditions to indicate a possible transition from an action state.

    Decision shape.

  • Use the Fork node to represent the forking of one action state into multiple parallel states.

    Fork node.

  • Use the Join node to represent the synchronization of multiple action states into one state.

    Join node.

Start an activity diagram

  1. Open the UML model diagram that contains the UML element for which you want to create an activity diagram.

  2. In the tree view, right-click the icon for the package, subsystem, class, operation, or use case in which you want to create an activity diagram. Point to New, and then click Activity Diagram.

    A blank page appears, and the UML Activity stencil becomes the top-most stencil. The workspace displays 'Activity' as a watermark. An icon representing the diagram is added to the tree view.

    Note: If the tree view is not visible, on the UML menu, point to View, and then click Model Explorer.

Design your diagram

  1. If you want to indicate responsibility in the activity diagram, drag a Swimlane shape onto the page for each class, person, or organizational unit you want to represent.

    1. From the Activity stencil, drag a Swimlane shape onto the drawing page.

    2. Double-click the shape to add a name and other property values.

    3. Repeat steps a and b until you've added all the partitions or organizational units you need.

    4. Drag the side selection handles on the Swimlane shapes to make the lanes the size you want.

    5. Drag State, Action State, Object In State and Signal Receipt or Signal Send shapes into the areas defined by the swimlanes and connect them using Control Flow and Object Flow shapes.

  2. Drag an Action State or State shape onto the drawing page for each action or activity state you want to represent. Use the Initial State and Final State shapes to represent initial and final pseudo states. Work with state shapes in UML statechart and activity diagrams

  3. Connect Control Flow shapes to State shapes to indicate the change from one state to another.

    1. In an activity diagram, drag a Control Flow shape onto the drawing page.

    2. Glue the Control Flow shape endpoint (without the arrowhead) to a connection point Connection point image - blue X on the source Action State or State shape.

    3. Glue the Control Flow shape endpoint (with an arrowhead) to a connection point on the destination Action State or State shape.

    4. Double-click the Control Flow shape to add a transition string, including an event, guard condition, action expression, and more.

  4. Use the complex transition shapes, Transition (Fork) or Transition (Join), to represent the forking of one action state into multiple parallel states, or the synchronization of multiple action states into one state. For more information, see Work with transition shapes in UML statechart and activity diagrams.

  5. If you want to replace transition strings with signal icons, use the Signal Send and Signal Receipt shapes to represent the signals.

  6. Double-click any shape to open its UML Properties dialog box where you can add a name, transition string, guard condition, deferred events, and other properties.

  7. Save the diagram.

See Also

UML diagrams in Visio 

Create a UML state machine diagram

Create a UML use case diagram

Create outlook tasks in onenote

As you take notes and plan projects in OneNote, you might wonder how to manage deadlines and remember the things on your to-do list. One way is to create Outlook tasks. Then you can view and track those tasks in Outlook and even get reminders.

Create an Outlook task in OneNote

  1. In OneNote, select the words that you want to be your task.

  2. In the menu that appears, click the arrow next to the Outlook Tasks button and choose a reminder.

    A flag appears next to your task in OneNote and your task is added to Outlook.

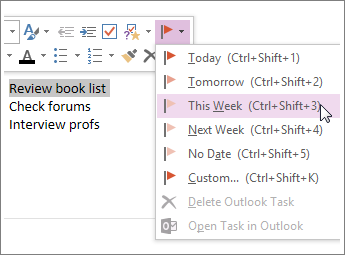
    You can create a task that you can track in Outlook.

Tip: You can also use this menu to add note tags. Note tags are handy for things like creating to-do lists or marking items as important. Unlike Outlook tasks (flags) though, note tags are a feature of OneNote. You can tag action items in meeting notes in OneNote, but they won't show up in Outlook.

Find a task in OneNote

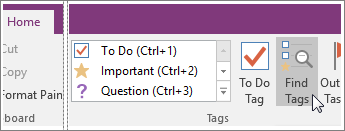
  • On the Home tab in OneNote, choose Find Tags.

    Screenshot of the Find Tags button in OneNote 2016

    Your Outlook tasks will be in the Tags Summary pane on the right.

Note: Outlook tasks are the ones with the flags or check marks. You'll also see OneNote tags here too, such as things you've marked for follow-up or tagged as a question.

You can see tasks at a glance in the Tags Summary.

Mark a task as complete

  • In the Tags Summary pane in OneNote, check the flag next to an Outlook task.

    The task is marked as completed in both the OneNote Tags Summary pane and in Outlook.

Tips: 

  • When you mark a task as complete in Outlook, the task is marked as complete in OneNote when Outlook and OneNote sync. If you check the task as complete in OneNote, it gets marked as complete in Outlook and is removed from your tasks list.

  • If you'd like to add the task back into Outlook, check the box again.

Delete a task

If you decide you don't need a task, you can remove it. You've got two choices: Delete the task from Outlook, which also removes the tag (flag) from OneNote (the text will still be in your OneNote notes) or Remove the tag from OneNote and keep the task in Outlook.

To remove the task from Outlook:

  • Right-click the tag in your notes, and choose Deleted Outlook Task.

    The text remains in OneNote and the task is removed from Outlook.

To keep the task in Outlook and remove the flag from OneNote:

  • Right-click the tag in your notes, and choose Remove Tag.

    The tag (flag) is removed from OneNote and the task remains in Outlook.

    Screenshot of how to delete an Outlook task in OneNote 2016.

OneNote and Outlook work together in other ways too. For example, you can insert meeting details and send notes in an email message.

Microsoft Office OneNote 2007 is tightly integrated with Microsoft Office Outlook 2007 to make it easy for you to manage and share information between your notebook and your schedule.

Create an Outlook task in OneNote

When you create an Outlook task from within OneNote, it is added to your Outlook Tasks list the next time you open Outlook.

Note: If your installation of Outlook is configured for multiple e-mail profiles, you must start Outlook before you can successfully create and save Outlook tasks in OneNote. To check the e-mail profiles on your computer, in Control Panel category view, click User Accounts, and then click Mail. If you are using Control Panel classic view, double-click the Mail icon.

  1. In any part of your notes, type a description for the task that you want to create.

    For example, type Send out notes from the meeting.

  2. On the Insert menu, point to Outlook Task, and then choose a reminder for the new task.

    A task flag appears next to the description when the task has been created. To view details about the task, move the pointer over the task icon until a tooltip appears.

    Note: The task flag may appear dimmed until Outlook recognizes the new task and the task is synchronized between Outlook and OneNote. When this is the case, the task tooltip also displays synchronization status.

Find a task in OneNote

  1. On the Standard toolbar, click the arrow next to the Tags button, and then click Show all Tagged Notes.

  2. In the Tags Summary pane, narrow the Search scope if needed, and then click Refresh Results.

Change an Outlook task in OneNote

  1. On your notes page in OneNote, right-click the Outlook task that you want to change.

  2. On the shortcut menu, do any of the following:

    • To change the start date associated with the selected Outlook task, click a new start date (for example, Tomorrow.) To remove the start date association with the task, click No Date.

    • To mark the selected Outlook task as completed, click Mark Complete.

    • To delete the selected Outlook task, click Delete Outlook Task.

Note: If you want to change the task directly in Outlook, right-click the Outlook task icon on your notes page, and then click Open Task in Outlook on the shortcut menu.

See also

View your tasks in Outlook

Send notes in an Outlook e-mail message

Insert meeting details from Outlook into notes

Change the line spacing in word

Embed a presentation in a web page or blog

When you want to share a presentation or a picture slide show with your friends, family, or colleagues, save it to OneDrive, then you can embed it in a web page or blog.

The embed code you need must be gotten from PowerPoint for the web. It isn't available from the PC or Mac versions of PowerPoint.

Get the embed code

  1. Save your presentation to OneDrive.com. (Storing the presentation to a public folder online is what allows you to embed it on a web page.)

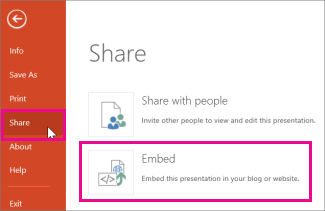
  2. Open your presentation in PowerPoint for the web. On the File tab of the Ribbon, click Share, and then click Embed.

    Click Share and then click Embed
  3. To create the HTML code to embed your file in the web page, click Generate Generate HTML code .

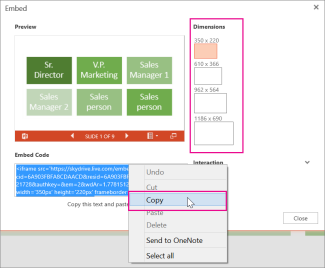
  4. In the Embed box, under Dimensions, select the correct dimensions for the blog or web page.

    Right-click the embed code, click Copy, and then click Close
  5. Under Embed Code, right-click the code, click Copy, and then click Close.

    You'll use this embed code in the next procedure. You may want to paste it somewhere handy, like Notepad, so that you don't lose it.

The HTML that you copied from the OneDrive page is an iframe tag, which is supported in many web authoring systems and blog services. The steps provided here work in some of the most popular blogging services, such as WordPress, Blogger, and TypePad.

  • Even though WordPress ordinarily doesn't allow iframes in posts, an exception is made for iframes that host Office for the web. To use HTML editing, don't use the New Post command at the top of the page. Go to your blog's dashboard and click Posts > Add New.

    In TypePad, don't use the Quick Compose editor. Go to Blogs, click the name of your blog, and then click Compose, where you can switch from Rich Text to HTML editing.

  • In Blogger, change the compose window to Edit HTML. You can switch back to compose mode after you finish the next step.

  1. In your blog editor or web page editor, write your content, and then switch to HTML editing.

    If you use a blogging service that does not support iframes in posts, consult your blogging service provider for assistance.

  2. With the HTML tag that you copied from the OneDrive page as the most recent item in your Clipboard, press ⌘+V.

  3. Finish writing your post. Preview and publish as you normally would.

    Updates to the presentation on OneDrive are automatically reflected on the page where the presentation is embedded.

Once you have the embed code as described above, you can also embed the presentation in a SharePoint wiki. In this case, you paste only the src portion of the copied iframe tag into a Page Viewer Web Part.

  1. On the wiki page click Edit.

  2. With the HTML tag that you copied from the OneDrive page as the most recent item in your Clipboard, press Ctrl+V to paste the tag on the wiki page. This is so that you can easily copy a portion of the tag into the Web Part. You'll delete the tag from the wiki page before you're done.

  3. Copy the portion of the tag between quotation marks that begins with http. Don't include the quotation marks.

  4. On the Editing Tools tab click Insert, and then click Web Part.

  5. In the list of categories, click Media and Content.

  6. In the list of Web Parts, click Page Viewer, and then click Add.

  7. To paste the address you copied in step 3, click open the tool pane, and then in the Link box, press ⌘+V.

  8. Click Apply to preview the page.

  9. Make adjustments to the Web Part as desired. For example, in the Page Viewer editor, expand Appearance and specify height of 332 pixels and width of 407 pixels to fit the presentation in the frame with no scroll bars.

  10. When you are finished, click OK in the Page Viewer editor, and delete the iframe tag from the wiki page.

    Updates to the presentation on OneDrive are automatically reflected on the page where the presentation is embedded.

Printing and print preview in visio

In Visio, you can print and preview files from the same location by clicking File and then Print (or pressing CTRL+P). Visio combines Print and Preview in the same window.

Tip: You can add the Print Preview or Print buttons to the Quick Access Toolbar in order to access them more quickly. For more information, see: Add commands to the Quick Access Toolbar.

  1. On the right, you'll see a preview of your diagram or drawing. On the left, you'll see the Print button and the configurable Settings.

    To pan around the diagram page, click and drag the page. If your mouse has a scroll wheel, you can use it to zoom in and out.

    To switch pages in the preview window, use the page tool in the toolbar below the print preview window, on the left side. On the right side of the toolbar are tools for showing and hiding page breaks and for changing the zoom amount.

  2. To see each page, click the arrow at the bottom of the preview, and if the text is too small to read, use the zoom slider to adjust it.

    The page preview and zoom sliders in the Print and Print preview window

  3. Choose the number of copies you want.

  4. Look under Settings to choose other print options such as printing only certain pages, changing the page orientation, or printing two-sided.

  5. When you are ready, click Print.

  6. Click Back button to return to your document.

See also

Troubleshooting

For printer troubleshooting or driver information, see:

Sunday, November 29, 2020

Schedule work to assign later

Create an assignment and set a date in the future when you'd like it to distribute to students.

Create a new assignment

  1. Navigate to the General channel in your desired classroom and select Assignments.

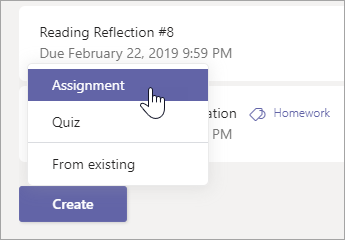
  2. Select Create>Assignment.

    Select Create, then Assignment.

  3. Give your assignment a title—this is required.

  4. Choose multiple classes or individual students to assign using the dropdowns. Your assignment will default to All Students in the current class.

    Note: You can only assign work to individual students in one class at a time.

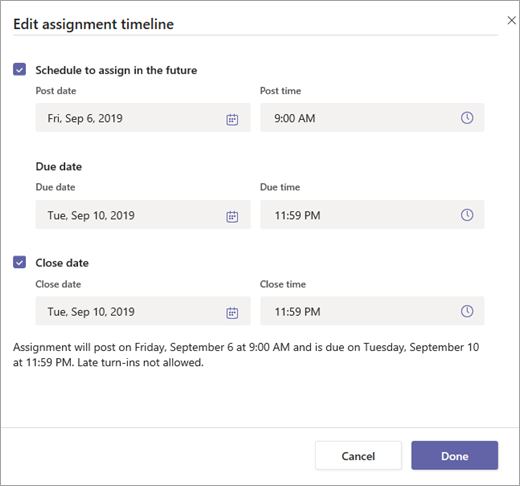
  5. Beneath the Date due and Time due fields, select Edit.

    Select Edit to edit assignment timeline.

    This will open the Edit assignment timeline window. Choose a date in the future when you'd like this assignment to post to students. You can also adjust the due date and close date of the assignment here. When you're finished making selections, select Done.

    Edit assignment timeline window.

  6. Finish adding details to your assignment:

    • Assignment title (required)

    • Instructions (optional)

    • Set points available using any denominator you wish. For example: 100 points or 4.0. (optional)

    • Attach resources to the assignment by selecting Add resources. You can also attach a blank Word, Excel, or PowerPoint file for your students to turn in during this step. (optional)

    • Add a category. (optional)

    • Select Add rubric to add a grading rubric.

  7. Select Schedule. Student(s) will be notified of their new assignment on the day you chose.

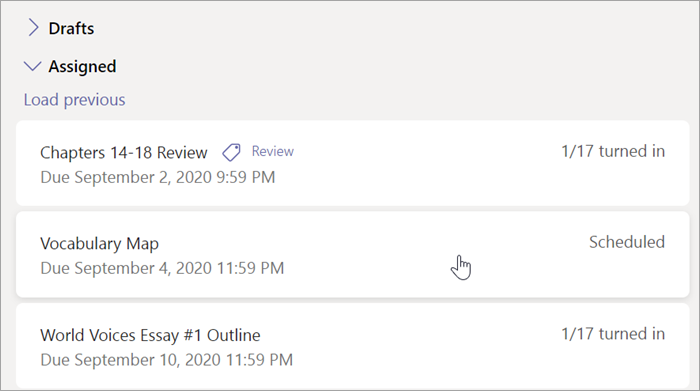
    The scheduled assignment will appear on your list of assigned work.

    Scheduled assignment in assignments list.

Learn more

Create an assignment

Edit an assignment

Delete an assignment

Print your powerpoint slides handouts or notes

In PowerPoint, you can print your slides, your speaker notes, and create handouts for your audience.

Your browser does not support video. Install Microsoft Silverlight, Adobe Flash Player, or Internet Explorer 9.

Print your presentation

  1. Select File > Print.

  2. For Printer, select the printer you want to print to.

  3. For Settings, select the options you want:

    • Slides: From the drop-down, choose to print all slides, selected slides, or the current slide. Or, in the Slides box, type which slide numbers to print, separated by a comma.

    • Print Layout: Choose to print just the slides, just the speaker notes, an outline, or handouts.

      The Outline prints only the text in the slides, without images. The Notes of a presentation show the slide and the related speaker notes below it. If you choose to print Handouts, you can print several slides on one page using a variety of layouts, some with space for note-taking.

    • Collated: Choose whether you want the sheets collated or uncollated.

    • Color: Choose whether you want color, grayscale, or pure black and white.

    • Edit Header & Footer: Select to edit the header and footer before printing.

  4. For Copies, select how many copies you want to print.

  5. Select Print.

Printed handouts: Add or remove slide numbering

This is a subscriber-only feature This feature is available only to Microsoft 365 Subscribers for Windows desktop clients.

By default, in PowerPoint for Microsoft 365 (beginning with version 1810), printed handouts include a slide number below each slide image.

You can turn off this option in the Print dialog box on the same menu where you chose to print Handouts. At the bottom of the menu are several toggle options with check marks. Clear the check mark next to Print slide numbers on handouts:
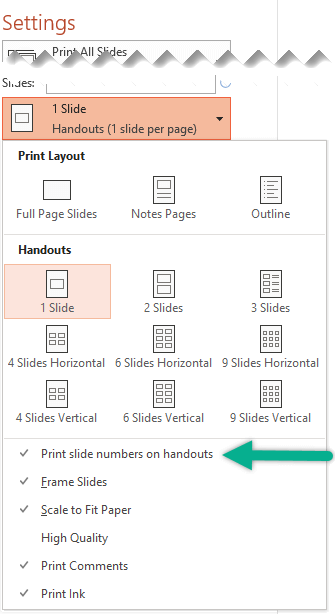
Print Slide Numbers on Handouts.

The Outline prints only the text in the slides, without images. The Notes of a presentation show the slide and the related speaker notes below it. If you choose to print Handouts, you can print several slides on one page using a variety of layouts, some with space for note-taking.

The following procedures cover printing in PowerPoint 2016 for Mac and newer versions.

Select a heading below to open it and see the detailed instructions.

  1. On the File menu select Print.

  2. Select Show Details at the bottom of the dialog box.

    The Show Details button in the Print dialog box.
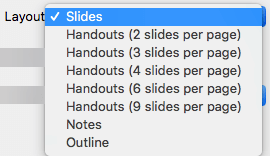
  3. In the Layout box, select Slides.

    Select the Slide layout in the Print dialog box
  4. Set the other printing options you want, and select Print.

  1. On the File menu select Print.

  2. Select Show Details at the bottom of the dialog box.

    The Show Details button in the Print dialog box.
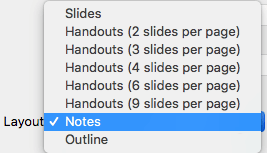
  3. In the Layout box, select Notes.

    Select the Notes layout in the Print dialog box
  4. Set the other printing options you want, and select Print.

  1. On the File menu select Print.

  2. Select Show Details at the bottom of the dialog box.

    The Show Details button in the Print dialog box.
  3. In the Layout box, select Outline.

    Select the Outline layout in the Print dialog box
  4. Set the other printing options you want, and select Print.

  1. On the File menu select Print.

  2. Select Show Details at the bottom of the dialog box.

    The Show Details button in the Print dialog box.
  3. In the Layout box, select one of the Handout options, depending on how many slides per page you want.
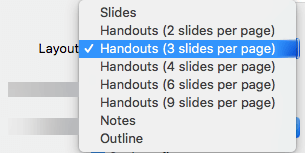
    Select a Handout layout in the Print dialog box
  4. By default, in PowerPoint for Microsoft 365 for Mac (beginning with version 16.30), printed handouts include a slide number below each slide image.

    You may turn off this option in the Print dialog box by clearing the check mark next to Print slide numbers on handouts:
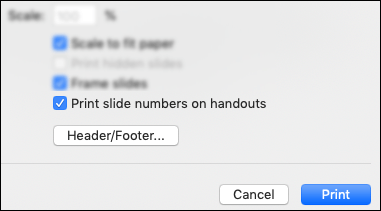
    The Print dialog with the Print slide numbers on handouts option shown.

  5. Select Print.

See Also

Add speaker notes to you slides

For files stored on OneDrive, OneDrive for work or school, or SharePoint in Microsoft 365, you can print slides, notes, or handouts.

A printed notes page has the slide on the upper half of the page and the speaker notes on the lower half.

A Notes Page prints the slide on the upper half of the page and the related speaker notes on the lower half.

A printed handout with three slides on the left side of the page and space for note-taking on the right side.

A Handouts page consists of three slide thumbnail images on the left side and several printed lines for note-taking to the right of each thumbnail.

To print handouts in other layouts, see Print handouts using Adobe Reader.

To get more advanced printing layout options, use a desktop version of PowerPoint.

Select a heading below to open it and see the detailed instructions.

  1. From your PowerPoint for the web slide show, select File > Print and then choose the kind of sheets you want to print:
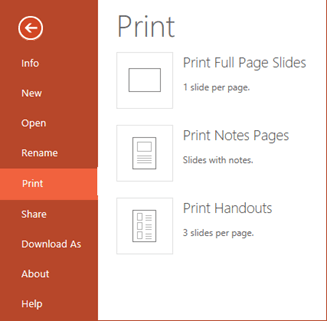
    Select one of the Print buttons

  2. Wait for the Print panel to open.

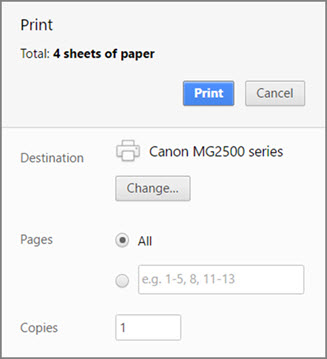
    Chrome Print panel options

  3. Next to Destination, click Change to choose a printer. Set any other print layout options you want, such as which slides to print and one-sided versus two-sided printing. (Available options vary by printer.)

    Click Change to choose a printer

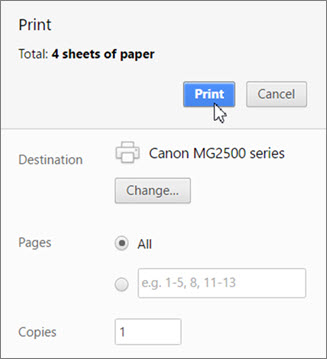
  4. Click Print.

    Click Print

  1. From your PowerPoint for the web slide show, click File > Print and then choose the kind of sheets you want to print:

    Select one of the Print buttons

  2. Wait for the Print dialog box to open.
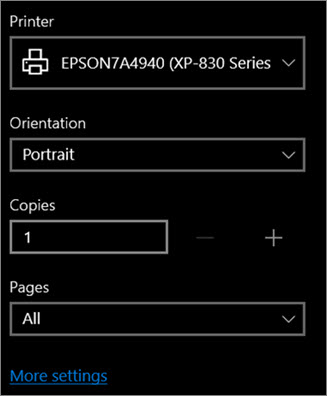
    Wait for the printer panel to open

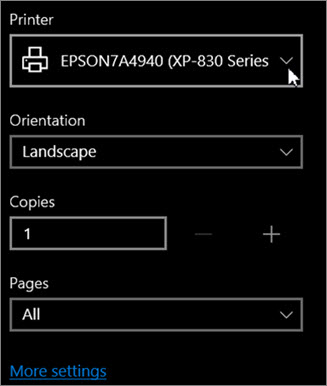
  3. Under Orientation, choose the option that matches the orientation of your slides. Set any other print layout options you want, such as which slides to print and one-sided versus two-sided printing. (Available options vary by printer.)
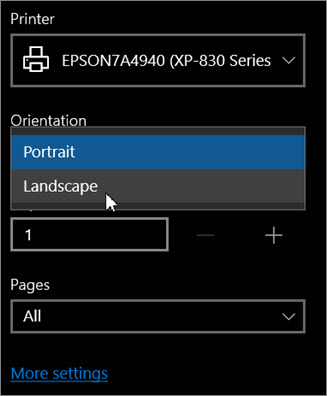
    Under Orientation, click Landscape

  4. Under Printer, choose a printer.

    Choose a printer

  5. Click Print to print your slide show (you might have to scroll to find Print on the print panel).

    Click Print

  1. From your PowerPoint for the web slide show, click File > Print and then choose the kind of sheets you want to print:

    Select one of the Print buttons

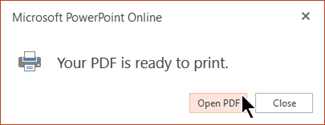
  2. Click Open PDF.

    Your PDF is ready

  3. Click the printer icon in the upper right above the slide show.
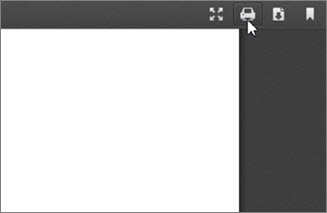
    Click the printer icon

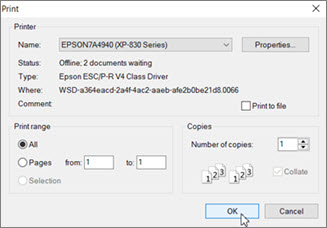
  4. In the Print dialog box that appears, under Printer, choose a printer.
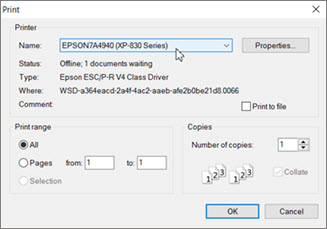
    Choose a printer

  5. Click OK to print your slide show.

    Click OK to print

  6. When you are finished printing, close the PDF file that was opened for printing in step 2.

We recommend using the Microsoft Edge web browser instead of Internet Explorer when you're working in PowerPoint for the web for a smoother experience when printing.

If you're using Internet Explorer, we recommend that you install Adobe Reader, because having it installed on your computer makes the printing process in PowerPoint for the web easier.

  1. From your PowerPoint for the web slide show, click File > Print and then choose the kind of sheets you want to print:

    Select one of the Print buttons

  2. Click Open PDF.

    Your PDF is ready

  3. On the Print page that appears, under Orientation, click Landscape. Set any other print layout options you want.
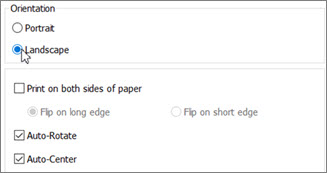
    Click Landscape and other options

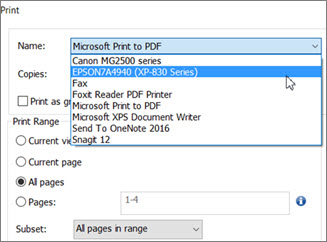
  4. In the Name box, choose a printer.

    In the Name box, click the printer name

  5. Click OK to print your slide show (you might have to scroll to find OK on the print page).
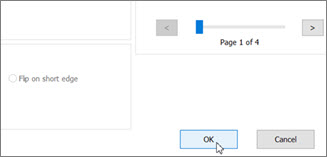
    Click OK to print

  6. When you are finished printing, close the PDF file that was opened for printing in step 2.

  1. From your PowerPoint for the web slide show, click File > Print and then choose the kind of sheets you want to print: .

    Select one of the Print buttons

  2. Click Open PDF.

    Your PDF is ready

  3. From the open presentation hover your pointer over the bottom of the presentation and click this image.

    Click the image on your PowerPoint Online presentation

  4. In the Print dialog box, under Orientation, click Landscape. Set any other print layout options you want.

    Choose print settings in the Print dialog box

  5. In the Printer box, choose a printer.

  6. Click Print to print your slide show.

  7. When you are finished printing, close the PDF file that was opened for printing in step 2.