Insert or delete cells, rows, and columns
You can insert blank cells above or to the left of the active cell on a worksheet. When you insert blank cells, Excel shifts other cells in the same column down or cells in the same row to the right to accommodate the new cells. Similarly, you can insert rows above a selected row and columns to the left of a selected column. You can also delete cells, rows, and columns.
Microsoft Excel has the following column and row limits: 16,384 columns wide by 1,048,576 rows tall.
For steps appropriate to entire worksheets, see Insert or delete a worksheet.
What do you want to do?
Insert blank cells on a worksheet
-
Select the cell or the range of cells where you want to insert the new blank cells. Select the same number of cells as you want to insert. For example, to insert five blank cells, select five cells.
To cancel a selection of cells, click any cell on the worksheet.
For more information about making selections, see Select cells, ranges, rows, or columns later in this topic.
-
Do one of the following:
-
Right-click the selected cells and then click Insert.
-
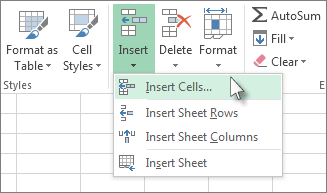
On the Home tab, in the Cells group, click the arrow below to Insert, and then click Insert Cells.

-
-
In the Insert dialog box, click the direction in which you want to shift the surrounding cells.
When you insert cells on a worksheet, the references adjust accordingly, whether they are relative or absolute cell references. The same behavior applies to deleting cells, except when a deleted cell is directly referenced by a formula. If you want references to adjust automatically, it's a good idea to use range references when you can in your formulas, instead of specifying individual cells.
-
You can insert cells that contain data and formulas by copying or cutting the cells, right-clicking the location where you want to paste them, and then clicking Insert Copied Cells or Insert Cut Cells.
Tips
-
To repeat the action of inserting a cell, click the location where you want to insert the cell, and then press Ctrl+Y.
-
If there is formatting, you can use Quick Analysis button to choose how to set the Formatting of the inserted cells.
Insert rows on a worksheet
-
Do one of the following:
-
To insert a single row, select either the whole row or a cell in the row above which you want to insert the new row. For example, to insert a new row above row 5, click a cell in row 5.
-
To insert multiple rows, select the rows above which you want to insert rows. Select the same number of rows as you want to insert. For example, to insert three new rows, you select three rows.
-
To insert nonadjacent rows, hold down Ctrl while you select nonadjacent rows.
To cancel a selection of cells, click any cell on the worksheet.
For more information about making selections, see Select cells, ranges, rows, or columns later in this topic.
-
-
Do one of the following:
-
Right-click the selected cells and then click Insert.
-
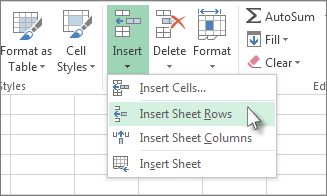
On the Home tab, in the Cells group, click the arrow under Insert, and then click Insert Sheet Rows.

-
Note: When you insert cells on a worksheet, the references adjust accordingly, whether they are relative or absolute cell references. The same behavior applies to deleting cells, except when a deleted cell is directly referenced by a formula. If you want references to adjust automatically, it's a good idea to use range references when you can in your formulas, instead of specifying individual cells.
Tips
-
To repeat the action of inserting a row, click the location where you want to insert the row, and then press Ctrl+Y.
-
If there is formatting, you can use Quick Analysis button to choose how to set the Formatting of the inserted rows.
Insert columns on a worksheet
-
Do one of the following:
-
To insert a single column, select the column or a cell in the column immediately to the right of where you want to insert the new column. For example, to insert a new column to the left of column B, click a cell in column B.
-
To insert multiple columns, select the columns immediately to the right of where you want to insert columns. Select the same number of columns as you want to insert. For example, to insert three new columns, you select three columns.
-
To insert nonadjacent columns, hold down Ctrl while you select nonadjacent columns.
To cancel a selection of cells, click any cell on the worksheet.
For more information about making selections, see Select cells, ranges, rows, or columns later in this topic.
-
-
Do one of the following:
-
Right-click the selected cells and then click Insert
-
On the Home tab, in the Cells group, click the arrow under Insert, and then click Insert Sheet Columns.

-
Note: When you insert cells on a worksheet, the references adjust accordingly, whether they are relative or absolute cell references. The same behavior applies to deleting cells, except when a deleted cell is directly referenced by a formula. If you want references to adjust automatically, it's a good idea to use range references when you can in your formulas, instead of specifying individual cells.
Tips
-
To repeat the action of inserting a column, click the location where you want to insert the column, and then press Ctrl+Y.
-
If there is formatting, you can use Quick Analysis button to choose how to set the Formatting of the inserted columns.
Delete cells, rows, or columns
-
Select the cells, rows, or columns that you want to delete.
To cancel a selection of cells, click any cell on the worksheet.
For more information about making selections, see Select cells, ranges, rows, or columns later in this topic.
-
On the Home tab, in the Cells group, click the arrow next to Delete, and then do one of the following:
-
To delete selected cells, click Delete Cells.
-
To delete selected rows, click Delete Sheet Rows.
-
To delete selected columns, click Delete Sheet Columns.
You can right-click a selection of cells, click Delete, and then click the option that you want. You can also right-click a selection of rows or columns and then click Delete.
-
-
If you are deleting a cell or a range of cells, in the Delete dialog box, click Shift cells left, Shift cells up, Entire row, or Entire column.
If you are deleting rows or columns, other rows or columns automatically shift up or to the left.
Tips
-
To repeat deleting cells, rows, or columns, select the next cells, rows, or columns, and then press Ctrl+Y.
-
If needed, you can restore deleted data immediately after you delete it. On the Quick Access Toolbar, click Undo Delete, or press Ctrl+Z.
-
Pressing the Delete key deletes the contents of the selected cells only, not the cells themselves.
-
Excel keeps formulas up to date by adjusting references to the shifted cells to reflect their new locations. However, a formula that refers to a deleted cell displays the #REF! error value.
Select cells, ranges, rows, or columns
| To select | Do this |
| A single cell | Click the cell, or press the arrow keys to move to the cell. |
| A range of cells | Click the first cell in the range, and then drag to the last cell, or hold down Shift while you press the arrow keys to extend the selection. You can also select the first cell in the range, and then press F8 to extend the selection by using the arrow keys. To stop extending the selection, press F8 again. |
| A large range of cells | Click the first cell in the range, and then hold down Shift while you click the last cell in the range. You can scroll to make the last cell visible. |
| All cells on a worksheet | Click the Select All button. To select the whole worksheet, you can also press Ctrl+A. If the worksheet contains data, Ctrl +A selects the current region. Pressing Ctrl +A again selects the whole worksheet. |
| Nonadjacent cells or cell ranges | Select the first cell or range of cells, and then hold down Ctrl while you select the other cells or ranges. You can also select the first cell or range of cells, and then press Shift+F8 to add another nonadjacent cell or range to the selection. To stop adding cells or ranges to the selection, press Shift+F8 again. You can't cancel the selection of a cell or range of cells in a nonadjacent selection without canceling the whole selection. |
| A whole row or column | Click the row or column heading. Row heading 2. Column heading You can also select cells in a row or column by selecting the first cell and then pressing Ctrl+Shift+Arrow key (Right Arrow or Left Arrow for rows, Up Arrow or Down Arrow for columns). If the row or column contains data, Ctrl+Shift+Arrow key selects the row or column to the last used cell. Pressing Ctrl+Shift+Arrow key again selects the whole row or column. |
| Adjacent rows or columns | Drag across the row or column headings. Or select the first row or column. Then hold down Shift while you select the last row or column. |
| Nonadjacent rows or columns | Click the column or row heading of the first row or column in your selection. Then hold down Ctrl while you click the column or row headings of other rows or columns that you want to add to the selection. |
| The first or last cell in a row or column | Select a cell in the row or column, and then press Ctrl+Arrow key (Right Arrow or Left Arrow for rows, Up Arrow or Down Arrow for columns). |
| The first or last cell on a worksheet or in a Microsoft Office Excel table | Press Ctrl+Home to select the first cell on the worksheet or in an Excel table. Press Ctrl+End to select the last cell on the worksheet or in an Excel table that contains data or formatting. |
| Cells to the last used cell on the worksheet (lower-right corner) | Select the first cell, and then press Ctrl+Shift+End to extend the selection of cells to the last used cell on the worksheet (lower-right corner). |
| Cells to the beginning of the worksheet | Select the first cell, and then press Ctrl+Shift+Home to extend the selection of cells to the beginning of the worksheet. |
| More or fewer cells than the active selection | Hold down Shift while you click the last cell that you want to include in the new selection. The rectangular range between the active cell and the cell that you click becomes the new selection. |
Do you have a specific function question?
Help us improve Excel
Do you have suggestions about how we can improve the next version of Excel? If so, please check out the topics at Excel User Voice.


No comments:
Post a Comment