Create additional calendars
In addition to the default Microsoft Outlook Calendar, you can create other Outlook calendars. For example, you can create a calendar for your personal appointments, separate from your work calendar.
Tip: See Publish and share calendars on Office.com to share calendars with other people.
-
In Calendar, on the Folder tab, in the New group, click New Calendar.

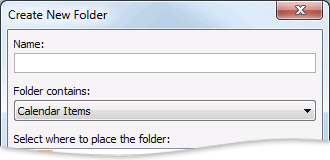
Note: If you are in Mail, Contacts, Tasks, Journal, or Notes, on the Folder tab, in the New group, click New Folder. In the Folder contains list, click Calendar Items.
-
In the Name box, type a name for the new calendar.
-
In the Select where to place the folder list, click Calendar, and then click OK.
The new calendar appears in the Calendar Navigation Pane.
To view a calendar, select the check box for the calendar.
When multiple check boxes are selected, the calendars appear in side-by-side view and can be switched to the calendar overlay view. For more information, see View calendars side-by-side or overlaid.
Tip: To delete a calendar, right-click the calendar name in the Navigation Pane, and then click Delete calendar name.
No comments:
Post a Comment