Change the color of a shape, shape border, or entire SmartArt graphic
This article discusses changing the colors in a SmartArt graphic. For information about changing the colors of cells and borders in Excel, see Change the color of fills, lines, and borders. If you want to change the color of text in a document, see Change the font color. For help with changing the background color of a document, see All about themes, Quick Styles, cell styles, and background styles. For help with adding a background to your SmartArt graphic, see Format the background of your SmartArt graphic.
You can apply professionally-designed color combinations to all of the shapes in your entire SmartArt graphic simultaneously, or you can change the color of an individual shape or shape border.
In this article
Overview of changing colors
You can change the colors of all of the shapes in your SmartArt graphic by applying a different color combination. Color thumbnails show the different ways colors are applied (such as, alternating, or darkest to lightest), rather than how colors are used.
You can apply colors from your document's theme colors to your SmartArt graphic, and the color variations automatically match the colors used in your slide or document. If you change your document's theme colors, your SmartArt graphic will also reflect the new theme colors.
There is a wide range of color choices designed to work well with all layouts for SmartArt graphics. Apply SmartArt Styles and colors to your SmartArt graphic to match the message that you want to communicate. You can even pick a layout, a SmartArt Style, and colors, and then change the layout again. Your SmartArt Style and colors will stay with your SmartArt graphic, so you do not need to re-do them.
If you are creating multiple SmartArt graphics and want them to look identical, you can apply the same colors and SmartArt Styles to them to achieve a consistent, professional look.
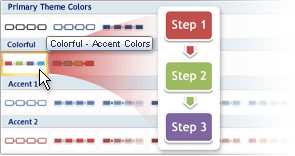
You can use colors to emphasize the message in your SmartArt graphic. For example, to emphasize that every step in a process is different, you could apply Colorful - Accent Colors.

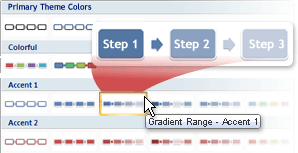
Or you could use Gradient Range Accent 1 to underline the direction of your message for a linear process.

You can create an effect of gradually changing color by applying a gradient to an object, so that its color varies smoothly from a darker to a lighter shade. You can also use a gradient to give the shapes in your graphic a rainbow effect.
Change the color of a shape
-
Click the shape that you want to change.
If you want to change multiple shapes to the same color, click the first shape, and then press and hold CTRL while you click the other shapes.
-
Under SmartArt Tools, on the Format tab, in the Shape Styles group, click the arrow next to Shape Fill, and then click the color that you want. To choose no color, click No Fill.

If you don't see the SmartArt Tools or Format tabs, make sure that you've selected a SmartArt graphic.
To change to a color that isn't in the theme colors, click More Fill Colors, and then either click the color that you want on the Standard tab, or mix your own color on the Custom tab. Custom colors and colors on the Standard tab are not updated if you later change the document theme.
Tips
-
If your SmartArt graphic contains many shapes, instead of changing the colors for all the shapes individually, change the colors for the entire SmartArt graphic, and then manually change the color of any shapes.
-
If you apply a Quick Style and then change the color of a shape, you can customize the effects applied to the shape.
-
To access the Format Shape dialog box, with many shape formatting options, right-click the shape, and then click Format Shape on the shortcut menu.
Create a gradient fill
You can use a gradient to create an effect of gradually changing color from a lighter shade to a darker shade or from one color to another. You can even use gradients to create rainbow effects.
-
Right-click the shape or shape border, and then click Format Shape.
If you want to change multiple shapes and shape borders, click the first shape, and then press and hold CTRL while you click the other shapes. To change all the shapes in a SmartArt graphic, click and drag to select all the shapes at once.
-
Click the Fill pane, and then click Gradient fill.
-
To choose a default gradient fill, click Preset colors
 , and then click the option that you want.
 -
To set custom options for the gradient fill, do one or more of the following:
-
To specify the direction to use when drawing the gradient fill, select an option from the Type list. The type that you select determines the options that are available under Direction.
-
To choose a different progression of color and shades, click Direction, and then click the option that you want. The directions that are available depend on the gradient type that you choose in the Type list.
-
To specify the angle at which the gradient fill is rotated within the shape, enter the degree value that you want in the Angle box. This option is available only when you select Linear in the Type list.
-
To set a gradient stop, click a stop number in the list, and then set the position, color, and transparency value that you want.
Gradient stops consist of a position, a color, and a transparency value and are used to create nonlinear gradients. For example, if you want to create a gradient that goes from red to green to blue, you need to add three gradient stops — one for each color. Or if you want to create a gradient that appears only in the corner of a shape, you need to use gradient stops to make the gradient nonlinear.
To set the position (location for the color and transparency change in the gradient fill), move the Stop position slider, or enter a number in the box next to the slider.
To choose the color used for the gradient stop, click Color
 , and then click the color that you want. To create a single-color gradient, choose different shades of the same color. To create a multicolor gradient, choose a different color for each gradient stop. For example, you can create a rainbow effect by making your first gradient stop red, the second gradient stop orange, and so on.
To specify how much you can see through the background color, move the Transparency slider, or enter a number in the box next to the slider. You can vary the percentage of transparency from 0% (fully opaque, the default setting) to 100% (fully transparent). The transparency value applies to the gradient stop, not to the overall fill.
-
-
Tip: To adjust existing gradient stops, in the list click the stop number that you want to change. To add or remove stops, click Add or Remove.
Change the color of a shape border
-
Click the shape border that you want to change.
If you want to change multiple shape borders to the same color, click the first shape, and then press and hold CTRL while you click the other shapes.
-
Under SmartArt Tools, on the Format tab, in the Shape Styles group, click the arrow next to Shape Outline, and then click the color that you want. To hide the border, click No Outline.

If you don't see the SmartArt Tools or Format tabs, make sure that you've selected a SmartArt graphic.
To change to a color that isn't in the theme colors, click More Outline Colors, and then either click the color that you want on the Standard tab, or mix your own color on the Custom tab. Custom colors and colors on the Standard tab are not updated if you later change the document theme.
Change the color of an entire SmartArt graphic
-
Click the SmartArt graphic.
-
Under SmartArt Tools, on the Design tab, in the SmartArt Styles group, click Change Colors, and then click the thumbnail that you want.

If you don't see the SmartArt Tools or Design tabs, make sure that you've selected a SmartArt graphic.
Tips
-
To see how a color will be applied to your SmartArt graphic before you select a thumbnail, place your pointer over the thumbnail that you want, and then look at your SmartArt graphic.
-
To ensure that your document will look good printed in black and white, click a thumbnail under Primary Theme Colors.
-
To give your SmartArt graphic the look of the example in the Choose a SmartArt Graphic gallery, apply Colorful - Accent Colors (click Change Colors), and SmartArt Style Cartoon.
No comments:
Post a Comment