Set, clear, or remove tab stops
You can use tab stops to create easy-to-format documents. By using document layout options in Word, you can create, for example, a table of contents or an index without setting a single tab stop.
Word also provides predesigned table, header and footer, cover page, and other page layout options. These options make adding tab stops unnecessary.
Tip: To accommodate different versions of Word, many procedures refer to "on the Home tab." For Word 2016, you also can use the Layout tab. For Word 2013, Word 2010, and Word 2007, you also can use the Page Layout tab.
Learn about tab stops
Regardless of which version of Word you're using, the procedure for setting (adding) tab stops on the horizontal ruler is the same. By default, there are no tab stops on the ruler when you open a new blank document. There is, however, default tab spacing set at every half inch.
Before you begin setting (adding) tab stops, you might want to become familiar with the Tab Selector and the available tab stops.

The Tab Selector is the small box at the leftmost edge of the ruler. You can click through the Tab Selector to discover each tab described next.
| | Left Tab | Text is aligned to the right of the tab stop. |
| | Center Tab | Text is centered as you type. |
| | Right Tab | Text is right aligned and extends to the left. |
| | Decimal Tab | Numbers are aligned to the left of the decimal. You can't use the Decimal Tab to align numbers around a different character, such as a hyphen or an ampersand symbol. |
| | Bar Tab | Text isn't positioned with a Bar Tab. Instead, a vertical bar is inserted at the tab position. |
| | First Line Indent | Located at the top of the ruler, the First Line Indent lets you indent the text in the first line of a paragraph. |
| | Hanging Indent | Located at the bottom of the ruler, the Hanging Indent lets you indent the text in the second line of the paragraph and all lines thereafter. |
Set tabs on the ruler
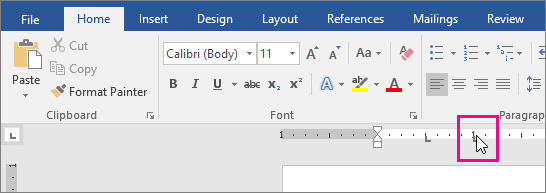
A quick way to set a tab stop in your document is to choose a tab stop and click the location on the ruler where you want the tab to appear.

-
At the leftmost edge of the ruler, click the tab stop in the Tab Selector you want, and then click the location on the ruler where you want to set the tab.
Note: Don't see the ruler at the top of your document? Click View > Ruler. And if you want to see the tab stop characters in your document, on the Home tab, choose Show/Hide
 .
.
Tips
-
To move a tab you've set, drag it to a new location on the ruler.
-
To identify the precise location where you set a tab stop, double-click the tab. The Tabs dialog box opens and shows the precise location in the Tab stop position box.
-
To confirm the alignment for text you created with the tab stops you set, press Tab.
-
When multiple paragraphs are selected only the tabs from the first paragraph show on the ruler.
Clear tab stops on the ruler
You can quickly remove any tab stop you set on the horizontal ruler.
Note: If you don't see the ruler at the top of your document, click View > Ruler. If you don't see the tab stop character in your document, on the Home tab, in the Paragraph group, click Show/Hide  .
.
-
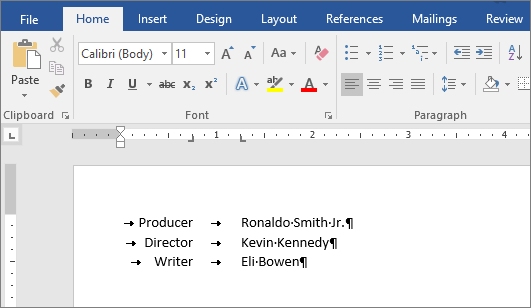
Drag a tab stop from the ruler to remove it.

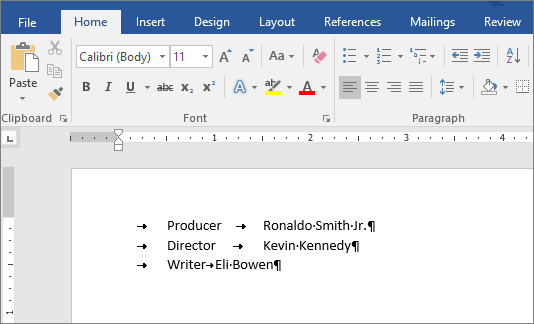
Note: When you release the mouse button, the tab stop disappears and your text moves to the next tab location or to the default tab spacing, set at every half inch.
The image below shows text aligned to tab stops that were added to the document—a right-aligned tab stop at .75 inches and a left-aligned tab stop at 1.25 inches.

After tab stops are removed, the text moves to the default tab locations of every half inch as shown in the next image.
 .
.
Set tabs in the Tabs dialog box
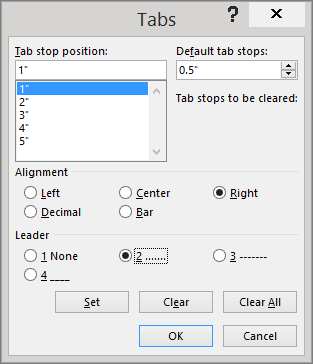
You can set tabs by using the Tabs dialog box. By using the Tabs dialog box, you get more precise tab positions and also can insert a specific character (leader) before the tab.
-
On the Home tab, in the Paragraph group, click the Paragraph dialog box launcher, and then click Tabs.

-
In the Tab stop position box, enter the position (measurement) on the ruler where you want to set the tab stop.

-
Under Alignment, choose Left, Center, Right, Decimal, or Bar.
-
Under Leader, choose 1 None, 2 dots, 3 dashes, or 4 underline to set—in the case of options 2, 3, and 4—a series of characters that links, for example, a section title with a page number.

-
Click Set > OK.
Clear tabs in the Tabs dialog box
You can clear all tab stops you set, or just clear one or more.
-
On the Home tab, in the Paragraph group, click the Paragraph dialog box launcher, and then click Tabs.
-
Choose one of the following:
-
To clear a single tab stop, in the Tab stop position list, choose a tab stop position, click Clear, and then click OK.

-
To clear all tab stops, click Clear All > OK.
-
You also can use Find and Replace to clear tabs. See Remove the default tab spacing for details.
Add an indent
You can add a first-line indent or a hanging indent. By using a first-line indent, you can set off the first line of text in a paragraph and let all lines that follow align left. With a hanging indent, the second line of text in a paragraph and all the following lines are indented more than the first line.

-
Do one of the following:
-
Drag the First Line Indent
 at the top of the ruler to the location where you want the first line of a paragraph to begin.
 -
Drag the Hanging Indent
 at the bottom of the ruler to the location where you want the second line of the paragraph and all lines thereafter to begin.
Note: If you don't see the ruler at the top of your document, click View > Ruler.
-
Add leaders between tab stops
Leaders are those special characters—dots, dashes, underlines—that create a visual link between tab stops. Most often, leaders are used in a table of contents or an index.
Note: If you want to use tab stops and leaders to format a table of contents, consider using Word to create a table of contents automatically.
-
Type the text that you want to appear before the leader.
-
On the horizontal ruler, set the tab stop that you want, and then double-click it.
-
In the Tabs dialog box, under Leader, choose 1 None, 2 dots, 3 dashes, or 4 underline to set a series of characters—in the case of option 2, 3, and 4—to create a link between tab stops.

-
Click OK, and then press Tab.
Tip: When you press Enter to start a new line, the formatted tab stop is available.
Change the spacing between the default tab stops
If you set manual tab stops, the default tab stops are interrupted by the manual tab stops that you set. Manual tab stops that are set on the ruler override the default tab stop settings. Remember that default tab stops are set at every half inch.
-
On the Home tab, in the Paragraph group, click the Paragraph dialog box launcher.
-
In the Paragraph dialog box, click Tabs.
-
In the Tabs dialog box, in the Default tab stops box.
-
Enter the amount (a unit of measure) of space you want between tab stops.
-
Click the up or down arrow and select a standard unit of measure (for example, .4").
-
-
Click OK.
Remove the default tab spacing
You can remove the default tab spacing and delete the tab stop characters in your document by manually selecting and deleting them. Or you can use Find and Replace to remove several tab stops or all tab stops.
-
On the Home tab, click Replace.
-
Type ^t in the Find what box and leave the Replace with box empty.
-
Do one of the following:
-
To delete one tab at a time, click Find Next and then Replace to move through the document.
-
To delete all tabs at once, click Replace All.
-


Microsoft Office Tutorials: Set, Clear, Or Remove Tab Stops >>>>> Download Now
ReplyDelete>>>>> Download Full
Microsoft Office Tutorials: Set, Clear, Or Remove Tab Stops >>>>> Download LINK
>>>>> Download Now
Microsoft Office Tutorials: Set, Clear, Or Remove Tab Stops >>>>> Download Full
>>>>> Download LINK ce