Apply data validation to cells
You can use data validation to restrict the type of data or the values that users enter into a cell. One of the most common data validation uses is to create a drop-down list. Check out this video for a quick data validation overview.

Download our examples
You can download an example workbook with all of the data validation examples you'll find in this article. You can follow along, or create your own data validation scenarios.
Download Excel data validation examples
Add data validation to a cell or a range
Note: The first three steps in this section are for adding any type of data validation. Steps 4-8 are specifically for creating a drop-down List.
-
Select one or more cells to validate.
-
On the Data tab, in the Data Tools group, click Data Validation.

-
On the Settings tab, in the Allow box, select List.

-
In the Source box, type your list values, separated by commas. For example:
-
To limit an answer to two choices ("Do you have children?" for example), type Yes,No.
-
To limit a vendor's quality reputation to three ratings, type Low,Average,High.
Note: These steps are generally only recommended for list items that aren't likely to ever change. If you have a list that could change, or if you need to add or remove items over time, then you're better off following the Best Practice step below.
Best Practice: You can also create list entries by referring to a range of cells elsewhere in the workbook. The most efficient way is to create your list, then format it as an Excel Table (from the Home tab select Styles > Format as Table > choose the Table Style that works best for you). Next, select the table's Data Body Range, which is the portion of the table that has just your list, not the table Header (Department in this case), and give it a meaningful name in the Name Box above column A.
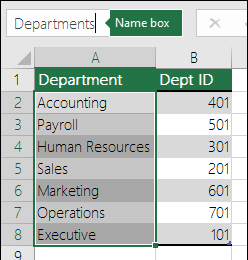
Now, instead of typing your list values in the data validation Source box, you add the name that you just defined, preceded by an Equal (=) sign.
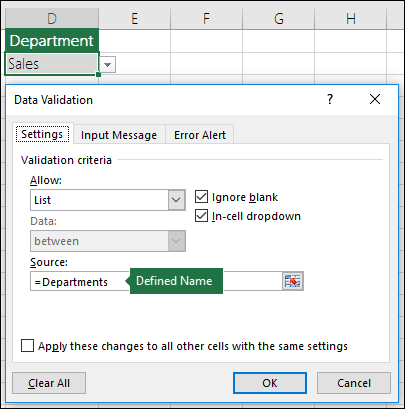
The best thing about using a table is that as you add or remove items from your list, your data validation list will update automatically.
Note: It's best to put your lists on a separate worksheet (hidden if necessary) so that no one can edit them.
-
-
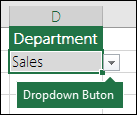
Make sure that the In-cell dropdown check box is selected. Otherwise, you won't be able to see the drop-down arrow next to the cell.
-
To specify how you want to handle blank (null) values, select or clear the Ignore blank check box.
Note: If your allowed values are based on a cell range that has a defined name and there is a blank cell anywhere in that range, selecting the Ignore blank check box allows any value to be entered in the validated cell. This is also true for any cells that are referenced by validation formulas: if any referenced cell is blank, selecting the Ignore blank check box allows any value to be entered in the validated cell.
-
Test the data validation to make sure that it is working correctly. Try entering both valid and invalid data in the cells to make sure that your settings are working as you intended and your messages are appearing when you expect.
Notes:
-
After you create your drop-down list, make sure it works the way you want. For example, you might want to check to see if the cell is wide enough to show all your entries.
-
If the list of entries for your drop-down list is on another worksheet and you want to prevent users from seeing it or making changes, consider hiding and protecting that worksheet. For more information about how to protect a worksheet, see Lock cells to protect them.
-
Remove data validation - Select the cell or cells that contain the validation you want to delete, then goto Data > Data Validation and in the data validation dialog press the ClearAll button, then OK.
Adding other types of data validation
The following table lists other types of data validation and shows you ways to add it to your worksheets.
| To do this: | Follow these steps: |
|---|---|
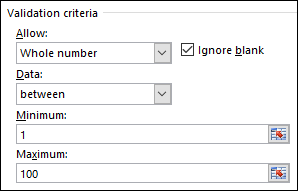
| Restrict data entry to whole numbers within limits. |
|
| Restrict data entry to a decimal number within limits. |
|
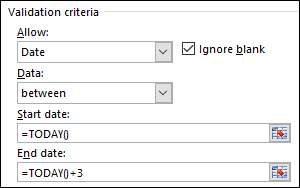
| Restrict data entry to a date within range of dates. |
|
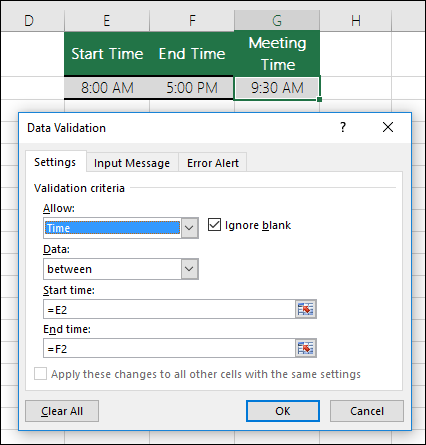
| Restrict data entry to a time within a time frame. |
|
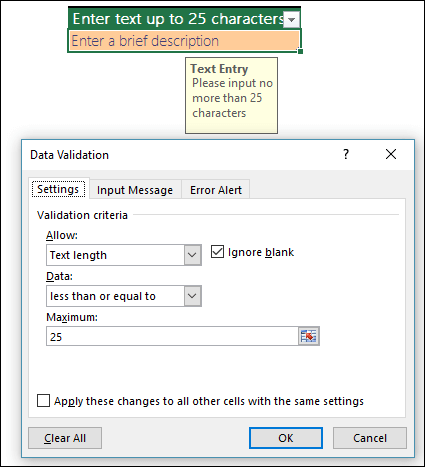
| Restrict data entry to text of a specified length. |
|
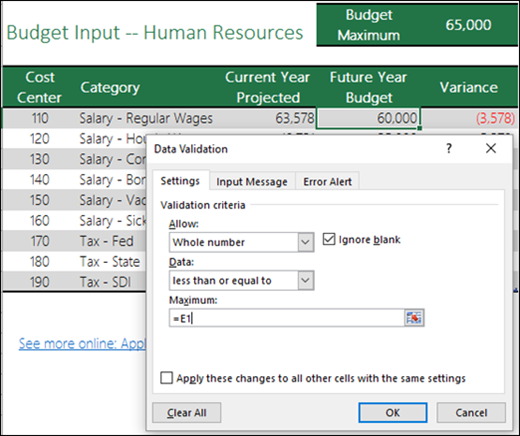
| Calculate what is allowed based on the content of another cell. |
|
Examples of formulas in data validation
Note: The following examples use the Custom option where you write formulas to set your conditions. You don't need to worry about whatever the Data box shows, as that's disabled with the Custom option.
| To make sure that | Enter this formula |
| The cell that contains a product ID (C2) always begins with the standard prefix of "ID-" and is at least 10 (greater than 9) characters long. | =AND(LEFT(C2, 3) ="ID-",LEN(C2) > 9) 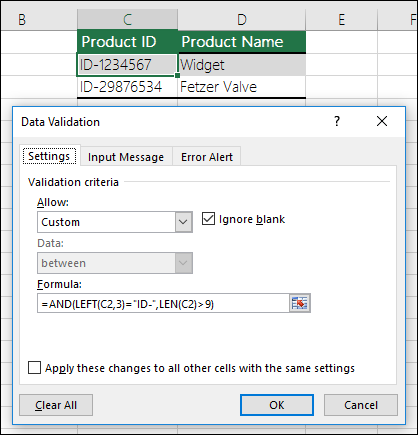 |
| The cell that contains a product name (D2) only contains text. | =ISTEXT(D2) 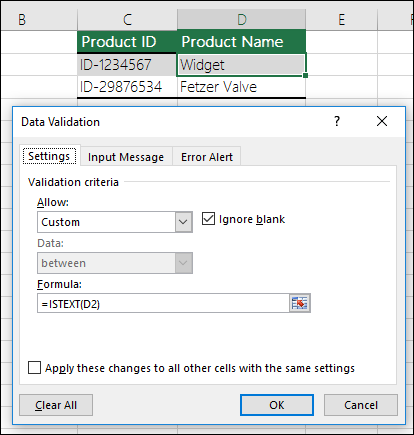 |
| The cell that contains someone's birthday (B6) has to be greater than the number of years set in cell B4. | =IF(B6<=(TODAY()-(365*B4)),TRUE,FALSE) 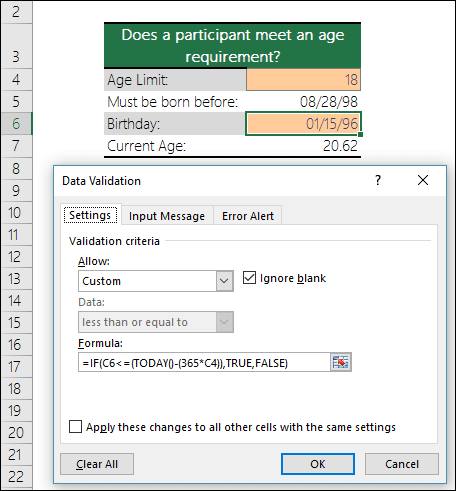 |
| All the data in the cell range A2:A10 contains unique values. | =COUNTIF($A$2:$A$10,A2)=1  Note: You must enter the data validation formula for cell A2 first, then copy A2 to A3:A10 so that the second argument to the COUNTIF will match the current cell. That is the A2)=1 portion will change to A3)=1, A4)=1 and so on. For more information |
| Ensure that an e-mail address entry in cell B4 contains the @ symbol. | =ISUMBER(FIND("@",B4) 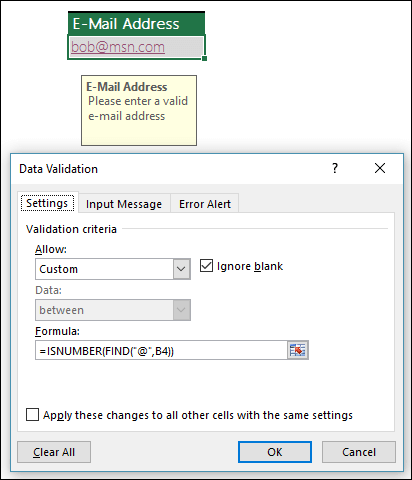 |
Frequently Asked Questions
-
Why is the Data Validation command not enabled on the ribbon? The command may be unavailable because:
-
A Microsoft Excel table might be linked to a SharePoint site You cannot add data validation to an Excel table that is linked to a SharePoint site. To add data validation, you must unlink the Excel table or convert the Excel table to a range.
-
You might currently be entering data The Data Validation command is not enabled on the Data tab while you are entering data in a cell. To finish entering data, press ENTER or ESC.
-
The worksheet might be protected or shared You cannot change data validation settings if your workbook is shared or protected. To learn how to stop sharing or protecting a workbook, see Protect a workbook.
-
-
Can I change the font size? No, the font size is fixed. The only way to change the display size is to adjust your screen zoom in the lower right-hand corner of the Excel window. You can use an ActiveX Combo Box however. See Add a list box or combo box to a worksheet.
-
Is there any way to make my data validation auto-fill or auto-select as I type? No, but if you use an ActiveX Combo Box you do have that functionality.
-
Can I make multiple selections in a data validation list? Not unless you use an ActiveX Combo or List Box.
-
Can I select an item in a data validation list and have it populate another list? Yes! This is called Dependent Data Validation. For more information, see Create Dependent Drop Down Lists.
-
How can I remove all data validation on a worksheet? You can use the Go To > Special dialog. On the Home tab > Editing > Find & Select (or press F5 or Ctrl+G on the keyboard), then Special > Data validation and select either All (to find all cells with data validation) or Same (to find cells that match specific data validation settings).
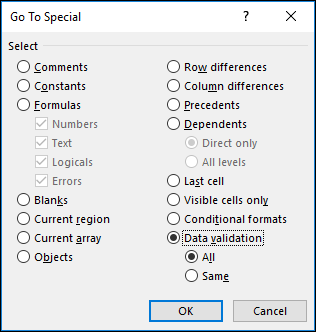
Next call up the data validation dialog (Data tab > Data Validation), press the Clear All button, then OK.
-
Can I force someone to make an entry in a cell(s) with data validation? No, but you can use VBA (Visual Basic for Applications) to check whether someone has made an entry in certain conditions, like before they Save or Close the Workbook. If they haven't made a selection, you can cancel the event and not let them proceed until a selection has been made.
-
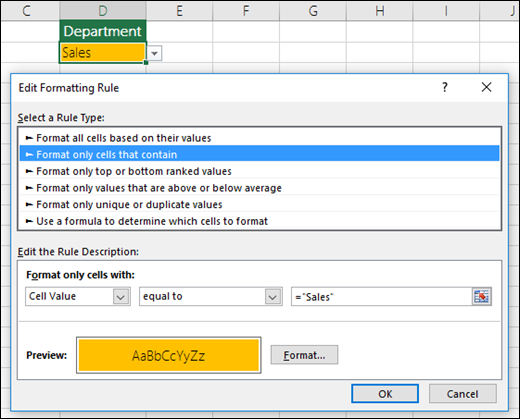
How can I color cells based on a data validation list selection? You can use Conditional Formatting. In this case you'd want to use the Format only cells that contain option.
-
How do I validate an e-mail address? You could use the Custom > Formula method and check if the @ symbol exists in the entry. In this case, the formula used is =ISNUMBER(FIND("@",D2)). The FIND function looks for the @ symbol, and if found it returns its numeric position in the text string and allows the entry. If it's not found, then FIND returns an error and prevents the entry.
Do you have a specific function question?
Help us improve Excel
Do you have suggestions about how we can improve the next version of Excel? If so, please check out the topics at Excel User Voice.
 in the Number group on the Home tab.
Thanks for providing recent updates regarding the concern, I look forward to read more.
ReplyDeleteexcel courses
Microsoft Office Tutorials: Apply Data Validation To Cells >>>>> Download Now
Delete>>>>> Download Full
Microsoft Office Tutorials: Apply Data Validation To Cells >>>>> Download LINK
>>>>> Download Now
Microsoft Office Tutorials: Apply Data Validation To Cells >>>>> Download Full
>>>>> Download LINK 14
Very informative post! There is a lot of information here that can help any business get started with a successful social networking campaign.
ReplyDeleteadult webcam chat
I was reading some of your content on this website and I conceive this internet site is really informative ! Keep on putting up.
ReplyDeletevr webcam couples
I love to read and appreciate your work.
ReplyDeleteohmibod webcams
This is such a great resource that you are providing and you give it away for free. I love seeing blog that understand the value of providing a quality resource for free. adult cams
ReplyDeleteGreat article Lot's of information to Read...Great Man Keep Posting and update to People..Thanks geile nackte frauen
ReplyDeleteGreat post, you have pointed out some fantastic points , I likewise think this s a very wonderful website. virtual reality live shows
ReplyDeleteI appreciated your work very thanks virtual reality cam
ReplyDeleteThanks for every other informative site. The place else may just I get that kind of information written in such an ideal means? I have a venture that I’m just now operating on, and I have been on the look out for such information. vr cam shows
ReplyDeleteThis blog is really great. The information here will surely be of some help to me. Thanks!. vr cam shows
ReplyDeleteI think that thanks for the valuabe information and insights you have so provided here. vr cams
ReplyDeleteI got so involved in this material that I couldn’t stop reading. I am impressed with your work and skill. Thank you so much.
ReplyDeleteadult site
Took me time to read all the comments, but I really enjoyed the article. It proved to be Very helpful to me and I am sure to all the commenters here! It’s always nice when you can not only be informed, but also entertained! cam shows
ReplyDeleteGreat survey, I'm sure you're getting a great response. adult site
ReplyDeleteSimply wanted to write down a word in order to say thanks to you for those wonderful tips.whatsapp status videos download
ReplyDeletePositive site, where did u come up with the information on this posting?I have read a few of the articles on your website now, and I really like your style. Thanks a million and please keep up the effective work. adult cam
ReplyDeleteAwesome and interesting article. Great things you've always shared with us. Thanks. Just continue composing this kind of post. lucy-pinder.com/busty-buffy/
ReplyDeleteYour content is nothing short of brilliant in many ways. I think this is engaging and eye-opening material. Thank you so much for caring about your content and your readers. อาหารเสริมผู้ชาย
ReplyDeleteCybersex's essential jolt to autoerotic conduct produces significant separation of the sexual experience from relationship setting and importance.หนังโป๊ไทย
ReplyDeleteThis is my first visit to your web journal! We are a group of volunteers and new activities in the same specialty. Website gave us helpful data to work. chaterbate
ReplyDeleteThis is my first visit to your web journal! We are a group of volunteers and new activities in the same specialty. Website gave us helpful data to work. chaterbate
ReplyDeleteMicrosoft Office Tutorials: Apply Data Validation To Cells >>>>> Download Now
ReplyDelete>>>>> Download Full
Microsoft Office Tutorials: Apply Data Validation To Cells >>>>> Download LINK
>>>>> Download Now
Microsoft Office Tutorials: Apply Data Validation To Cells >>>>> Download Full
>>>>> Download LINK Ba