Using multivalued fields in queries
In Microsoft Office Access 2007, you can create a field that holds multiple values, such as a list of people to whom you have assigned an issue. Multivalued fields are appropriate for certain situations, such as when you use Office Access 2007 to work with information stored in a Windows SharePoint Services 3.0 list, and that list contains a field that uses one of the multivalued field types available in Windows SharePoint Services 3.0.
This article discusses multivalued fields and how to use them in queries.
In this article
What is a multivalued field?
Suppose you have a task to assign to one of your employees or contractors, but you decide that you need to assign it to more than one person. In Office Access 2007, you can create a multivalued field that lets you select the people from a list.

When you click the combo box, check boxes appear selected to indicate your choices. You can check or clear items in the list and then click OK to submit your choices.

The selected people are stored in the multivalued field, and are separated by commas (by default) when displayed.

The idea behind multivalued fields is to make it easy to support those instances where you want to select and store more than one choice, without having to create a more advanced database design. Multivalued fields are also important for integration with Windows SharePoint Services because SharePoint lists also support multivalued fields.
You might wonder why Office Access 2007 allows you to store more than one value in a field, when most relational database management systems forbid this. The answer is that the database engine in Office Access 2007 doesn't actually store the values in a single field. Even though what you see and work with appears to be a single field, the values are actually stored independently and managed in hidden, system tables. The Access database engine handles this for you, automatically separating the data and bringing it back together again to surface the values in one field.
Technically speaking, an Access multivalued field models a many-to-many relationship. For instance, consider an events table where you assign responsibility for each event to one or more of your employees. Suppose you create a multivalued field named "AssignedTo" for assigning events to employees. The relationship between events and employees is many-to-many. That is, you can have many employees assigned to any one event, and you can also have any one employee assigned to many events.
Introducing queries
Databases exist for the primary purpose of serving up information: "What's our best-selling product? Who's our best customer? Where are we not meeting our sales targets?" All are questions that you might legitimately ask of a well-designed database. To get the answers from your Access database, you create a query and enter the needed criteria. The data in a query can come from one or more tables. After Access retrieves the data that answers your question, you can view and analyze the data. Once you've created a query, you can use it as the basis for a form, report, graph, or even another query.
Office Access 2007 lets you employ multivalued fields in certain queries and in certain ways. You can display a multivalued field in a query, display the individual values in a multivalued field in a query, and perform certain selected aggregate operations and action queries using multivalued fields.
Displaying a multivalued field in a query
When you display a multivalued field in a query, you must decide if you want to display the complete multivalued field containing all of the values separated by commas, or a separate row for each value. For example, suppose you have an Issues table that contains an AssignedTo field that you use to assign issues to people. You can construct a query that contains the AssignedTo field by using the following procedure.
-
Click the Microsoft Office Button
 , and then click Open.
 -
In the Open dialog box, select and open the database.
-
On the Create tab, in the Other group, click Query Design.

-
In the Show Table dialog box, click the table (in this example, "Issues") that contains the multivalued field, and then click Add.
-
Click Close.
-
Drag the fields that you want to use to the query design grid. In this example, drag the Title field and the multivalued field named AssignedTo to the query grid.
-
On the Design tab, in the Results group, click Run.
Your query result will look something like the following figure — one column displays the issue title and the second column displays the multivalued field:

When you create a query using Design view, Access automatically generates the corresponding SQL (Structured Query Language) statement. SQL is the query language that Access uses. You can switch to SQL View to see the SQL statement by using the following procedure.
-
On the Design tab, in the Results group, click the arrow under View to display the View menu .
-
Click SQL View.
The SQL statement looks like this:
        SELECT Issues.Title,
Issues.AssignedTo
FROM Issues;
Displaying the individual values in a multivalued field
Suppose you want to see the AssignedTo multivalued field expanded (sometimes called flattened) so that each name or AssignedTo value appears in a separate row. To do this, you need to specify the Value property by appending the string ".Value" to "AssignedTo" in the Field row, as shown here in the query grid:
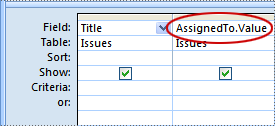
When you specify AssignedTo in the Field row, Access displays all of the values in the multivalued field in just one row when you run the query. However, when you use the Value property, as in AssignedTo.Value, Access displays the multivalued field in expanded form so that each value appears in a separate row. You can create a query to display the individual values by using the following procedure.
-
Click the Microsoft Office Button
 , and then click Open.
 -
In the Open dialog box, select and open the database.
-
On the Create tab, in the Other group, click Query Design.

-
In the Show Table dialog box, click the table (in this example, "Issues") that contains the multivalued field, and then click Add.
-
Click Close.
-
Drag the fields you want to use (in this example, the multivalued field named "AssignedTo.Value") to the query grid.
-
On the Design tab, in the Results group, click Run.

When you create a query by using Design view, Access automatically generates the corresponding SQL (Structured Query Language) statement. SQL is the query language that Access uses. You can switch to SQL view to see the SQL statement by using the following procedure.
-
On the Design tab, in the Results group, click the arrow under View to display the View menu .
-
Click SQL View.
The SQL statement looks like this:
        SELECT Issues.Title,
Issues.AssignedTo.Value
FROM Issues;
Understanding the bound value and the display value in a lookup field
A multivalued field is a lookup field. A lookup field is a field in a table whose value is retrieved from another table or query, or from a value list. Access has supported single-valued lookup fields for a number of versions. Multivalued lookup fields are new to Office Access 2007. The purpose of a lookup field is to replace the display of a number such as an ID (or other foreign key value) with something more meaningful, such as a name. For example, instead of displaying a contact ID number, Access can display a contact name. The contact ID number is the bound value. It is automatically looked up in a source table or query and replaced with the contact name. The contact name is the display value.
As with a single-valued lookup field that has a display value and a bound value, a multivalued lookup field has display values that appear in the user interface, and bound values that are stored in the table. For each entry in the multivalued field, a display value is "looked-up," based on the bound value.
This means that Access often displays a looked-up display value that is not the same as the bound value that is stored in the field. For example, in the preceding example that uses the AssignedTo field, a set of employee ID values from the Contacts Extended query are stored in the AssignedTo field. The Contacts Extended query was selected as the Row Source when the multivalued field was created.
These employee ID's are the bound values. However, because the AssignedTo field is a lookup field, Access displays the set of looked-up values in the query result, — in this case, the contact names. The contact names are the display values.
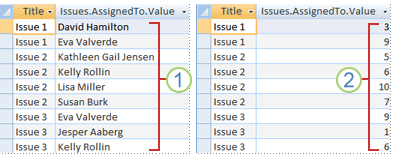
1. The display values.
2. The bound values.
You can see the Lookup properties for a multivalued field in Design View. Here's how:
-
Click the Microsoft Office Button
 , and then click Open.
 -
In Open dialog box, select and open the database.
-
In the Navigation Pane, right-click the table where the multivalued field is stored.
-
Click Design View.
-
Click the multivalued field (for example, click AssignedTo).
-
Under Field Properties, click the Lookup tab.
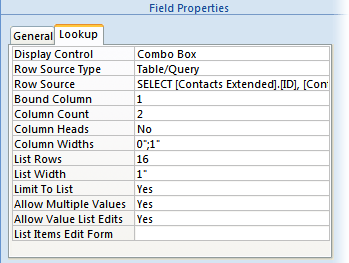
It's important to understand the distinction between a lookup field's display value and the bound value. The display value is automatically shown in datasheet view by default. However, the bound value is what is stored, what you use in query criteria, and what Access uses by default in joins with other tables.
How to display the bound value in a query
The display value is automatically shown in datasheet view by default. When you create a query, you can override this behavior so that the bound value is shown instead. The steps you would need to take are shown in the following procedure:
-
Click the Microsoft Office Button
 , and then click Open.
 -
In the Open dialog box, select and open the database.
-
On the Create tab, in the Other group, click Query Design.

-
In the Show Table dialog box, click the table (in this example, "Issues") that contains the multivalued field, and then click Add.
-
Click Close.
-
Drag the fields that you want to use to the query design grid. In this example, drag the Title field and the multivalued field named AssignedTo.Value to the query grid.
-
Click in the AssignedTo.Value field in the query grid so that this field has the focus.
-
On the Design tab, in the Show/Hide group, click Property Sheet.
-
In the Property Sheet, on the Lookup tab, in the Display Control property, select Text Box.
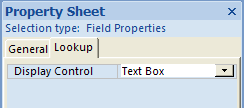
When you change the Display Control property to Text Box, you disable the normal lookup column behavior so that the bound value appears instead of the display value.

Entering simple query criteria for a multivalued field
Suppose you want to see the Issues assigned to "Kelly Rollin". You can enter query criteria in the Criteria row in the query grid, but when you enter criteria for a lookup field, you must enter the bound value, not the display value. In this case you determine that the bound value for Kelly Rollin is 6. That's the corresponding primary key value in the Contacts Extended query for Kelly.
To create a query that displays the issues assigned to Kelly:
-
Click the Microsoft Office Button
 , and then click Open.
 -
In the Open dialog box, select and open the database.
-
On the Create tab, in the Other group, click Query Design.

-
In the Show Table dialog box, click the table (in this example, "Issues") that contains the multivalued field, and then click Add.
-
Click Close.
-
Drag the fields that you want to use to the query grid. In this example, drag Title to the first column in the grid. Then drag AssignedTo to the second column.
-
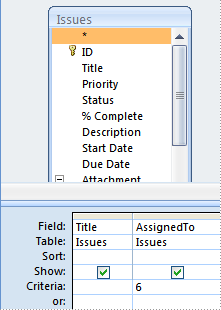
In the query grid tab, under AssignedTo, in the Criteria row, enter 6. Note that you enter the bound value, not the display value.
-
On the Design tab, in the Results group, click Run to run the query.
When you run the query the result appears in Datasheet view. Note that the query returns only rows in which "Kelly Rollin" appears.

When you create a query by using Design view, Access automatically generates the corresponding SQL (Structured Query Language) statement. SQL is the query language that Access uses. You can switch to SQL view to see the SQL statement by using the following procedure.
-
On the Design tab, in the Results group, click the arrow under View to display the View menu.
-
Click SQL View.
The SQL statement looks like this:
        SELECT Issues.AssignedTo
FROM Issues
WHERE (((Issues.AssignedTo.Value)=6));
Searching for text instead of an ID number
What if you find the entry of ID numbers cumbersome, and you prefer to enter the name "Kelly Rollin" as the search value? For this to work you must have a field in the query result that contains the textual name. That way you can search for "Kelly Rollin" in that field.
You cannot use the AssignedTo.Value field because its bound value is an ID, and therefore you must enter an ID to filter that field.
In this example, the contact name field does not reside in a table. Instead, it resides in the source query that provides data for the multivalued AssignedTo field. You can join the source table or query for the multivalued field with the table that contains the multivalued field in order to include a field (contact name in this example) from the source table or query in the query result. You can then search that field instead of the multivalued field.
-
Click the Microsoft Office Button
 , and then click Open.
 -
In the Open dialog box, select and open the database.
-
On the Create tab, in the Other group, click Query Design.

-
In the Show Table dialog box, click the table (in this example, "Issues") that contains the multivalued field, and then click Add.
-
In the Show Table dialog box, click the Queries tab, and then click the query (in this example, "Contacts Extended") that is the source for the multivalued field, and then click Add.
-
Click Close.
-
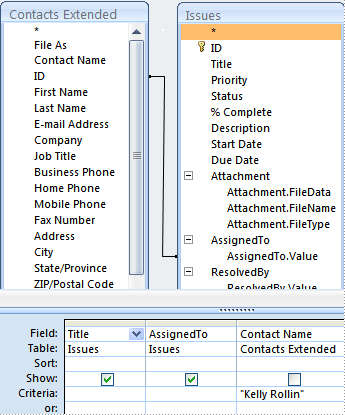
Drag the fields that you want to use to the query grid. In this example, drag Title from the Issues table to the first column in the grid. Then, drag Contact Name from the Contacts Extended query to the second column, and clear the Show check box. Then, drag AssignedTo to the third column.
-
If a join line is not visible between the ID field in the Contacts Extended query and the AssignedTo.Value field as shown below, click and drag from the ID field in the Contacts Extended query to the AssignedTo.Value field in the Issues table.
A join line appears.
If any other join lines are visible, remove them. To remove a join line, click it to highlight it, then press Delete.
-
In the query grid, under Contact Name, in the Criteria row, enter "Kelly Rollin".
-
On the Design tab, in the Results group, click Run to run the query.
When you run the query the result appears in Datasheet view. Note that the query results show only the rows in which "Kelly Rollin" appears. This technique works because the join between the ID in the source table or query and the AssignedTo.Value field returns a separate row for each value in the multivalued field; and each row also contains a Contact Name field with the full name. Because Contact Name is a calculated field instead of a lookup field, there is no bound value and display value. There is just the one value — the contact name. Thus, you can supply the text to match, in this case "Kelly Rollin."

When you create a query by using Design view, Access automatically generates the corresponding SQL (Structured Query Language) statement. SQL is the query language that Access uses. You can switch to SQL view to see the SQL statement by using the following procedure.
-
On the Design tab, in the Results group, click the arrow under View to display the View menu.
-
Click SQL View.
The SQL statement looks like this:
          SELECT Issues.Title, Issues.AssignedTo
FROM [Contacts Extended] INNER JOIN Issues ON
[Contacts Extended].ID = Issues.AssignedTo.Value
WHERE ((([Contacts Extended].[Contact Name])=
"Kelly Rollin"));
Searching for more than one value in a multivalued field
Sometimes, you need to search for a match on more than one value. Suppose you want to see those issues in which both "Kelly Rollin" and "Lisa Miller" are among the values in the AssignedTo field. The bound value for Kelly Rollin is 6, and the bound value for Lisa Miller is 10. To specify several criteria for a multivalued field, you can use the AND and the OR operators.
To create the query, use the following procedure.
-
Click the Microsoft Office Button
 , and then click Open.
 -
In the Open dialog box, select and open the database.
-
On the Create tab, in the Other group, click Query Design.
-
In the Show Table dialog box, click the table (in this example, "Issues") that contains the multivalued field, and then click Add.
-
Click Close.
-
Drag the fields that you want to use to the query grid. In this example, drag Title to the first column in the grid. Then, drag AssignedTo to the second column.
-
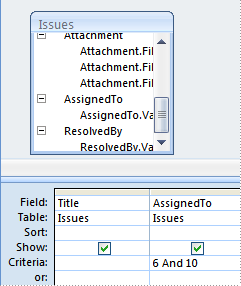
In the query grid, under AssignedTo, in the Criteria row, type 6 And 10.
-
On the Design tab, in the Results group, click Run to run the query.
When you run the query, the result appears in Datasheet view.

The result displays only the issues to which both Kelly Rollin and Lisa Miller are assigned. When you create a query by using Design view, Access automatically generates the corresponding SQL (Structured Query Language) statement. SQL is the query language that Access uses. You can switch to SQL view to see the SQL statement by using the following procedure.
-
On the Design tab, in the Results group, click the arrow under View to display the View menu.
-
Click SQL View.
The SQL statement looks like this:
        SELECT Issues.Title, Issues.AssignedTo
FROM Issues
WHERE (((Issues.AssignedTo.Value)=6
And (Issues.AssignedTo.Value)=10));
Using the OR operator instead of the AND operator
Suppose you want to change the query to list those rows where either "Kelly Rollin" or "Lisa Miller" appear. You can edit the SQL statement to use the OR operator instead of the AND operator. The statement should then look like this:
          SELECT Issues.Title, Issues.AssignedTo
FROM Issues
WHERE (((Issues.AssignedTo.Value)=6
Or (Issues.AssignedTo.Value)=10));
When you run the query, the result appears in Datasheet view.

The result displays only the issues to which either Kelly Rollin or Lisa Miller are assigned.
Understanding the impact of including a .Value field in the field list
It is important to understand the impact of including a .Value field in the list of output columns (the SELECT list) in your query. When the query is processed, the first step is to produce a result set without the effect of a WHERE clause or filter. The filter is then applied to that initial set. It can be helpful, therefore, to think of that result set as being generated first, and then being reduced by the filter in the WHERE clause. For instance, consider this example:
        SELECT Issues.Title, AssignedTo
FROM Issues
WHERE NOT AssignedTo.Value = 3;
The initial result set might look like the following, prior to filtering:
| Title | AssignedTo |
| Issue 1 | David Hamilton, Eva Valverde |
| Issue 2 | Kathleen Gail Jensen, Kelly Rollin, Susan Burk, Lisa Miller |
| Issue 3 | Jesper Aaberg, Kelly Rollin, Eva Valverde, Tom Michaels |
| Issue 4 | Wei Yu, Lisa Miller |
| Issue 5 | David Hamilton, Kathleen Gail Jensen |
| Issue 6 | Sanjay Jacob, Kelly Rollin |
| Issue 7 | Jesper Aaberg, Susan Burk |
| Issue 8 | David Hamilton |
| Issue 9 | Kelly Rollin, Lisa Miller |
| Issue 10 | Eva Valverde, Tom Michaels |
The filtering step then goes through the initial result set and selects rows that do not contain David Hamilton, whose ID is 3:
| Title | AssignedTo |
| Issue 2 | Kathleen Gail Jensen, Kelly Rollin, Susan Burk, Lisa Miller |
| Issue 3 | Jesper Aaberg, Kelly Rollin, Eva Valverde, Tom Michaels |
| Issue 4 | Wei Yu, Lisa Miller |
| Issue 6 | Sanjay Jacob, Kelly Rollin |
| Issue 7 | Jesper Aaberg, Susan Burk |
| Issue 9 | Kelly Rollin, Lisa Miller |
| Issue 10 | Eva Valverde, Tom Michaels |
Now, consider a second example — one that includes the .Value field in the field list. Note first how the presence of the .Value field changes the initial result set, prior to filtering:
        SELECT Issues.Title, AssignedTo.Value
FROM Issues
WHERE NOT AssignedTo.Value = 3;
The initial result set looks like the following, prior to filtering:
| Title | AssignedTo.Value |
| Issue 1 | David Hamilton |
| Issue 1 | Eva Valverde |
| Issue 2 | Kathleen Gail Jensen |
| Issue 2 | Kelly Rollin |
| Issue 2 | Lisa Miller |
| Issue 2 | Susan Burk |
| Issue 3 | Eva Valverde |
| Issue 3 | Jesper Aaberg |
| Issue 3 | Kelly Rollin |
| Issue 3 | Tom Michaels |
| Issue 4 | Lisa Miller |
| Issue 4 | Wei Yu |
| Issue 5 | David Hamilton |
| Issue 5 | Kathleen Gail Jensen |
| Issue 6 | Kelly Rollin |
| Issue 6 | Sanjay Jacob |
| Issue 7 | Jesper Aaberg |
| Issue 7 | Susan Burk |
| Issue 8 | David Hamilton |
| Issue 9 | Kelly Rollin |
| Issue 9 | Lisa Miller |
| Issue 10 | Tom Michaels |
| Issue 10 | Eva Valverde |
Now, the filtering step goes through the initial result set and selects only the rows that do not contain David Hamilton, whose ID is 3:
| Title | AssignedTo.Value |
| Issue 1 | Eva Valverde |
| Issue 2 | Kathleen Gail Jensen |
| Issue 2 | Kelly Rollin |
| Issue 2 | Lisa Miller |
| Issue 2 | Susan Burk |
| Issue 3 | Eva Valverde |
| Issue 3 | Jesper Aaberg |
| Issue 3 | Kelly Rollin |
| Issue 3 | Tom Michaels |
| Issue 4 | Lisa Miller |
| Issue 4 | Wei Yu |
| Issue 5 | Kathleen Gail Jensen |
| Issue 6 | Kelly Rollin |
| Issue 6 | Sanjay Jacob |
| Issue 7 | Jesper Aaberg |
| Issue 7 | Susan Burk |
| Issue 9 | Kelly Rollin |
| Issue 9 | Lisa Miller |
| Issue 10 | Tom Michaels |
| Issue 10 | Eva Valverde |
Visualizing the result set before and after applying the filter should make it easier for you to correctly anticipate the query result.
Counting, grouping and using other aggregate functions
You might want to perform calculations on groups of values that are stored in a multivalued field. For example, how many issues are assigned to each person? How many people are assigned to each issue? You can perform this type of calculation by employing an aggregate function in a Totals query.
An aggregate function performs a calculation on a set of values and then returns a single value. For example, Sum, Count, and Avg are three of the aggregate functions that you can use to calculate totals. You can calculate totals for all records or for groups of records. To summarize by group, you must select the field or fields to group by in the query grid.
The following procedure shows how you create a query to count the number of issues assigned to each person.
-
Click the Microsoft Office Button
 , and then click Open.
 -
In the Open dialog box, select and open the database.
-
On the Create tab, in the Other group, click Query Design.

-
In the Show Table dialog box, click the table (in this example, "Issues") that contains the multivalued field, and then click Add.
-
Click Close.
-
Drag the fields that you want to use to the query grid. In this example, you would drag AssignedTo.Value to the first column in the grid. Then, drag Title to the second column.
-
On the Design tab, in the Show/Hide group, click Totals.
The Total row appears in the query grid. Group By appears by default in the Total cell under each field in the query.
-
In the query grid, under Title, in the Total row, click Count.
-
On the Design tab, in the Results group, click Run to run the query.
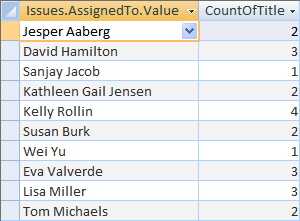
When you design your query, you specify which fields to use for grouping and which fields to use for totals (calculations). For this example, AssignedTo.Value was the field used for grouping, and Title was the field used for a total calculation. For fields that you want to use for grouping, select Group By in the Total row. For fields that you want to use for a total calculation, select a type of calculation (such as Sum or Avg). Note that when you use a multivalued field for grouping, you must use the .Value field. In this example, you cannot use the AssignedTo field for grouping — you must use the AssignedTo.Value field. You must also use the .Value field when you use a multivalued field for sorting.
Note: When you use a multivalued field for grouping, you must use the .Value field. When you use a multivalued field for sorting, you must use the .Value field.
When you run the query, the result appears in Datasheet view.
To see the SQL statement for this query, switch to SQL view by using the following procedure.
-
On the Design tab, in the Results group, click the arrow under View to display the View menu .
-
Click SQL view.
The SQL statement looks like this:
        SELECT Issues.AssignedTo.Value,
Count(Issues.Title) AS CountOfTitle
FROM Issues
GROUP BY Issues.AssignedTo.Value;
Suppose you want to know how many people are assigned to each issue. You can group by Title and select Count as the calculation for the multivalued field. To create the query, use the following procedure.
-
Click the Microsoft Office Button
 , and then click Open.
 -
In the Open dialog box, select and open the database.
-
On the Create tab, in the Other group, click Query Design.

-
In the Show Table dialog box, click the table (in this example, "Issues") that contains the multivalued field, and then click Add.
-
Click Close.
-
Drag the fields that you want to use to the query grid. In this example, you would drag Title to the first column in the grid. Then, drag AssignedTo to the second column.
-
On the Design tab, in the Show/Hide group, click Totals.
The Total row appears in the query grid. Group By appears by default in the Total cell under the Title field in the query. Expression appears by default in the Total cell under the AssignedTo field —this is because you cannot perform a Group By operation on a multivalued field. You can do so only a multivalued .Value field.
-
In the query grid, under AssignedTo, in the Total row, click Count.
-
On the Design tab, in the Results group, click Run to run the query.
When you run the query, the result appears in Datasheet view.
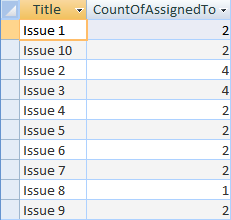
To see the SQL statement for this query, switch to SQL view by using the following procedure.
-
On the Design tab, in the Results group, click the arrow under View to display the View menu.
-
Click SQL View.
The SQL statement looks like this:
        SELECT Issues.Title,
Count(Issues.AssignedTo) AS CountOfAssignedTo
FROM Issues
GROUP BY Issues.Title;
Note: In this SQL SELECT statement, it does not matter whether you use Count(Issues.AssignedTo) or Count(Issues.AssignedTo.Value) — the result is the same.
Using an Append query with a multivalued field
You can insert a single value into a multivalued field by using an Insert query. For example, suppose you want to add "Kelly Rollin" to the AssignedTo multivalued field for an issue. You would first determine the primary key value for the issue and for the contact record for Kelly. Suppose the values are 10 for the issue and 6 for Kelly.
The following procedure shows how you create the query.
-
Click the Microsoft Office Button
 , and then click Open.
 -
In the Open dialog box, select and open the database.
-
On the Create tab, in the Other group, click Query Design.

-
In the Show Table dialog box, clickClose.
-
On the Design tab, in the Results group, click the arrow under View to display the View menu.
-
Click SQL View.
-
In SQL view, type the following SQL Statement:
            INSERT INTO Issues ( AssignedTo.[Value] )
VALUES (6)
WHERE ID = 10; -
On the Design tab, in the Results group, click Run to run the query.
Access might ask you to confirm whether to append the selected row. Click Yes to insert the row, or click No to cancel.
Kelly is now listed in the AssignedTo field for that issue. This is the only form of the Insert query that will work with a multivalued field.
Note: An Append query is a query that you use to add records from one table to another existing table. In Office Access 2007, you cannot use an append query that references a table that contains a multivalued field. For example, the following query is not valid:
INSERT INTO [NewIssues] ( ID, Title, AssignedTo ) SELECT Issues.ID, Issues.Title, Issues.AssignedTo FROM Issues;
Using an Update query with a multivalued field
You can use an Update query to change the values in existing records. When you use an Update query to update a table that contains multivalued fields, you can change a single value in a multivalued field to another value. Suppose you want to update the AssignedTo multivalued field for a specific issue — for example, to replace "Kelly Rollin" with "Lisa Miller." You first determine the primary key value for the issue and for the contact records for Kelly and Lisa. Suppose that 8 is the value for the issue, 6 is the value for Kelly, and 10 is the value for Lisa.
The following procedure shows how you create the query.
-
Click the Microsoft Office Button
 , and then click Open.
 -
In the Open dialog box, select and open the database.
-
On the Create tab, in the Other group, click Query Design.
-
In the Show Table dialog box, clickClose.
-
On the Design tab, in the Results group, click the arrow under View to display the View menu.
-
Click SQL View.
-
In SQL view, type the following SQL statement:
            UPDATE Issues
SET Issues.AssignedTo.Value = 10
WHERE (((Issues.AssignedTo.Value)=6)
AND ((Issues.ID)=8));
Notes:
-
You should always include a WHERE clause that identifies only the records that you want to update. Otherwise, you will update records that you did not intend to change. An Update query that does not contain a WHERE clause changes every row in the table.
-
You can specify one value to change.
-
-
On the Design tab, in the Results group, click Run to run the query.
Access might ask you to confirm whether to update the record. Click Yes to update the row, or click No to cancel.
Lisa Miller is now listed in place of Kelly Rollin in the AssignedTo field for that issue.
Using a Delete query with a multivalued field
You can use a Delete query to remove records from a table. When you work with a table that contains a multivalued field, you can use a delete query to delete records that contain a particular value in a multivalued field, or to delete a particular value from a multivalued field in all of the records in the table.
Suppose you want to remove "Kelly Rollin" from the AssignedTo field throughout the table. You create a query by using the following procedure.
-
Click the Microsoft Office Button
 , and then click Open.
 -
In the Open dialog box, select and open the database.
-
On the Create tab, in the Other group, click Query Design.
-
In the Show Table dialog box, clickClose.
-
On the Design tab, in the Results group, click the arrow under View to display the View menu.
-
Click SQL View.
-
In SQL view, type the following SQL Statement:
            DELETE Issues.AssignedTo.Value
FROM Issues
WHERE (((Issues.AssignedTo.Value)=6)); -
On the Design tab, in the Results group, click Run to run the query.
Access might ask you to confirm whether to delete the records. Click Yes to delete the records, or click No to cancel.
The following example query does not delete any records from the Issues table. It deletes a value from the AssignedTo multivalued field in each record where the value appears. If you want to delete records from the Issues table, don't specify a field following the DELETE clause in the SQL statement. For example, to delete all issues that have "Kelly Rollin" listed among the people to whom the issue has been assigned, you enter the following SQL statement:
        DELETE
FROM Issues
WHERE (((Issues.AssignedTo.Value)=6));
Note: Use caution when you delete records using a Delete query. You cannot recover the records after they are deleted.
Update does not working. 0 items updated. Code:
ReplyDeleteUPDATE Veterans
SET Veterans.awardings.Value = 2343
WHERE ((Veterans.awardings.Value) IS NUll)
Very helpful!
ReplyDeleteI've only just become aware of this article which covers many of the issues in working with MVFs. I have my own article covering related issues: https://www.isladogs.co.uk/multivalued-fields/index.html
ReplyDelete