Migrate your SharePoint Online Public Website to a partner website
If you have a public website hosted by Office 365 and you want to migrate the content to one of Office 365 public website partner sites, such as GoDaddy or Wix.com, follow the general guidelines here to set up and move to your new site.
To illustrate the steps, we'll use an example Office 365 website, Contoso Bistro.
-
Instructions for GoDaddy
-
Instructions for Wix.com
Before you start: Add a network location
Adding the folder with your website's files as a network location will let you easily browse to and copy files to the partner site by accessing your site's files using File Explorer. These steps assume you have an Office 365 account with a public website and administrator sign-in credentials to access the account.
-
Sign in to Office 365 with your work or school account. For example ellen@contoso.onmicrosoft.com, ellen@contoso.edu, or ellen@contoso.com. If you're not sure what your work or school account is, check the welcome email message that asked you to sign in the first time.
When you sign in, be sure to check the Keep me signed in box, or you'll get an access denied error when you try to connect to the network location later.
-
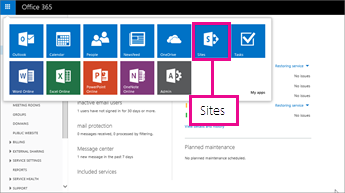
In Office 365, select the waffle menu at the top left, select Sites, and then select Public site.
-
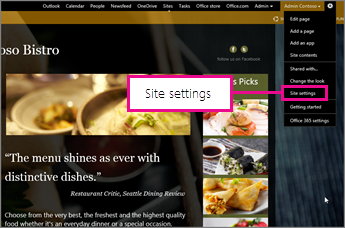
In Office 365, select the gear menu in the top right, and select Site settings.
-
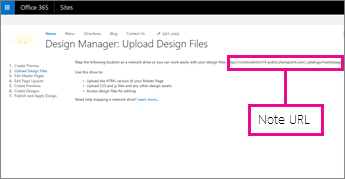
Select Design Manager, and select Upload Design Files.
-
Take note of the URL that follows this text: Map the following location as a network drive:.
-
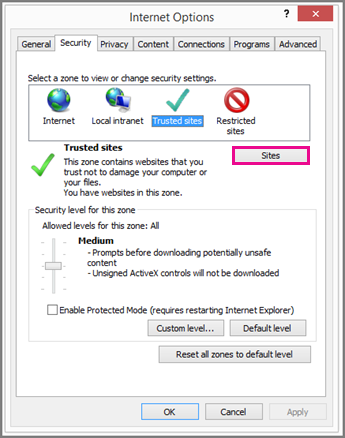
In Internet Explorer, select the gear menu at the top right, select Internet Options, and then select the Security tab.
-
Select Trusted sites, and select Sites.
-
Add the website address you copied earlier, for example, https://contosobistro14-public.sharepoint.com/.
-
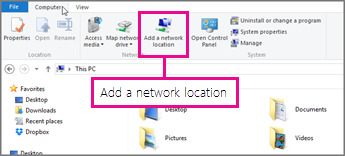
Open File Explorer, select the Computer tab at the top of the window, and then select Add a network location.
-
Follow the steps in the Add Network Location Wizard by using the website address you copied above.
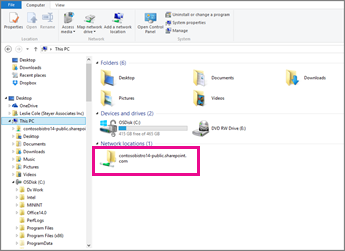
Your website will be added to your computer network locations.
Copy content to a new GoDaddy website
These steps assume that you've purchased a GoDaddy account with a Business or Business Plus subscription. You can purchase a discounted plan by going to GoDaddy from the GoDaddy partner link in Office 365.
If you need help completing these steps, contact GoDaddy support.
-
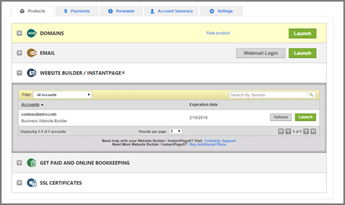
In a browser tab, sign in to your account at GoDaddy and open Website Builder.
-
Set up a few basic elements for your new website. You'll need a basic website structure so you can copy content to the pages. You can add more features later. GoDaddy provides detailed help for learning about working with Website Builder. To get started, you should:
Select a theme for your new website. Unless you have a lot of experience designing websites, we recommend that you choose one of the business website templates that GoDaddy offers. Pick a design that most closely matches your Office 365 website design, unless you want to change the design when you migrate.
Choose a background and a title. You can change the background later; for example, you might want to use the same background that you have for your Office 365 website so you can change it to that after you copy the background over to GoDaddy with your other content. The title will appear on every page of your website.
-
Migrate content from your Office 365 website's home page. Follow the basic steps here to copy over content from Office 365, from the folder that you already added as a network location. After you migrate the home page, you'll copy over content for other pages in a similar way. You can also add navigation between the pages. But first, let's look at an example of copying home page content.
These are the basic steps.
-
Copy content from your Office 365 page.
-
Create a corresponding page on your new GoDaddy site.
-
Paste content in your newly created GoDaddy page.
To make copying the content easier, open two browser windows or tabs, one to display your Office 365 website and the other with GoDaddy's Website Builder page. Then take a look at the different areas on your Office 365 website home page that you'll copy to your GoDaddy site.
For our Contoso Bistro example, these are the key elements.
-
Banner image
-
Body text
-
Sidebar with images
Let's look at how you could migrate each of these.
-
Banner image
To copy your banner image to your GoDaddy website, drag and drop the image from the network drive with your Office 365 website files (the banner image is probably in the SiteAssets subfolder) over to the GoDaddy Website Builder window.
Or, follow the steps in GoDaddy Help to browse to an image file and insert it.
Body text
-
In the GoDaddy Website Builder left pane, select Text. You see a text box on the editing canvas with placeholder text.
-
In the window with your Office 365 website, select and copy the text you want to use.
-
In the GoDaddy Website Builder window, paste the text into the text box you added, and in the shortcut menu, select Edit.
-
Select and format sections of your text, using the options that appear above the text box. For example, you can change the text color by setting that color for each text box.
GoDaddy Help includes more details about how to add and edit text.

Sidebar with images
-
Copy images to your GoDaddy website from the network drive with your Office 365 website files by dragging and dropping (to the GoDaddy Website Builder window) the images that you want to include in the sidebar.
Or, follow the steps in GoDaddy Help to browse to image files and insert them.
-
Select individual images to resize and position them as you like. The images rearrange to fill the space provided to them.
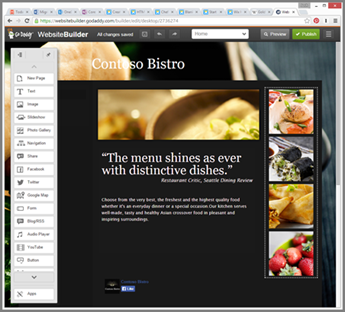
For Contoso Bistro, to get a vertical column, we reduced the width of the gallery.
-
To set the background color, select the gallery, and in the menu that appears, select Settings. On the Advanced tab, select a background color you want for the gallery, and then select Save.
For Contoso Bistro, we chose a color that matches the background.
Notes for migrating a website to GoDaddy
Here are some things to keep in mind when you migrate a website from Office 365 to GoDaddy.
-
Unlike Office 365 public websites, a GoDaddy Website Builder website can't be set as "public" unless you change the address to use a custom domain. That is, you can't make the website accessible to anonymous HTTP traffic and visible on the Internet unless you change the URL to use your domain name.
Table row
Office 365 website
GoDaddy website
With no custom domain
yourcompanyname-public.sharepoint.com
None
With a custom domain
www.yourdomain.com
www.yourdomain.com
-
The address for the home page for a GoDaddy Website Builder website can be set to use your domain, just as with an Office 365 website homepage. But, the URL format of other GoDaddy Website Builder pages is different from that of Office 365 website pages. People won't be able to get to your GoDaddy Website Builder pages using the same URL that they did for your Office 365 website pages.
You also can't add HTTP 301 (Moved Permanently) redirects from Office 365 website–formatted URLs to GoDaddy-formatted URLs. To learn more about how these redirects are set up and used, see the information here.
Here's an example of how the addresses are different.
Table row
Office 365 website
GoDaddy website
Home page
www.yourdomain.com/
www.yourdomain.com/
Other pages
www.yourdomain.com/contoso
www.yourdomain.com/contoso.html
This might be important for your website's search result rankings. That's because Google and Bing use links between websites to help determine search result ranking. In addition, you might need to fix some broken links. For example, if Website A has "deep links" to Website B's "About Us" (websiteb.com/about-us) page, then after Website B migrates from Office 365 to GoDaddy, Website A's hyperlink will be broken (it will return a 404 error) because the new "About Us" page on the GoDaddy website will have an .html file name extension.
-
You can't make global "theme" changes after you've chosen a template to use. Instead, you pick a theme and then make customizations for each area separately. For example, if you pick a template with black text on a white background, and you decide you want to change the background to black, you'll have to change the text color for each text box, one by one, to avoid having black text on a black background. Be aware that some widgets in GoDaddy Website Builder don't let you change the text color.
Copy content to a new Wix.com website, including page content, and images and other files
These steps assume that you've purchased a Wix.com subscription. You can purchase a discounted plan by going to Wix.com from the Wix.com partner link in Office 365.
If you need help completing these steps, contact Wix.com support.
-
In a browser tab, sign in to your account at Wix.com.
-
Set up a few basic elements for your new website. You'll need a basic website structure so you can copy content to the pages. You can add more features later. Wix provides detailed help for learning about working with their website builder. To get started, you should:
Start by selecting a template (similar to a theme) for your new website. You can refresh the design of your Office 365 website while you're moving content to Wix by choosing one of the business website templates that Wix.com offers. Pick a design that most closely matches your Office 365 website design, unless you want to change it when you migrate. Or, you can choose the Blank template and then Start from Scratch to create a site from an empty template.
Next choose a background (select the Design icon and then Background) and a title. You can change the background later; for example, you might want to use the same background that you have for your Office 365 website. You can change it when you copy your content over. The title will appear on every page of your website.
-
Migrate content from your Office 365 website's home page. Follow the basic steps here to copy over content from Office 365, from the folder that you already added as a network location. After you migrate the home page, you'll copy over content for other pages in a similar way. You can also add navigation between the pages. But first, let's look at an example of copying home page content.
These are the basic steps.
-
Copy the content.
-
Create a corresponding page on your new Wix.com site.
-
Paste the content.
To make copying the content easier, open two browser windows or tabs, one to display your Office 365 website and the other with Wix open. Then take a look at the different areas on your Office 365 website home page that you'll copy to Wix.
For our Contoso Bistro example, these are the key elements:
-
Banner image
-
Body text
-
Sidebar with images
Let's look at how you could migrate each of these.
-
Migrate a banner image
Follow the steps provided in Wix Help to add an image to use for your banner. When you're prompted to upload an image, browse to your banner image on the network drive with your Office 365 website files. The banner image is probably in the SiteAssets subfolder.
Migrate body text
Follow the steps provided in Wix Help to copy and add text using text from your current Office 365 website.
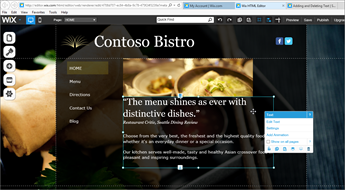
Migrate a sidebar with images
You can add several different kinds of galleries for a Wix website. To copy over photos to use for the gallery, follow the steps provided in Wix Help to add images. When you're prompted to upload images, browse to the network drive with your Office 365 website files.
Notes for migrating a website to Wix.com
Here are some things to keep in mind when you migrate a website from Office 365 to Wix.com.
-
Like Office 365 public websites, a Wix.com website can be set as "public" without changing the address to use a custom domain. That is, you can make the website accessible to anonymous HTTP traffic and visible on the Internet without changing the URL to use your domain name.
Table row
Office 365 website
Wix.com website
With no custom domain
yourcompanyname-public.sharepoint.com
youraccount.wix.com/yourwebsitename
With custom domain
www.yourdomain.com
www.yourdomain.com
A website that you create on Wix.com will have a URL (address) that follows this format: http://www.contoso.com#!menu/c1zqp
-
Here's an example of how the addresses are different.
Table row
Office 365 website
Wix.com website
Home page
www.yourdomain.com/
www.yourdomain.com/
Other pages
www.yourdomain.com/contoso
www.yourdomain.com/#!contoso/c1zqp
Change your website address to use your domain name (GoDaddy and Wix.com)
After you finish designing your new website at GoDaddy or Wix.com, you can set up the website address with your domain name so people can easily find your site, like www.contoso.com.
If you need help completing these steps, contact GoDaddy or Wix.com support.
GoDaddy
When you sign in, you provide a domain that will be used when you publish your website.
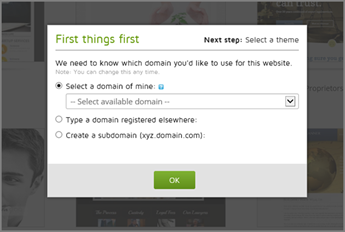
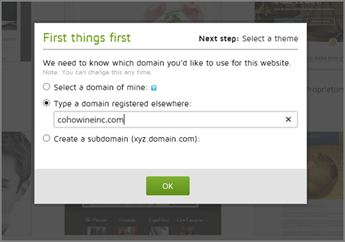
If Office 365 manages the DNS records for the domain, then when you choose to publish the site, it will work automatically.
If you manage DNS for your domain outside of Office 365, follow these steps to set up your domain to use with your GoDaddy website.
Wix.com
If Office 365 manages the DNS records for the domain, then when you choose to publish the site, it will work automatically.
If you manage DNS for your domain outside of Office 365, to set up your website with your domain, you add three DNS records for the domain at your domain's DNS host:
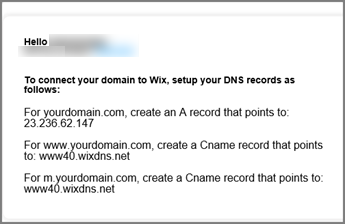
Wix provides steps for adding the DNS records at a number of popular domain registrars. Choose the steps provided for Pointing, not the Name Servers option.
If you change your mind, you can unpublish your site.
No comments:
Post a Comment