Getting started with Visio
This article walks you through a first experience using Visio, beginning from when you first start Visio, through the basics of making and saving a simple diagram. To begin, start Visio on your computer.
Start Visio
Visio opens to the Start Page, where you can find templates for many diagram types.
Templates are unfinished example diagrams that serve as starting points. Visio templates come with shapes and tools for a specific type of diagram, arranged around a blank page where you drag and connect the shapes into a drawing.
Open a template
Click the template type that you want, or click Basic Diagram to start from scratch. A small window opens with some information and the option to use metric units or US units. Click the Create button to open the template.
Above the blank drawing page is the Microsoft Office ribbon, which contains commands and tools for diagramming. If you see only the tab names and no buttons, click a tab name to open the ribbon temporarily to that tab.
Tip: To keep the ribbon open all the time, click the little pin icon  in the top right corner.
Shapes window
On the left side is the Shapes window. It contains stencils that hold shapes – in this diagram, flowchart shapes.

-
Stencil – Stencils are containers for holding related shapes. Templates generally have more than one stencil, to help organize shapes into categories. Stencils have title bars near the top of the Shapes window. Click a stencil title bar to see the shapes it contains.
-
Shape – Pretty much everything from a template that you can use in your diagram is a shape, including connectors and even the page. Shapes are more than icons or pictures, because they have abilities that help you customize your diagram.
At the top of the open stencil, but below the stencil title bars, is a tab labeled More Shapes. Click it to open a menu of options for finding more shapes to use in your diagram.
-
My Shapes – If you download or create custom stencils and save them in your My Shapes folder, those stencils will automatically show up on this submenu. Visio creates a My Shapes folder inside your Documents folder.
-
Business, Engineering, Flowchart, and other categories – Browse through these categories to find stencils from other templates when you need to include shapes that aren't in the template you started with.
-
Visio Extras – This stencil contains special shapes not included in other stencils, such as symbols, icons, connectors, callouts, engineering and architectural tools or titles. Choose as many of these as you want to add to your stencil list.
-
Open Stencil, New Stencil – Open lets you browse your computer or network for stencil files (.vss) that you can add to your diagram. New opens an empty stencil that you can add shapes to by dragging the shapes and dropping them on the new stencil. Save your custom stencil by right-clicking the stencil title bar and clicking Save.
-
Show Document Stencil – This is a stencil that contains all the shapes that are currently in the document, and also all the shapes that have been dropped on the document and then deleted from the page.
Quick Shapes is the top-most title bar. Each stencil has its own set of Quick Shapes, the shapes most often used in that stencil. The Quick Shapes stencil keeps together the Quick Shapes from all the stencils you're using, giving you one place to find the most popular shapes for the type of diagram you're creating.
If you can't find a shape you want, try searching. Click Search at the top of the Shapes window, then type in a keyword.
Create a simple diagram
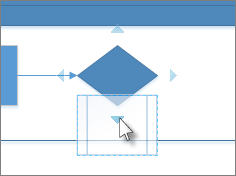
Drag a shape from the Shapes window and drop it on the page. Leave the mouse pointer over the shape until four arrows  appear around the sides. These are AutoConnect arrows, which give you several ways to automatically connect shapes.
-
Hold the mouse pointer over one of the arrows and a mini toolbar appears, holding the top four shapes in the Quick Shapes area.

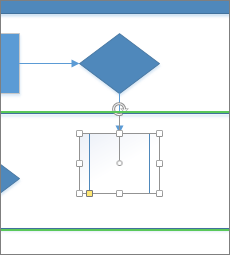
Move the pointer over each to see a preview of that shape on your diagram. Click the one that you want, and that shape appears with a connector between it and your first shape. -
Drag a shape from the Shapes window and hold it over a shape on the page until the arrows appear, then drop the shape on top of one of the arrows.
 To connect two shapes, drag one on top of an autoconnect arrow of another shape.

-
Hold the pointer over a shape until the arrows appear, then grab an arrow, drag it to a shape you want to connect to, and drop it in the middle of the second shape.
Note: Some templates have other handy ways to add and connect shapes. For example, the organization chart template lets you drop subordinates' shapes on top of a manager's shape, automatically forming that manager's reporting structure.
Add text to the shapes
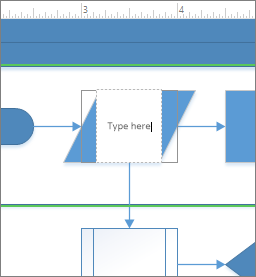
Click a shape once and start typing. Press ESC or click an empty area of the page when you're done typing.

Add text to a connector the same way. After you press ESC or click away, select the connector again and you'll see a tiny box on the text – this is a handle for moving the text block. Click and drag it up, down, or beside the connector.
Move text on a shape
Click Home > Tools > Text Block  , go to a shape that has text on it, and drag the text around. Go back and click Home > Tools > Pointer Tool
  when you're done moving text.
Change the font, size, and other formatting
Select a shape that has text. Click Home and use tools in the Font and Paragraph groups to format the text.
Make the diagram look better
Click Design > Backgrounds > Backgrounds. Click one of the background designs.
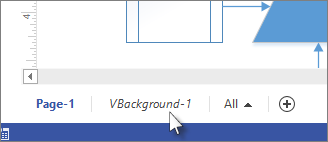
Now look down at the bottom of Visio, just under the drawing page. There are two tabs: Page-1 and VBackground-1. Page-1 is the page with the shapes on it, and VBackground-1 is a background page you just added. Click VBackground-1 to see just the background page, and then click Page-1 to go back to the diagram.

Click Design > Backgrounds > Borders & Titles. Click one of the options to add it to the diagram.
Notice the border and title are added to the background page, so if you want to add the title, click the tab for the background page. Now click Title once and start typing. The title changes to your new text. When you're done, click the Page-1 tab to go back to your diagram.
Add color and other formatting
On the Design tab, in the Themes group, move the pointer slowly over the different themes. Each theme adds different colors and effects to the diagram. Click the one you want to apply.
Save the diagram
-
Click File > Save. Look at the options and select a location to save your file.
-
In the Save As dialog box, find the Save as type list just under the File name box and click the down arrow to open the list. There are a lot of formats you can save your diagram in, including a number of image formats and PDF.
Click File and try some of the other tabs in the side bar, such as Share and Export, to see what options are available.
Really well information. Thanks a lot. Here, I got the special deals for Microsoft Visio Professional 2016 and many more .Our specialty is quick email delivery. You will get 24/7 support. So let’s check it out.
ReplyDelete