Set permissions for a shared folder
Instructions for setting up your new shared notebook
OneNote has created the shared notebook on your computer at the location that you specified in the New Notebook Wizard.
To finish setting up this shared notebook and allow others to access it, you need to specify its access permissions. Follow the instructions in this article to specify the access permissions on Windows Vista or Microsoft Windows XP.
To continue, click the heading for the operating system that your computer is running:
Windows Vista
Set shared notebook permissions on Windows Vista
Each user with whom you want to share your notebook must have a user account and password on the same network as you.
-
In Windows Vista, click the Start button
 , and then click Documents.
 -
In the Documents folder, open the OneNote Notebooks folder. This is where OneNote typically stores all of your notebook folders. If the folder of a particular notebook that you want to share is located elsewhere on your computer, navigate to its correct location.
-
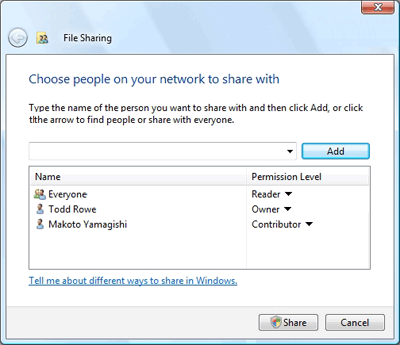
Click the name of the shared notebook that you created with the New Notebook Wizard, and then click Share on the menu bar. The File Sharing dialog box opens.

-
In the File Sharing dialog box, do one of the following:
-
To share your notebook with everyone on your network, click the arrow to the right of the text box, and then click Everyone.
-
To share your notebook with a specific user or group of people, type the name of the user or group, and then click Add. Repeat this for every additional user or group that you want to add to your permissions list.
-
To find specific users on your network before adding them, click the arrow to the right of the text box, and then click Find. Type the name of the person you want to share files with, click Check Names, and then click OK.
-
-
When the name of the user or group that you selected appears in the file-sharing list, click the arrow next to the permission level for that user or group, and then do one of the following:
-
Click Reader to allow this user or group to view your notebook. Users at this level cannot modify or delete information in your shared notebook.
-
Click Contributor to allow this user or group to view, add, change, or delete information in your shared notebook.
-
Click Co-owner to allow this user or group to view, change, add, and delete files in the shared folder.
Warning: If you don't have password-protected file sharing turned on, and you choose Everyone or Guest from the list of people to share your files with, anyone who has access to your network will be able to access the shared folder. Assigning a permission level of Co-owner or Contributor for the Everyone group or the Guest user account is, therefore, not recommended if you are on a large corporate or school network. For more information, click Tell me about different ways to share in Windows in the Windows Vista File Sharing dialog box.
-
-
When you finish choosing the people or groups that you want to share files with, click Share. If you are prompted for an administrator password or for User Account Control confirmation, type the password or provide the confirmation to continue.
-
Click Done to exit the File Sharing dialog box.
Notify users about your shared notebook
After you grant other users permission to view or edit your shared notebook, you can notify them about its availability by sending them a link to the notebook. OneNote can automatically create an e-mail message that points the recipients to the correct location.
-
In OneNote, open or navigate to the shared notebook.
-
On the Share menu, click Send Shared Notebook Link to Others.
-
In the e-mail message that OneNote creates, specify the recipients, add any additional information you want to include, and then send the message.
Windows XP
Set shared notebook permissions on Windows XP
If you are running OneNote on Windows XP, the Properties dialog box for your shared notebook folder should automatically appear on your screen when this Help article appears.
Click here if the Properties dialog box did not automatically appear.
If the Properties dialog box for the shared notebook folder is not open, do the following:
-
In Windows XP, click Start, and then click My Documents.
-
In My Documents, open the OneNote Notebooks folder. This is where OneNote typically stores all of your notebook folders. If the folder of a particular notebook that you want to share is located elsewhere on your computer, navigate to its correct location.
-
Right-click the folder of the notebook that you want to share, and then click Properties on the shortcut menu.
The next steps for adding other computers or specific users to your permissions list depend on whether you are connected to a simple home or office network, or to a more complex business network that has a domain controller.
To continue, click the type of network that your computer is connected to:
A simple home or office network
Share your notebook on a simple home or office network
Follow these steps if you are using OneNote on Windows XP and you want to share your notebook with other computers that are connected to a simple home or office network.
Note: If the suggested configuration steps in this section do not match what you see on your computer, you may be on a different type of network or on a network with restricted permissions. In either case, contact your network or system administrator for assistance.
-
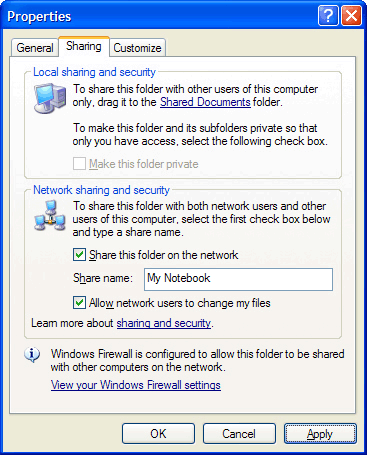
In the folder Properties dialog box , under Network sharing and security, select the Share this folder on the network check box.

Note: If you have never before shared a folder on your network, the Share this folder on the network check box may not appear until you acknowledge a security warning and select the option Just enable file sharing.
-
In the Share Name box, verify the name of the notebook. It is not necessary to change the default name.
-
Select the Allow network users to change my files check box only if you want other users to be able to add, edit, or remove information in your shared notebook.
-
Click Apply to save the new security settings for the selected notebook, and then click OK.
Tip: To make sure that your notebook has been successfully shared, you can test the connection from another computer on your network.
Notify users about your shared notebook
After you grant other users permission to view or edit your shared notebook, you can notify them about its availability by sending them a link to the notebook. OneNote can automatically create an e-mail message that points the recipients to the correct location.
-
In OneNote, open the shared notebook. (On the File menu, point to Open, and then click Notebook.)
-
On the Share menu, click Send Shared Notebook Link to Others.
-
In the e-mail message that OneNote creates, specify the recipients, add any additional information you want to include, and then send the message.
A large corporate network with a domain controller
Share your notebook on a network that has a domain controller
Follow these steps if you are using OneNote on Windows XP and you want to share your notebook with specific people who are connected to a large network, such as a business or school network, that is controlled by a domain.
Note: If the suggested configuration steps in this section do not match what you see on your computer, you may be on a different type of network or on a network with restricted permissions. In either case, contact your network or system administrator for assistance.
-
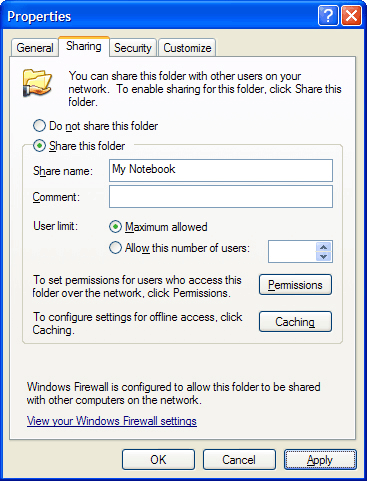
In the folder Properties dialog box, on the Sharing tab, click Share this folder.

-
Click Permissions.
-
In the Permissions dialog box, click Add.
-
In the Select Users, Computers, or Groups dialog box, specify the people whom you want to be able to access your shared notebook. You can enter full names, user names, or e-mail addresses. The users you add to the list of permissions must be on the same network as your computer.
-
Click Check Names to verify your entries on the network, and then click OK.
-
In the Permissions dialog box, select a user name by clicking it in the list, and then specify the permissions for that user. For example, select the Full Control check box in the Allow column to let that person open and modify pages in your shared notebook.
-
Click Apply to save the permissions for the selected user, before going on to the next user in the list.
-
Repeat steps 6 and 7 for each user on the list.
-
Click OK when you finish setting permissions for all users.
-
If you see a Security tab in the Properties dialog box, your computer is connected to a network with a domain controller. To share a notebook folder on such networks, you must repeat steps 3-8 and set the same permissions on the Security tab that you previously set on the Sharing tab. If you do not see a Security tab in the Properties dialog box, click OK to close the folder Properties dialog box.
Tip: To make sure your notebook has been successfully shared, you can test the connection from the computer of someone on your permissions list.
Notify users about your shared notebook
After you grant other users permission to view or edit your shared notebook, you can notify them about its availability by sending them a link to the notebook. OneNote can automatically create an e-mail message that points the recipients to the correct location.
-
In OneNote, open the shared notebook. (On the File menu, point to Open, and then click Notebook.)
-
On the Share menu, click Send Shared Notebook Link to Others.
-
In the e-mail message that OneNote creates, specify the recipients, add any additional information you want to include, and then send the message.
Microsoft Office Tutorials: Set Permissions For A Shared Folder >>>>> Download Now
ReplyDelete>>>>> Download Full
Microsoft Office Tutorials: Set Permissions For A Shared Folder >>>>> Download LINK
>>>>> Download Now
Microsoft Office Tutorials: Set Permissions For A Shared Folder >>>>> Download Full
>>>>> Download LINK pW