Create or customize page templates
A template is a pre-designed layout that you can apply to a new page to provide a level of consistency and save time. OneNote comes with several built-in templates, including decorative page backgrounds and to-do lists. You can create your own template or customize an existing one.
You can use OneNote templates as they are, change them as you like, or create your own.
Create a new page template
-
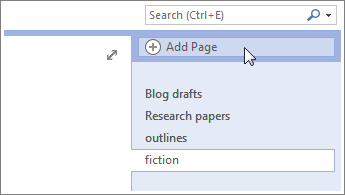
In the list of pages on the right side of your screen, choose Add Page.
-
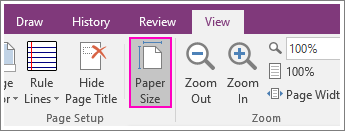
Choose View > Paper Size.
-
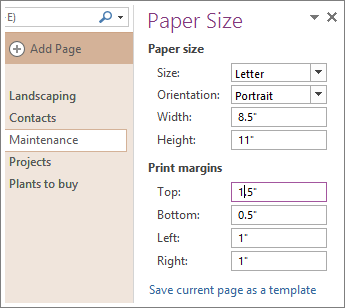
In the Paper Size task pane, set the paper size and print margins.
-
Add any content that you want to appear in the template.
Every new page that you create using this template will have this information on it.
-
When you're done, choose Save current page as a template at the bottom of the Paper Size task pane.
-
In the Save As Template dialog box, give the template a name and click Save.
Note: When you apply a template to a page, you'll be able to choose your template from the My Templates list in the Templates task pane.
Customize a page template
-
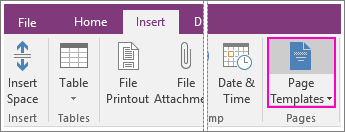
Choose Insert > Page Templates > Page Templates.
-
In the Templates task pane, click the small arrows next to the category names to expand them.
-
Choose the name of the template you want to customize.
The template will be applied to a new, blank page.
-
On the ribbon, choose View > Paper Size.
-
In the Paper Size task pane, set the paper size and print margins.
-
Edit or delete the existing page content and then choose Save current page as a template at the bottom of the Paper Size task pane.

-
In the Save As Template dialog box, give the template a name and click Save.
Note: When you apply a template to a page, you'll be able to choose the customized template from the My Templates list in the Templates task pane.
Best practices for creating page templates
-
Turn on rule lines (View > Rule Lines) to make it easier to align text boxes, pictures, and other content in your template. Turn the rule lines off again before you save your work, unless you want them to be part of the template.
-
Use paragraph styles (Home > Styles) to format text and headings to keep your styles consistent.
-
Don't use a picture as a background image unless it's essential to your template's design. Background images affect the file size and can cause text placed on top of the picture to be converted to an image if you email the page. Consider placing pictures at the top, bottom, or sides instead of behind text.
-
Make sure placeholder text is clear and easy to identify, so anyone using the template can tell what information each placeholder should contain. For example, a text box intended to contain a company name, could be called "[Company name]".
-
Make sure tables and pictures are clearly positioned and that their headings are kept separate from text that will be entered later on. Text boxes expand when they're filled with content and a page could quickly get cluttered.
-
Choose a font color that will be visible without the background color, in case the template is printed.
-
Position text and objects within the print margins of your page.
Create a new page template
-
Click Add Page to create a new, blank page.

-
Click View > Paper Size.

-
In the Paper Size task pane, set the paper size and print margins.
-
Add any content that you want to appear in the template.
Every new page that you create using this template will have this information on it.
-
When you're done, click Save current page as a template at the bottom of the Paper Size task pane.

-
In the Save As Template dialog box, give the template a name and click Save.
Note: When you apply a template to a page, you'll be able to choose your template from the My Templates list in the Templates task pane.
Customize a page template
-
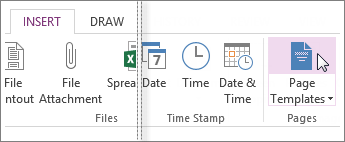
Click Insert > Page Templates > Page Templates.
-
In the Templates task pane, click the small arrows next to the category names to expand them.
-
Click the name of the template you want to customize.
The template will be applied to a new, blank page.
-
On the ribbon, click View > Paper Size.
-
In the Paper Size task pane, set the paper size and print margins.
-
Edit or delete the existing page content and then click Save current page as a template at the bottom of the Paper Size task pane.

-
In the Save As Template dialog box, give the template a name and click Save.
Note: When you apply a template to a page, you'll be able to choose the customized template from the My Templates list in the Templates task pane.
Best practices for creating page templates
-
Turn on rule lines (View > Rule Lines) to make it easier to align text boxes, pictures, and other content in your template. Turn the rule lines off again before you save your work, unless you want them to be part of the template.
-
Use paragraph styles (Home > Styles) to format text and headings to keep your styles consistent.
-
Don't use a picture as a background image unless it's essential to your template's design. Background images affect the file size and can cause text placed on top of the picture to be converted to an image if you email the page. Consider placing pictures at the top, bottom, or sides instead of behind text.
-
Make sure placeholder text is clear and easy to identify, so anyone using the template can tell what information each placeholder should contain. For example, a text box intended to contain a company name, could be called "[Company name]".
-
Make sure tables and pictures are clearly positioned and that their headings are kept separate from text that will be entered later on. Text boxes expand when they're filled with content and a page could quickly get cluttered.
-
Choose a font color that will be visible without the background color, in case the template is printed.
-
Position text and objects within the print margins of your page.
In this article
Create a template from a OneNote 2010 page
-
Create or open the page that you want to use as a page template.
-
In the right pane, click the downward arrow next to New Page, and then click Page Templates.
-
At the bottom of the Templates pane, click Save current page as a template.
-
Type a name for the page template, and then click Save.
Whenever you want to add a new page to the current OneNote section based on your saved page template, in the right pane, click the arrow next to New Page, and then click Page Templates. Click My Templates, and then click the name of your saved template.
Create a template from a OneNote 2010 section
-
Create or open the section that you want to use as a template.
-
Click the File tab, and then click Save As.
-
Under Save Current, click Section.
-
Under Select Format, click OneNote 2010 Section (*.one).
-
Click Save As.
-
Select a name and location to save your section template, and then click Save.
Whenever you want to add a new section to one of your notebooks based on your saved section template, locate the template on your computer and double-click it to open it in OneNote. Click and drag the section title tab from the upper left corner of your screen onto one of your notebooks on the left side of your screen to add a new section to the notebook based on your section template.
Note: If you prefer, you can also add the section to a notebook by placing a copy of the section template file in the folder on your computer where the notebook is saved. By default, OneNote notebooks are saved at C:\Users\<username>\OneNote Notebooks\<notebook name>.
Create a template from a OneNote 2010 notebook
-
Create or open the notebook that you want to use as a template.
-
Click the File tab, and then click Save As.
-
Under Save Current, click Notebook.
-
Under Select Format, click OneNote Package (*.onepkg).
-
Click Save As.
-
Select a name and location to save your section template, and then click Save.
Whenever you want to create an entirely new notebook based on your saved notebook template, locate the template on your computer and double-click it to open it in OneNote. Type a name for your new notebook, and select a location to save it (by default, OneNote notebooks are saved at C:\Users\<username>\OneNote Notebooks\<notebook name>), and then click Create.
Best practices when creating OneNote 2010 templates
The following are some hints and tips we suggest you remember when creating OneNote 2010 templates. Templates tend to be used again and again, so it's a good idea to ensure that they're designed as efficiently as possible to maximize your convenience.
-
Select clear and distinct colors for each section to make them easy to distinguish.
-
If your template is intended for printing, keep in mind that page colors (like rule lines) appear only when your template is viewed on a computer and not when the template is printed. Make sure that you select a font color that will be visible without the background color when the template is printed.
-
If your template is intended for printing, make sure that the page margins are at least 0.4", and that all the text and objects are positioned within the margins.
-
Remember that using a picture as a background image will affect file size and can cause text placed on top of it to be converted to an image when you send the page by e-mail. We recommend using JPEG files for pictures and positioning pictures at the top, bottom, or sides of a page instead of behind text, unless it is essential to your design.
-
Use rule lines (press CTRL+SHIFT+R to show rule lines) to help align text boxes, pictures, and other content that you insert on your pages.
-
When you insert placeholder text in your templates, make sure that it's clear and easy to identify, so that anyone using the template (including you, if you come back to it after a long time) can tell what information each placeholder should contain. For instance, when you insert a text box intended to contain a company name, populate the text box with "[company name]".
-
If you're using tables, pictures, and similar information, make sure they're clearly positioned relative to one another, and that their headings are clearly separate from text that will be entered when the template is filled in. Remember that objects such as text boxes may expand when they're filled with real content instead of placeholder content.
What do you want to do?
Apply a page template
OneNote provides several page templates to help you get started; from decorative backgrounds to functional notes pages, like planners and To Do lists.
Do the following:
-
On the File menu, point to New, and then click Page from Template.
-
In the Templates task pane, under Add a page, click a category in the list, and then click the name of the template you want to use. OneNote creates a new page in the current section based on the selected template.
Tip: To quickly apply recently used templates to a new page, in the page tabs list, click the arrow next to the New Page button, and then click the name of the template you want to apply. Click Blank Template if you want to create a new blank page.
Note: Many template designs include page content that appears in specific places. Templates can therefore be applied only to new pages that do not already contain notes. To use a template for notes you have already taken, create a new page from the template you want, and then copy your existing notes to it.
Customize a template
If you do not want to create an entirely new template yourself, you can easily change the contents and appearance of an existing template and then save it as a custom template.
Do the following:
-
On the Format menu, click Templates.
-
In the Templates task pane, Under Add a page, click a category, and then click the name of the template you want to modify.
-
On the File menu, click Page Setup, and then in the Page Setup task pane, change any options you want.
-
Change any content on the page so that it is the way it should appear whenever new pages are created based on your modified template. Likewise, delete any existing template content that you do not want to keep.
-
At the bottom of the Page Setup task pane, click Save current page as template.
-
In the Save As Template dialog box, type a name the Template Name box.
-
To apply this template to every new page that you add to the current section in your notebook, select the Set as default template for new pages in the current section check box.
-
Click Save.
Note: Templates that you have customized are automatically added to the My Templates list in the Templates task pane.
Create a new template
In addition to the templates that OneNote provides, you can format a page in your notebook the way you want, and then save it as a new template.
-
On the File menu, point to New, and then click Page.
Note: You can also create a new page by clicking New Page above the page tabs.
-
On the File menu, click Page Setup, and then in the Page Setup task pane, set any options you want.
-
Add any content to the page that you want to appear whenever new pages are created based on your custom template.
For example, if you are creating a template for meeting notes, you could add an agenda section and headings for the meeting's date and time.
-
At the bottom of the Page Setup task pane, click Save current page as a template.
-
In the Save As Template dialog box, type a name the Template Name box.
-
To apply this template to every new page that you add to the current section in your notebook, select the Set as default template for new pages in the current section check box.
-
Click Save.
Note: Templates that you create are automatically added to the My Templates list in the Templates task pane.
No comments:
Post a Comment