Create an e-mail message
Creating an e-mail message is the most frequent task you perform in Microsoft Outlook. This task also offers you the most options and configurations of any Outlook feature. No matter what type of message you are composing, whether business or personal, you can always find a way to add your unique style.
Microsoft Office Outlook 2007 uses an editor based on Microsoft Office Word 2007 for e-mail messages. For detailed assistance with the editing features of this editor, start Office Word 2007, press F1, and then search in Word Help.
Frequently used e-mail features are described in this topic.
 When you are ready to send your message, next to To and Cc, click Send.
What do you want to do?
Change the appearance of your message
Insert or attach items to your message
Improve the security and privacy of your message
Check spelling and grammar, perform research, and translate your e-mail message
Create a new e-mail message
Start a new message
-
On the File menu, point to New, and then click Mail Message.
Keyboard shortcut To create a new e-mail message, press CTRL+SHIFT+M
-
In the Subject box, type the subject of the message.
Add recipients
-
Enter the recipients' names in the To , Cc, or Bcc box. Separate the names with a semicolon (;).
The Bcc box is missing
To turn on the Bcc box for this and all future messages, on the Message Options tab, in the Fields group, click Show Bcc.
To select recipients' names from a list in the Address Book, click the To or Cc button.
Set the delivery options
Assign the level of importance
You can set the level of importance for a message so that recipients can see the indicator in their Inbox before they open the item. Setting the level of importance also enables the recipients to sort their messages by importance.
-
On the Message tab, in the Options group, click
 High Importance or
  Low Importance.
Set the expiration date
When a message expires, the message header remains visible in Outlook folders with a strikethrough, and the message can still be opened.
-
On the Options tab, in the More Options group, click the Message Options Dialog Box Launcher
 .
. -
In the Message Options dialog box, under Delivery options, select the Expires after check box, and then click a date and time.
Delay sending the message
If you use a Microsoft Exchange e-mail account, you can delay the delivery of an individual message. Regardless of e-mail account type, everyone can use rules to delay the delivery of all messages by having them held in the Outbox for a specified time after clicking Send.
-
Exchange accounts only
-
On the Options tab, in the More Options group, click Delay Delivery.
-
Click the delivery date and time that you want.
Note: You must click Delay Delivery on each message that you want to delay. To delay all messages, see the next section, All e-mail accounts.
-
-
All e-mail accounts
This process delays all messages for all accounts. You can customize the settings in the Rules Wizard to limit the criteria for when the delay is imposed.
-
In the main Outlook window, on the Tools menu, click Rules and Alerts.
-
In the Rules and Alerts dialog box, on the E-mail Rules tab, click New Rule.
-
Under Step 1: Select a template, under Start from a blank rule, click Check messages after sending, and then click Next.
-
Click Next again, and when you see the message This rule will be applied to every message you send, click Yes.
-
Under Step 1: Select action(s), select the defer delivery by a number of minutes check box.
-
Under Step 2: Edit the rule description (click an underlined value), click a number of.
-
Enter a number between 1 and 120, and then click OK.
-
Click Finish, and when you see the message This rule is a client-side rule, and will process only when Outlook is running, click OK.
Note: This rule delays all messages that you send for the number of minutes that you enter in step 7. Outlook must remain running so that the message can be sent after the specified delay.
-
Change the appearance of your message
Add a background color, gradient, texture, pattern, or picture
-
On the Message Options tab, in the Themes group, click Page Color.
-
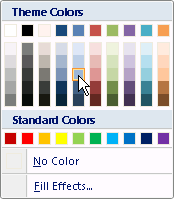
Click a color on the Theme Colors or Standard Colors palette. To remove the color, click No Color.
-
If you want to add a gradient, texture, pattern, or picture, click Fill Effects.
-
Select the fill options that you want.
Tip: The color of the gradient, texture, or pattern is based on the color that you select in step 2.
Change the font
You can change the font in your message in several ways:
-
On the Message tab, in the Basic Text group, you can select the font, font size, font style (bold, italic, and underline), font color, and text highlighting.
-
On the Format tab, in the Font group, you can select the font and font size; increase or decrease the size by one increment; change the font style (bold, italic, underline, strikethrough, subscript, superscript); change the case, the font color, and the text highlighting; and remove all font formatting.
-
On the Mini toolbar that appears when you select text, you can select the font, increase or decrease the size by one increment, select a theme, use the Format Painter, select the font style (bold, italic, and underline), and highlight text.

-
On the Format tab, in the Style group, you can select styles.
Tip: Use styles to create professional-looking messages.
Add graphics
Graphics can get the attention of your recipients. Graphics can also increase the file size of your e-mail message, so graphics should be used in moderation. If you want to send graphics as attachments, not as part of the body of the message, see the next section, Insert or attach items to your message. To change the background appearance of the message, see the previous section, Add a background color, gradient, texture, pattern, or picture.
-
On the Insert tab, in the Illustrations group, click one of the following:
-
Picture from File Browse to the folder where the picture that you want is saved, select the picture, and then click Insert. You can resize or rotate the picture with the picture drag handles. For additional picture options, right-click the picture, and then click a command on the shortcut menu.
-
SmartArt Choose a layout for a SmartArt graphic, and then click OK. Click the SmartArt graphic to add text. For additional options, right-click the SmartArt graphic, and then click a command on the shortcut menu.
For additional information about how to use SmartArt graphics, see Create a SmartArt graphic.
-
Chart Choose a chart type, and then click OK. In the Microsoft Office Excel 2007 worksheet that appears, enter the data for your chart. On the File menu, click Close. For additional chart options, right-click the chart, and then click a command on the shortcut menu.
-
Shapes Click a shape. For additional shape options, right-click the shape, and then click a command on the shortcut menu.
-
-
To insert WordArt, on the Insert menu, in the Text group, click WordArt.
Add a numbered or bulleted list
-
Type * (asterisk) to start a bulleted list or 1. to start a numbered list, and then press SPACEBAR or the TAB key.
-
Type any text that you want.
-
Press ENTER to add the next list item.
Outlook automatically inserts the next bullet or number.
-
To finish the list, press ENTER twice, or press BACKSPACE to delete the last bullet or number in the list.
Add a table
A table is made up of rows and columns of cells that you can fill with text and graphics. Tables are often used to organize and present information.

You can also use tables to create interesting page layouts, or to create text, graphics, and advanced table layouts.

-
Click where you want to insert a table.
-
On the Insert tab, in the Table group, click Table.
-
Do one of the following:
-
Point to Quick Tables, and then click the table that you want. Replace the data in the table with the data that you want.
-
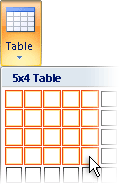
Click the table grid to determine the number of rows and columns to create in a new empty table.
-
Add a signature
You can create a default signature to be added to all your outgoing messages, or you can insert a signature manually into outgoing messages on an individual basis. Do one of the following:
-
Insert a signature automatically
-
On the Message tab, in the Include group, click Signature, and then click Signatures.
You can also access the signature options that are available on the Message tab after you click Reply, Reply to All, or Forward in an open message.
-
On the E-mail Signature tab, in the Select signature to edit list, select the signature that you want.
-
Under Choose default signature, in the New messages list, select the signature that you want.
-
If you want to include a signature in messages that you reply to and in messages that you forward, in the Replies/forwards list, select the signature. If you don't want a signature in these messages, select none.
-
Click OK.
-
To add the default signature to a current message, on the Message tab, in the Include group, click Signature, and then select the signature.
-
-
Insert a signature manually
-
On the Message tab, in the Include group, click Signature, and then select the signature that you want.
You can also access the signature options that are available on the Message tab after you click Reply, Reply to All, or Forward in an open message.
-
Add symbols, equations, and horizontal lines
You can use the Symbol command to enter the following:
-
Symbols that are not on the keyboard, such as ¼ and ©
-
Special characters that are not on the keyboard, such as an em dash (—) or ellipsis (…)
-
Unicode characters
If you are using an expanded font, such as Arial or Times New Roman, the Subset list appears. From this list you can choose from an extended list of language characters, including Greek and Russian (Cyrillic), if available.
The Equation command allows you to enter complex equations quickly.
The Horizontal Line command allows you to break apart sections of your message.
-
On the Insert tab, in the Symbols group, click Equation, Symbol, or Horizontal Line.
Change the theme
A theme is a set of unified design elements and color schemes. A theme helps you to easily create professional and well-designed messages.
 When you apply a theme to a document, Outlook customizes the background colors and graphics, body and heading styles, lists, horizontal lines, hyperlink colors, and table border colors. Both the single-level and the multiple-level lists are also customized.
To quickly change the appearance of these elements, you can change the theme.
-
On the Message Options tab, in the Themes group, click Themes.
Insert or attach items to your message
Add attachments
-
On the File menu, click New, and then click Mail Message.
-
On the Message tab, in the Include group, click Attach File, and then click File.

-
Browse to and select the file that you want to attach, and then click Insert.
If you don't see the file that you want in the appropriate folder, make sure that All files (*.*) is selected in the Files of type box, and that Windows Explorer is configured to show file name extensions.
Important: By default, Outlook blocks potentially unsafe attachments (such as .bat, .exe, .vbs, and .js files) that might contain viruses. If you attach such a file to an e-mail message, you will be asked whether you want to send a potentially unsafe attachment. If you click Yes, Outlook will send the attachment. If you click No, you can then remove the potentially unsafe attachment.
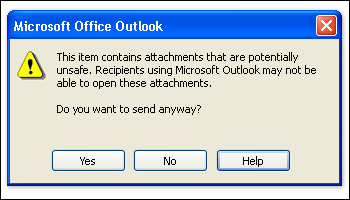
You can attach multiple files simultaneously by selecting the files and dragging them from a folder on your computer to an open message in Outlook.
Where the attachments appear in your message depends on the format in which you compose the message:
-
If the message format is HTML or plain text, attachments appear in the attachment box below the Subject box.

-
If the message format is Rich Text, attachments appear in the body of the message. Even though the file appears to be embedded in the message, it is actually still a separate attachment.
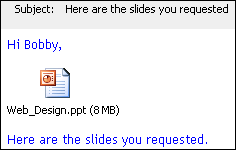
The format in which a message is composed is indicated in the title bar at the top of the message.

Insert links to other documents and Web sites
To insert a hyperlink, do one of the following:
-
Insert from the Hyperlink command.
-
On the Insert tab, in the Links group, click Hyperlink.
-
-
Type the hyperlink in the item.
Microsoft Windows supports long file names, including spaces. However, if you include a link to a file name with spaces in an e-mail message, Microsoft Outlook truncates the link at the first space. If the first space is in the network path or location of the file, the link is truncated at that point.
For example, if you type \\networkshare\February Expense Report.xls into the body of the message, Outlook converts only the first part of the text to a link, as in the following example:
\\networkshare\February
This is not a valid link to the file.
To preserve the spaces in your link text, use an opening and closing chevron, as in the following examples:
<\\networkshare\February Expense Report.xls> or <http://www.contoso.com/finance/February Expense Report.xls>
Outlook includes all text that is inside the chevrons as part of the link, and the recipient receives the complete link to the file.
-
Drag a hyperlink into an item.
Include an Electronic Business Card
 Electronic Business Cards make sharing contact information easier. They can quickly be inserted into messages that you send and are immediately recognizable by the recipient. You can send your corporate Electronic Business Card or a personal one that you customized. Alternately, you can send someone else's contact information as an Electronic Business Card. You can also forward the cards. In each case, in an HTML-based message, the person who receives your message gets a visible identifier to quickly save as a contact.
For more information about Electronic Business Cards, see Create Electronic Business Cards.
-
On the Message tab, in the Include group, click Business Card, and then click a name in the list.
-
If you don't see the name that you want, click Other Business Cards, click the name in the Filed As list, and then click OK.
Notes:
-
The Business Card menu shows the last 10 contact names that were inserted as Electronic Business Cards in messages.
-
You can insert more than one Electronic Business Card in a message.
-
To help distinguish between duplicate names on the Business Card menu, click Other Business Cards. You see more information, including a card preview, in the Insert Business Card dialog box.
-
If you drag a business card from Business Cards view into a new message, only a .vcf file is included when the message is sent. This attached .vcf file opens the contact form with all the information that the recipients can save to their Contacts lists. If a recipient is using Office Outlook 2007, the Electronic Business Card is visible in the contact form.
-
Add tracking to your message
Flag a message
Flagged e-mail messages help you to better manage your mail. Flagged messages create to-do items either for you alone or for you and the recipients of the e-mail message. For example, you can flag an e-mail message that requests information that you need by a certain date. When the recipient receives the message, a flag appears with it, and a message appears in the InfoBar in the Reading Pane and at the top of the message when it is opened in Outlook.
A message that is flagged for yourself can help you to track who has replied to the message. In the previous scenario, you sent a flagged e-mail message requesting information by a certain date. By also flagging the message for yourself, you are reminded to check for replies. Outlook can even help you to automatically find replies to the original flagged message.
-
On the Message tab, in the Options group, click Follow Up, and then select the follow-up due date, or click Custom.
-
If you want a reminder about this flagged message, on the Message tab, in the Options group, click Follow Up, and then click Add Reminder. If you want, you can change the reminder date and time.
-
If you want, you can include a flag to the recipients so that they will be alerted of a deadline. On the Message tab, in the Options group, click Follow Up, and then click Flag for Recipients. To include a reminder to the recipient about this flagged message, select the Reminder check box, and then, if necessary, change the date and time.
Add voting buttons
This feature requires you to use a Microsoft Exchange Server 2000, Exchange Server 2003, or Exchange Server 2007 account. Most home and personal accounts do not use Microsoft Exchange. For more information about Microsoft Exchange accounts and how to determine which version of Exchange your account connects to, see the links in the See Also section.
It is easy to create a poll in Microsoft Outlook by including voting buttons in an e-mail message.
-
On the Message Options tab, in the Format group, click Use Voting Buttons.
-
Click one of the following:
-
Yes;No When all you need is either a yes or a no, this is a good way to take a quick poll.
-
Yes;No;Maybe When you don't want to limit the choices to yes and no, this voting option offers an alternative response.
-
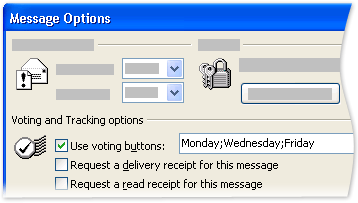
Custom Click this command to create your own custom voting button names. For example, you can ask your colleagues to choose among three days of the week for a recurring weekly staff meeting.
-
When the Message Options dialog box appears, under Voting and Tracking options, select the Use voting buttons check box.
-
Select and delete the default button names, and then type the text that you want. Separate the button names with semicolons.
-
-
Get a delivery or read receipt
A delivery receipt tells you that your e-mail message was delivered to the recipient's mailbox, but not whether the recipient has seen it or read it. A read receipt tells you that your message has been opened. In both cases, you receive a message notification when your message is delivered or read. The contents of the message notifications are then automatically recorded in the original message in your Sent Items folder.
However, do not rely solely on these receipts. The message recipient might determine whether a read request has been requested and decline to send one. If the message is read-only in the Reading Pane, a read receipt may not be sent. In addition, the recipient's e-mail program might not support read receipts.
-
In the message, click Options.
-
Under Voting and tracking options, select the Request a delivery receipt for this message or the Request a read receipt for this message check box.
To learn how to turn on these options for all e-mail messages that you send, see Be notified when messages are delivered or read.
Improve the security and privacy of your message
Digitally sign your message
Before you can digitally sign an e-mail message, you must have a digital certificate or digital ID. For more information about digital IDs, see Get a digital ID.
-
On the Message tab, in the Options group, click Sign
 .
.
Encrypt your message
Encrypting an e-mail message in Office Outlook 2007 protects the privacy of the message by converting it from readable plaintext, or nonencrypted text, into ciphered (scrambled) text. Only the recipient who has the private key that matches the public key that was used to encrypt the message can decipher the message.
For more information about encrypting messages, see Encrypt e-mail messages.
-
On the Message tab, in the Options group, click Encrypt
 .
.
Control what recipients can do with a message
Information Rights Management (IRM) in the 2007 Microsoft Office system allows individuals to specify permission access to documents and e-mail messages. This helps prevent sensitive information from being printed, forwarded, or copied by unauthorized people. After permission for a document or message has been restricted with IRM technology, the access and usage restrictions are enforced no matter where the information is located, because the permission to access an e-mail message or a document is stored in the file itself.
For more information about IRM, see Restrict permission to confidential information in e-mail messages.
-
On the Message tab, in the Options group, click Permission
 .
.
Check spelling and grammar, perform research, and translate your e-mail message
Check your spelling or grammar
By default, Outlook checks spelling and grammar automatically as you type. Wavy red underlines indicate possible spelling problems, and wavy green underlines indicate possible grammatical problems.
If you want to check for all errors when you finish composing your message, do the following:
-
On the Format tab, in the Proofing group, click Proofing, and then click Spelling & Grammar.
Note: If you type a word incorrectly but the result is not a misspelling (for example, "from" instead of "form" or "there" instead of "their"), the spelling checker will not flag the word.
Perform research online
With research services, you can modify your search scope to include multiple resources or just the one that you want. Results from multiple resources are returned to you in an organized structure, so that you can scan the information quickly and stay productive. You can also navigate between the Research task panes in different 2007 Office release programs without losing your settings or search results in any program.
-
Select the term that you want to research.
-
On the Format tab, in the Proofing group, click Proofing, and then click Research.
Translate text
You can use bilingual dictionaries to look up words and short phrases in the dictionary of another language, or you can obtain a basic translation of words, phrases, or your whole document by using machine translation over the Web. By using Microsoft partners, you can obtain a professional translation of content. Fees and availability vary for professional translation. Details are provided when you use the Translate feature.
-
Select your text.
To select the entire message, click in the message body, and then press CTRL+A.
-
On the Format tab, in the Proofing group, click Proofing, and then click Translate.
No comments:
Post a Comment