Create a custom list form
By default, most SharePoint lists and libraries include forms that are displayed when you want to add an item to, or edit or display an item in, that list or library. With Microsoft Office SharePoint Designer 2007, you can easily replace any of the default list forms with a custom list form that you design to meet your specific needs. After you create the custom list form, including the fields that you want, you can make the new form the default form for that list or library.
After you create a custom list form, you can use the WYSIWYG tools in Office SharePoint Designer 2007 to add or remove columns, change font formatting, or apply colors. When you do this, Extensible Stylesheet Language (XSL) is inserted directly into the HTML. Although it is possible to edit the XSL directly in Code view, you can also use the formatting tools in Office SharePoint Designer 2007 to apply XSL quickly and easily without knowing any XSL.
This article will show you how to locate the default list forms, how to create a new page that contains a custom list form, and then how to associate the new page with a list.
In this article
Locate the default list forms
Most SharePoint lists and libraries have list forms that are used to add a new item to, edit, or display an item in that list or library. The list forms are located in the folder that contains the associated list.
Although it is not necessary to locate the default forms before creating a custom list form, it can be helpful to know where they are located and to store your custom list forms in the same location. To find the default list forms for a list or library, do the following.
-
If the Folder List isn't visible, on the View menu, click Folder List.
Keyboard shortcut To open the Folder List, press ALT+F1.
-
For a SharePoint list, in the Folder List, locate the Lists folder. For a SharePoint library, locate the Shared Documents folder. If the Lists or Shared Documents folder is collapsed, click the plus sign (+) to expand it.
-
Locate the list or library for which you want to create a custom list form. If the list or library list is collapsed, click the plus sign (+) to expand it.
In the following illustration, the Announcements list has been expanded.
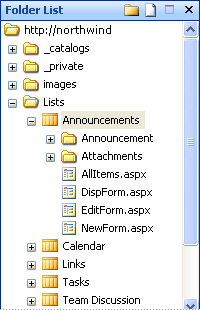
By default, three form page files appear in the folder: DispForm.aspx, EditForm.aspx, and NewForm.aspx. A fourth file, AllItems.aspx, is the default Data View that displays the items in the list, as shown in the following illustration.

Note: Depending on the list, there may be multiple Data View pages in the folder, in addition to multiple form pages.
With Office SharePoint Designer 2007, you can create custom forms that replace the default New Item form, Edit Item form, or Display Item form by replacing the existing list view Web Part with a custom form Web Part.
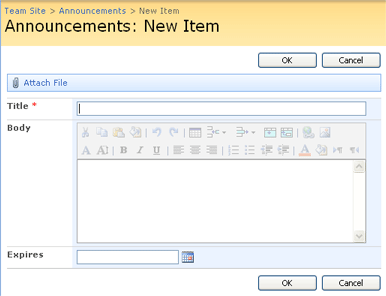
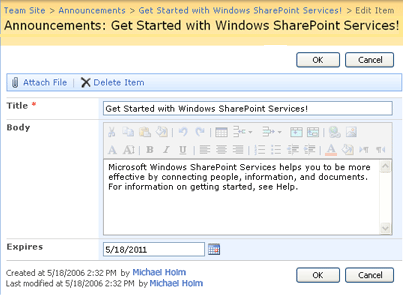
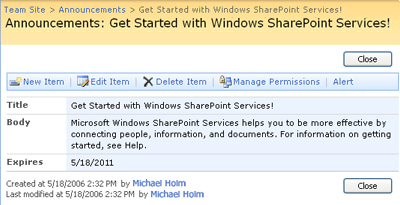
The following three illustrations show the default list forms for an Announcements list.
-
The NewForm.aspx page displays the New Item form that appears when you add a new item to a list.
-
The EditForm.aspx page displays the Edit Item form that appears when you edit an item in a list.
-
The DispForm.aspx page provides the Display Item form that appears when you view a single item from a list.
Create a new page that contains a custom list form
You begin by creating a new page, and then inserting a custom list form onto the page. After you save the page, you can associate the page with an existing list.
-
On the File menu, click New.
-
In the New dialog box, on the Page tab, click General, and then double-click ASPX.
-
On the Insert menu, point to SharePoint Controls, and then click Custom List Form.
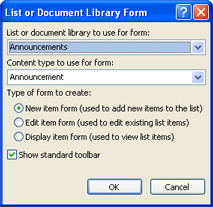
The List or Document Library Form dialog box opens.
-
In the List or document library to use for form list, choose the list or library for which you want to create a form. To follow the example, click Announcements.
-
In the Content type to use for form list, click the content type for which you want to use the form. To follow the example, click Announcements.(This may be your only choice, because the Announcements list has only one default content type.)
Every list or library can be configured to allow multiple content types, which then appear in this dialog box in the Content type to use for form list. You can use a distinct set of custom list forms for each content type available for a list or library. For example, if your list has both a Press Releases content type and an Industry News content type, you can create and use two separate sets of custom list forms, one for each of the two content types.
The advantage to using a separate set of custom list forms for each content type is that then each custom list form is designed to display only the fields that are appropriate for that content type.
-
Under Type of form to create, indicate whether you want to create a New item form, an Edit item form, or a Display item form.
To follow the example, click New item form.
-
To include a toolbar with the form, select the Show standard toolbar check box.
The custom list form can include a toolbar to help users perform common actions for an item. The commands on the toolbar depending on the type of the form. For example, the toolbar for EditForm.aspx might look like the following illustration.

But the toolbar for DispForm.aspx might look like this illustration.

-
Click OK. The New item form appears on the page.
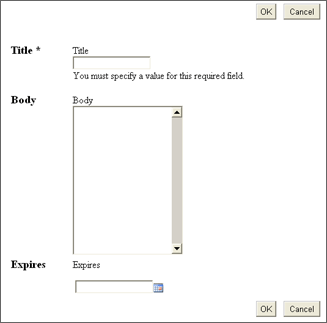
Note: The illustration is an example of an ASPX page that is not attached to a master page. To apply the look and feel of your SharePoint site, attach the page to a master page. To do this, on the Format menu, point to Master Page, and then click Attach Master Page. In the Select a Master Page dialog box, click Default Master Page, and then click OK. The Match Content Regions dialog box appears. To match the body of the page to the PlaceHolderMain content placeholder, click OK.
By default, the custom list form shows the default fields for the selected form type, along with any default controls for each field. For example, for the Announcements list, the Expires field has a date-picker control. Required fields, if any, are automatically indicated by an asterisk.
-
To save the new custom list form, on the File menu, click Save as. Alternatively, you can press CTRL+S.
-
In the Save As dialog box, in the large list box, browse to the list or library folder for which the custom list form was created.
To follow the example, in the Save As dialog box, double-click Lists, and then double-click Announcements to open the Announcements folder. In the File Name box, type NewAnnouncements, and then click Save.
To follow the example, in the File Name box, type NewAnnouncements, and then click Save.
The NewAnnouncements.aspx page appears in the Folder List in the Announcements folder.
Associate the new page with a list
After you create a custom list form, you can associate it with the list for which it was created. Until you associate the custom list form with the list, the custom list form will not appear in the browser when users create, view, or edit items in that list.
In the earlier example, you created NewAnnouncements.aspx for the Announcements list, so the next step is to associate NewAnnouncements.aspx with the Announcements list.
-
In the Folder List, right-click the list or library with which you want to associate the custom list form — in this example, Announcements — and then click Properties on the shortcut menu.
-
In the List Properties dialog box, click the Supporting Files tab.
-
If your list is configured to allow multiple content types, in the Content type specific forms list, click the content type for which you want to use the custom list form.
Each time you change the content type, the text boxes change to display the forms used for the current content type. Each content type can use a separate set of custom list forms.
-
Under New item form, click Browse, locate and click the custom list form — in this example, NewAnnouncements.aspx — and then click OK.
The path to the custom list form now appears in the New item form box.
-
Click OK.
If you have followed the example, you can test the new custom form. To do this, click Default.aspx in the Folder List, and then click F12 to open the page in the browser. In the browser, under Announcements, click Add new announcement to open the custom new item form.
No comments:
Post a Comment