Change your Lync picture
To change the photo or image that displays with your Lync contact info, in the Lync main window, go to Options  > My Picture > Edit or Remove Picture. Most often, that'll do it. But if you have any issues, keep reading. This topic provides details about this process. It also describes how to hide your profile picture—you can hide your picture in Lync, hide your picture in all Office programs, and hide others' pictures in Lync.
Note: This topic applies if you're using Lync 2013 or Lync Basic 2013 with Office 365. If you're using Lync 2010 with Office 365, see Change your Lync picture in Lync 2010 with Office 365. If you don't use Office 365, see Change your Lync picture in Lync 2013 or Lync Basic or Change your picture in Lync 2010.
Notes:
-
Your Lync picture also appears in other Office programs you might use, including Outlook.
-
After you change your picture it might take some time before the new one appears in Lync.
Change your picture
-
In the Lync main window, click your picture.
-
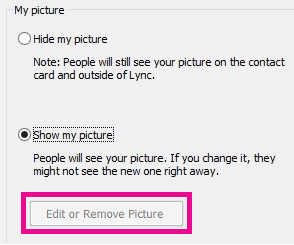
In My Picture options, under My picture, click Edit or Remove Picture to open your Office 365 About me page.
Notes:
-
If the Edit or Remove Picture button is unavailable (grayed out), like this:
-

-
Make sure:
-
The Hide my picture option, above Edit or Remove Picture, is not selected.
-
Your company allows people to change their Lync picture. For details, contact your workplace technical support.
-
-
Sign in to Office 365 with your work or school account.
-
Click Browse, and go the picture you want to use. Any size and resolution is fine.
-
Click the file, and then click Save.
Hide your picture
You can hide your picture in Lync. Lync users will see a blank representation instead of your picture.
You can also hide your picture from everywhere it appears in Office programs, including Lync.
To hide your picture in Lync
-
In the Lync main window, click your picture.
-
In My Picture options, under My picture, click Hide my picture, then click OK.
To hide your picture in Lync and other Office programs
-
In the Lync main window, click the Options button
 , and then click My Picture.
 -
In My Picture options, under My picture, click Edit or Remove Picture. If this button is not available, open the Office 365 portal instead.
-
Sign in to the Office 365 portal, if you're not signed in automatically, and then click the Delete (x) icon or Remove picture.
Hide everyone's picture in Lync
You can stop Lync from displaying pictures, for example, if you want to see more text in the Lync main window.
Important: This procedure removes your picture and everyone else's from your view, but it doesn't remove your picture from the view of others'. To hide your picture from other users, see the previous section.
-
In the Skype_for_Business_÷ main window, click the Options button, and then click Personal.
-
In Personal options, under Show pictures, clear the Show pictures of contacts check box.
No comments:
Post a Comment