Add a picture or image file to a Web page
Images are expected on a SharePoint page and can often show details that otherwise would take, well, a thousand words. You can add images from your local computer, SharePoint media libraries, or links from other locations on your site or the web.
Updated January 25, 2017 thanks to customer feedback.
Add a picture to a SharePoint Online Team Site home page
If you're using a modern SharePoint Online Team Site created from an Office 365 group, you can add images to your home page by following these steps.
-
Go to the site and page where you want to add an image.
-
Click Edit
 in the upper right corner.
 -
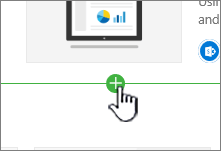
Hover over the top of the section where you want to add the image, and click the + sign.
-
In the drop down web app chooser, click Image.
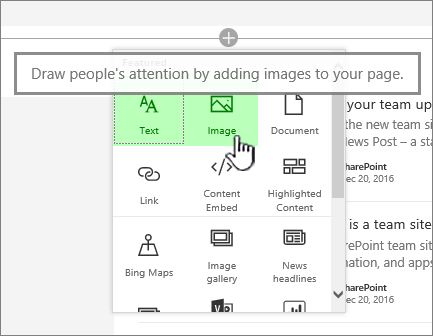
Note: There is limited editing capabilities currently, so you might want to size your image before uploading.
-
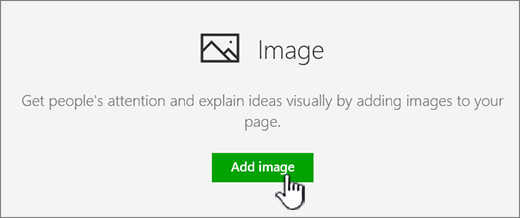
In the image web part, click Add image.
-
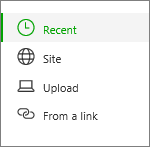
Choose where you're going to get the image from:
-
Recent image (maybe something you just edited or added to a SharePoint library)
-
SharePoint Site
-
Upload from your Computer
-
A link to an image
-
-
Choose an image and then click Open.
-
If you're satisfied with the image, click Add image to add it to the page.
To change the image, click Change Image and pick another picture.
Note: When adding an image to a Team site, you may need to size your image before adding it. Keeping images in an asset or picture library will let you store multiple sizes if you need them.
-
Once you add the image, you can do the following:
-
To add Alternative (Alt) text, click the Pencil
 in the upper left of the image and type in your Alt text
 -
Click in the lower left of the image on Add a caption to add a description or caption.
-
Add an image to a SharePoint 2016, 2013, or 2010 site
-
Go to the page where you want to add an image.
-
Select the Page tab. Then, on the ribbon, click Edit.
-
Click inside an editable area on the page.
-
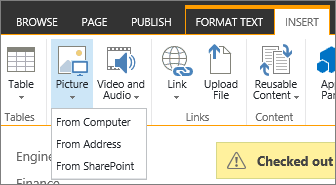
Choose the Insert tab, and in the Media group on the ribbon, click Picture.
-
You'll see the following options:
Upload a file from your computer
To upload a file from your computer, follow these steps.
-
Click From Computer.
-
Browse to the location of the file that you want, select the file and then click Open.
-
Specify a destination library where you want to store the file.
We recommend that you specify an Asset Library as the destination. To learn how to set up an Asset Library for image files, see Set up an Asset library to store image, audio, or video files. -
Click OK.
Add an image from another location
To add an image from another location on the web, follow these steps.
-
Click From Address.
-
Type the URL for the file that you want to use, and then click OK. The URL must point directly to an image file. For example: http://contoso.com/images/selfieImage1.jpg.
Add an image from a SharePoint site
To add an image from a location on a SharePoint site, follow these steps.
-
Click From SharePoint. This opens the Asset Picker, which you can browse for the folder or library that you want.
-
Browse to a location on your site, such as an Assets Library, where images, video and audio files are saved.
-
Select the file that you want, and then click Insert.
Edit image properties
When you add images to a SharePoint page, you can customize it to better fit the page or stand out more. For example, you can change its size or location, edit the Alt text, or create a border.
To change properties on an image on a page, follow these steps:
-
Go to the page that contains the image.
-
Select the Page tab, and then click Edit.
-
Click anywhere on the image to open the Image tab and its ribbon.

-
On the Image tab, in the Select group, click Change Picture to change to a different picture. and select the image file that you want.
-
In the Properties group, you can enter or change the Alt text or Address of the image.
-
In the Styles group on the ribbon, point to Image Styles and then select the border style for the picture.

-
In the Arrange group, click Position to change the position that the image takes in the space. In the drop down, you can pick a floating position as either left or right, or an inline position of top, middle, or bottom in relation to other objects.
-
In the Size group on the ribbon, you can resize the image. If you leave the Lock Aspect Ratio checked, then the Horizontal and Vertical sizes are linked. When you change one, the other will change to a proportionate size as well.
If you uncheck Lock Aspect Ratio, your image's horizontal and vertical sizes can be changed independently, though your image may become distorted.
-
When you finish making changes to the page, select the Page tab, and then click Save. If the page is checked out to you, you see a warning message together with a link so you can check it in.
Add a web link to a picture
Having a picture on a page is good, but making it a doorway to another page is even better. Here's how to make an image a live link.
-
Navigate to the page with the image you want to add a hyperlink to.
-
Click the Page tab, and then click Edit.
-
Click and select the photo or picture you want to an link to.
-
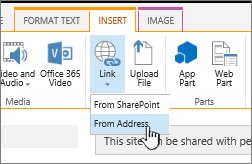
On the ribbon, click Insert, and then click Link.
-
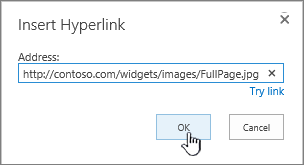
In the Add Hyperlink dialog, type in the Address to the webpage, site, or other media you want to link to. You can test the link by clicking Try out.
-
Click OK.
Delete a picture from a page
-
From a page, in the ribbon, click the Page tab, and then click the Edit command.
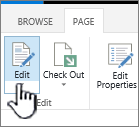
Note: If the Edit command is disabled, you may not have permission to edit the page.
-
Select the image you want to delete and press the Delete key on your keyboard.
Add images to SharePoint 2007 pages
You can add an image to any Web page that has a Page Image field control by picking the image from a library. When the image that is stored in the library is changed, pages that use the image automatically use the new image.
You can also add an image to any Web page that has a Page Content field control, by using the HTML Editor. When you use the HTML Editor to add an image to a Page Content field control, the image is also stored in a library, so that when the image in the library is updated, pages that use the image automatically use the new image.
When you create a new page, if you want the page to have an image, you can create the page by using a page layout that has a Page Image field control.
Page layouts that contain a Page Image field control
The following page layouts that are included with Microsoft Office SharePoint Server 2007 contain a Page Image field control:
-
Article page with image on left
-
Article page with image on right
-
Intranet Home
-
Welcome page with summary links
-
Welcome page with table of contents
-
Welcome splash page
Your site may contain additional page layouts that contain a Page Image field control.
Tip: One way that you may be able to tell whether a page has a Page Image field control is to edit the page. When you edit a page, each field control on that page displays a label. Page Image field controls on pages created by using page layouts that are included with Office SharePoint Server 2007 are labeled Page Image. This may or may not be the case for pages created by using custom page layouts that are designed by someone with Design permissions for your site. Ask your site collection administrator for more information about the custom page layouts that are available for use on your site.
Page layouts that contain a Page Content field control
The following page layouts that are included with Office SharePoint Server 2007 contain a Page Content field control:
-
Intranet Home
-
Welcome page with summary links
-
Welcome page with table of contents
Your site may contain additional page layouts that contain a Page Content field control.
Tip: One way that you may be able to tell whether a page has a Page Content field control is to edit the page. When you edit a page, each field control on that page displays a label. Page Content field controls on pages created by using page layouts that are included with Office SharePoint Server 2007 are labeled "Page Content". This may or may not be the case for pages created by using custom page layouts that are designed by someone with Design permissions for your site. Ask your site collection administrator for more information about the custom page layouts that are available for use on your site.
Add an image by using the Page Image field control
-
Browse to the page to which you want to add an image, and then click Edit Page on the Page Editing toolbar.
Note: If you do not see the Page Editing toolbar, on the Site Actions menu, click Show Page Editing Toolbar.
-
In the Page Image field control, click Edit Picture. The Edit Image Properties Web Page dialog box opens.
-
In the General section of the Edit Image Properties Web Page dialog box, click the Browse button located next to the Selected Image box. The Images library opens in a new window.
-
Click the image that you want to use, and then click OK. The Image library closes, and the address of the image that you selected now appears in the Selected Image box.
-
You can optionally set the remaining image properties:
-
Alternate Text Type text that briefly describes the image. This text is displayed instead of the image if the page viewer's browser does not display the image. Alternate text is also read by screen readers.
-
Hyperlink The image can optionally act as a hyperlink. Type the desired hyperlink target in this box. You can also use the Browse button to locate a target for the hyperlink. Select the Open This Link In New Window check box if you want the hyperlink to open in a new browser window.
In the Layout section, you can set these properties:
-
Alignment You can change the position of the image within the field control by choosing from the Alignment list. Since a Page Image field control is sized to fit the image, this option does not have a noticeable effect when used on an image that is in a Page Image field control.
-
Border Thickness You can give the image a border by specifying the thickness of the border. Border thickness is measured in pixels.
-
Horizontal Spacing You can add spacing on both sides of the image by specifying a value, in pixels, for the size of the space.
-
Vertical Spacing You can add spacing above and below the image by specifying a value, in pixels, for the size of the space.
In the Size section, you can set these properties:
-
Use default image size Select this option if you want the image to appear in its default size, which is the size specified by the image file's properties.
-
Specify Size Select this option if you want to specify the size of the image on the published page. This overrides the image file's size properties. If you select this option, you must set the width, the height, or both for the image by using the Width and Height properties.
-
Width (pixels) If you select Specify Size, you use Width (pixels) to specify the width of the image in pixels.
-
Height (pixels) If you select Specify Size, you use Height (pixels) to specify the height of the image in pixels.
-
Maintain aspect ratio You can use this option to preserve the ratio of the image's width and height. If you select this option, you can only set either the width or the height of the image, because the value that you choose for the image's width or height determines the value of the other dimension based on the ratio of the original image width and height.
-
Add an image to a Page Content field control by using the HTML Editor
-
Browse to the page to which you want to add an image, and then click Edit Page on the Page Editing toolbar.
Note: If you do not see the Page Editing toolbar, on the Site Actions menu, click Show Page Editing Toolbar.
-
In the Page Content field control, click Edit Content to start the HTML Editor. The HTML Editor may appear inline, or it may appear in a Web Page dialog box, in a new window.
-
Position the cursor in the Page Content field control in the spot where you want to add the image.
-
On the HTML Editor toolbar, click the Insert Image
 toolbar button.
Keyboard shortcut To insert an image, press CTRL+SHIFT+G.
The Edit Image Properties Web page dialog box opens.
-
In the General section of the Edit Image Properties Web Page dialog box, click the Browse button located next to the Selected Image box. The Images library opens in a new window.
-
Click the image that you want to use, and then click OK. The Image library closes, and the address of the image that you selected now appears in the Selected Image box.
-
You can optionally set the remaining image properties:
-
Alternate Text Type text that briefly describes the image. This text is displayed instead of the image if the page viewer's browser does not display the image. Alternate text is also read by screen readers.
-
Hyperlink The image can optionally act as a hyperlink. Type the desired hyperlink target in this box. You can also use the Browse button to locate a target for the hyperlink. Select the Open This Link In New Window check box if you want the hyperlink to open in a new browser window.
In the Layout section, you can set these properties:
-
Alignment You can change the position of the image within the field control by choosing from the Alignment list.
-
Border Thickness You can give the image a border by specifying the thickness of the border. Border thickness is measured in pixels.
-
Horizontal Spacing You can add spacing on both sides of the image by specifying a value, in pixels, for the size of the space.
-
Vertical Spacing You can add spacing above and below the image by specifying a value, in pixels, for the size of the space.
In the Size section, you can set these properties:
-
Use default image size Select this option if you want the image to appear in its default size, which is the size specified by the image file's properties.
-
Specify Size Select this option if you want to specify the size of the image on the published page. This overrides the image file's size properties. If you select this option, you must set the width, the height, or both for the image by using the Width and Height properties.
-
Width (pixels) If you select Specify Size, you use Width (pixels) to specify the width of the image in pixels.
-
Height (pixels) If you select Specify Size, you use Height (pixels) to specify the height of the image in pixels.
-
Maintain aspect ratio You can use this option to preserve the ratio of the image's width and height. If you select this option, you can only set either the width or the height of the image, because the value that you choose for the image's width or height determines the value of the other dimension, based on the ratio of the original image width and height.
Notes:
-
If the page to which you want to add an image is a Web Part Page, you can add an image by using an Image Web Part. For more information on using an Image Web Part, see the article Image Web Part.
-
If the image that you want to add to a page is not available in the Image library, you can add it if you have Contribute permissions. For more information on adding an image file to a library, see the article Add one or more files to a library.
-
-
Leave us a comment
Was this article helpful? If so, please let us know at the bottom of this page. Let us know what was confusing or missing. If you got here from a search and it wasn't the information you wanted, let us know what you searched for. Please include your version of SharePoint, OS, and browser. We'll use your feedback to double-check the steps and update this article.
No comments:
Post a Comment