Add an effect, text box, WordArt, picture, or shape to notes pages
What do you want to do?
Learn about the notes master, placeholders, notes page, and notes pane
Use the notes master to choose what information appears on all of your notes pages and to arrange the layout of that information.
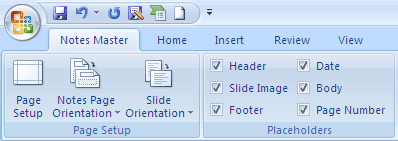
In addition to the placeholders for the headers and footers, date, and slide page number, the notes master includes a placeholder for the image of the slide and another placeholder for the notes text, called the Body placeholder. To distinguish between the placeholders, do the following:
-
On the View tab, in the Presentation Views group, click Notes Master.
-
On the Notes Master tab, in the Placeholders group, clear all of the check boxes.
As you clear each check box, each placeholder disappears from the notes page. Select each check box to see the placeholder.
The notes page and notes pane
Each notes page shows an image of a slide, along with the notes that go with that slide. When you print the notes page, you print one page for each slide along with additional text or images.
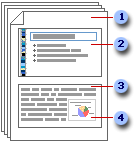
1. Notes pages include your notes and each slide in the presentation.
2. Each slide is printed on its own notes page.
3. Your notes accompany the slide.
4. Data such as charts or pictures can be added to your notes pages.
On the notes page, the Body placeholder is where you enter the text about the slide. The text of the Body placeholder is also displayed in the notes pane in Normal view, which is located just below the slide.
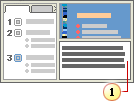
1. Notes pane in Normal view
When you enter text in the notes pane in Normal view, you also enter text in the Body placeholder of the slide's notes page.
In Normal view, use the notes pane to enter and format text while you edit the slide. In Notes Page view, use the notes page to see the full effect of any text formatting and to control how the notes appear when they are printed with the slides.
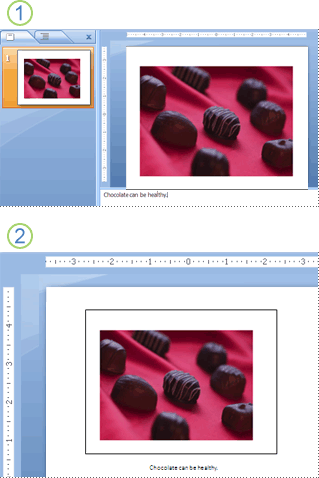
1. Notes pane in Normal view
2. Notes page in Notes Page view
In Note Master view or Notes Page view, you can create notes handouts to surprise and delight your audience by adding an effect,WordArt, tables, or a picture. Or you can add a company logo or text, such as draft or confidential, to all of your notes pages. You can also rearrange the placeholders and change the theme fonts, theme colors, and theme effects to match your slides to create a consistent look for both your slides and the handouts.
Pictures or other objects that you add in Notes Page view appear on your printed notes page, but not on your screen in Normal view. If you save your presentation as a Web page, the picture or object does not appear when you display your presentation in the Web browser, although your notes do.
You may want to experiment and perform several of the procedures below together to create a dramatic set of notes pages.
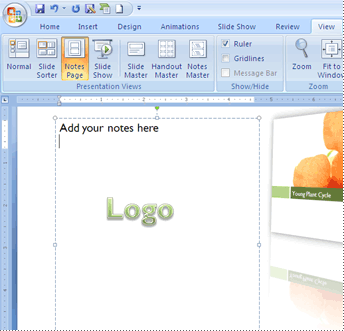
Rearrange the placeholders
You can move the placeholders to a different location on the notes master or change from portrait to landscape orientation so that your notes page displays better. For example, if you have a SmartArt graphic on your slide, you might want to change the orientation of the Slide Image placeholder to better display the SmartArt graphic on your notes pages.
Move the placeholders
-
On the View tab, in the Presentation Views group, click Notes Master.

-
To move either the Body or Slide Image placeholder, point to one of the placeholder borders. When the pointer becomes a
 , drag the placeholder to a new position.
 -
When you finish positioning the placeholders, on the Notes Master tab, in the Close group, click Close Master View.

Change the orientation of the placeholders
-
On the View tab, in the Presentation Views group, click Notes Master.

-
On the Notes Master tab, in the Page Setup group, do one or both of the following:
-
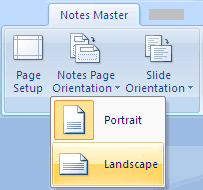
To change the Body placeholder orientation, click Notes Page Orientation, and then click Portrait or Landscape.
-
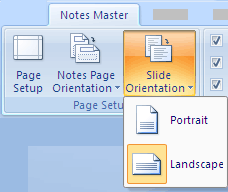
To change the Slide Image placeholder orientation, click Slide Orientation, and then click Portrait or Landscape.
-
-
When you finish changing the orientation, on the Notes Master tab, in the Close group, click Close Master View.

Add a text box or WordArt to your notes pages
You can use a text box or WordArt to indicate that your presentation is a draft or confidential.
Add a text box
-
On the View tab, in the Presentation Views group, click Notes Master.

-
On the Insert tab, in the Text group, click Text Box, click in the Body placeholder at the bottom of the notes page, and then drag to draw the text box the size that you want.

-
Enter text in the text box that you want to appear in the notes pages.
-
To position the text box, click it, and then when the pointer becomes a
 , drag the text box to a new location.
 -
Format the text in the text box by using the formatting options in the Font group on the Home tab, or the options in the Shape Styles group, under Drawing Tools on the Format tab.

You can also use the options in the Shape Styles group to format the text box itself. For more information, see Add or delete a fill, outline, or effect for text or WordArt.
-
After you position and format the text and the text box, on the Notes Master tab, in the Close group, click Close Master View.

Add WordArt
-
On the View tab, in the Presentation Views group, click Notes Master.

Note: To apply this procedure to only one notes page, click Notes Page instead of Notes Master.
-
On the Insert tab, in the Text group, click WordArt, and then click the WordArt style that you want.

-
Enter the text in WordArt that you want to appear in the notes pages.
-
To reposition the WordArt, click it, and then when the pointer becomes a
 , drag the WordArt to a new location.
 -
To change the look of the WordArt, use the options in the WordArt Styles group, under Drawing Tools, on the Format tab.

-
When you are satisfied with the way the WordArt looks, on the Notes Master tab, in the Close group, click Close Master View.

Tip: You can rotate the text box or Word Art to make it stand out from any notes that you add to the notes page, or make the text box or WordArt more transparent by changing the fill or outline.
Add a picture or clip art to your notes pages
-
On the View tab, in the Presentation Views group, click Notes Master.

-
On the Insert tab, in the Illustrations group, do one of the following.

-
To use a picture, click Picture, locate the picture that you want, and then click Insert.
-
To use clip art, click Clip Art. In the Clip Arttask pane, in the Search for box, either type a word or phrase that describes the clip that you want, or type all or part of the file name of the clip, and then click Go.
When you search for clip art and pictures online, you'll be directed to Bing. You're responsible for respecting copyright, and the license filter in Bing can help you choose which images to use.
-
-
To adjust the size of the picture or clip art, or reposition the picture or clip art, right-click the picture or clip art on the slide, and then click Size and Position on the shortcut menu.
-
To resize the picture or clip art, on the Size tab, under Scale, increase or decrease the settings in the Height and Width boxes.
To maintain proportional height and width of the picture or clip art when scaling, select the Lock aspect ratio check box.
To center your picture or clip art on the notes page, select the Relative to original picture size check box.
-
To move the picture or clip art on the slide, click the Position tab, and then enter the settings for the positions that you want in the Horizontal and Vertical boxes.
-
When you are satisfied with the way the picture or clip art looks, on the Notes Master tab, in the Close group, click Close Master View.

Tip: You can change the brightness, contrast, or transparency of a picture, change the picture border, or add effects by using the options under Picture Tools, on the Format tab.

Add a shape to your notes pages
-
On the View tab, in the Presentation Views group, click Notes Master.

Note: To apply this procedure to only one notes page, click Notes Page instead of Notes Master.
-
On the Home tab, in the Drawing group, click Shapes.

-
Click the shape that you want, click in the Body placeholder, and then drag to place the shape.
To create a perfect square or circle (or constrain the dimensions of other shapes), press and hold SHIFT while you drag.
-
To add a fill, outline, or effect to the shape, under Drawing Tools, on the Format tab, choose the options that you want in the Shape Styles group.

-
When you are satisfied with the way the shape looks, on the Notes Master tab, in the Close group, click Close Master View.

Add an effect to your notes pages
-
On the View tab, in the Presentation Views group, click Notes Master.

-
Select the text, text box, WordArt, picture, or other object that you want to add an effect to.
-
Under Drawing Tools, on the Format tab, in the Shape Styles group, click Shape Effects, and then click the effect that you want.

For more information about adding effects, see Add or delete a fill, outline, or effect for text or WordArt or Add or delete a shape fill or shape effect.
-
On the Notes Master tab, in the Close group, click Close Master View.

Tip: You might want to change the orientation of the Body placeholder or move the Body placeholder or the Slide Image placeholder to improve the appearance of your notes page.
Change the theme font, theme colors, or theme effects
A document theme is a set of formatting choices that include a set of theme colors, a set of theme fonts (including heading and body text fonts), and a set of theme effects (including lines and fill effects). Every document that you create by using Microsoft Office PowerPoint 2007 has a theme inside it — even blank, new documents.
Change the theme font
Theme fonts contain a heading font and a body text font. When you click the Theme Fonts button  , you can see the name of the heading font and body text font that are used for each theme font below the Theme Fonts name.
-
On the View tab, in the Presentation Views group, click Notes Master.

-
On the Notes Master tab, in the Edit Theme group, click Fonts, and then click the fonts used in your slide or the option that you want.

-
When you finish, on the Notes Master tab, in the Close group, click Close Master View.

Change the theme colors
Theme colors contain four text and background colors, six accent colors, and two hyperlink colors. The colors on the Theme Colors button  represent the current text and background colors. The set of colors that you see next to the Theme Colors name after you click the Theme Colors button represents the accent and hyperlink colors for that theme. When you change any of these colors to create your own set of theme colors, the colors that are shown on the Theme Colors button and next to the Theme Colors name will change accordingly.
-
On the View tab, in the Presentation Views group, click Notes Master.

-
On the Notes Master tab, in the Edit Theme group, click Colors, and then click the colors used in your slide or the option that you want.

-
When you finish, on the Notes Master tab, in the Close group, click Close Master View.

Change the theme effects
Theme effects are sets of lines and fill effects. When you click the Theme Effects button  , you can see the lines and fill effects that are used for each set of theme effects in the thumbnail that is displayed with the Theme Effects name.
-
On the View tab, in the Presentation Views group, click Notes Master.

-
On the Notes Master tab, in the Edit Theme group, click Effects.

-
Select the effect that you want to use.
-
When you finish, on the Notes Master tab, in the Close group, click Close Master View.

Tip: You can create your own theme fonts or theme colors. For more information, see Apply or customize a document theme.
Microsoft Office Tutorials: Add An Effect, Text Box, Wordart, Picture, Or Shape To Notes Pages >>>>> Download Now
ReplyDelete>>>>> Download Full
Microsoft Office Tutorials: Add An Effect, Text Box, Wordart, Picture, Or Shape To Notes Pages >>>>> Download LINK
>>>>> Download Now
Microsoft Office Tutorials: Add An Effect, Text Box, Wordart, Picture, Or Shape To Notes Pages >>>>> Download Full
>>>>> Download LINK Tw