When you delete an item from SharePoint document library, or list, it isn't immediately removed from SharePoint. Deleted items go into the site recycle bin, where they stay until they're automatically removed approximately 90 days later. Within that time, you can either restore the files to their original location, or remove them to free up storage space.
Important: The SharePoint Recycle Bin is different from the Recycle Bin in Windows. To recover local files deleted from your desktop or apps, use the Windows Recycle Bin first. To put your Windows recycle bin on your desktop, see Put the Windows Recycle bin back on your desktop.
Note: If you're looking for the recycle bin for OneDrive, go to your OneDrive site and select Recycle bin on the left side of the screen.
If you're looking to restore items in the site recycle bin, see Restore items in the Recycle Bin of a SharePoint site.
Updated January 25, 2017 thanks to customer feedback.
Delete an item from the Site Recycle bin
To delete items from the SharePoint Online Site Recycle Bin
-
Click Recycle Bin in the Quick Launch bar on the left of the screen.

If you don't see the Recycle Bin on the Quick Launch bar, follow these steps:
-
Click Settings  , and then click Site Content.
-
The Recycle Bin is in the top right portion of the Site Content page.

Note: If you don't see a Recycle Bin The Recycle Bin might have been disabled. Talk with your farm or server administrator. If you're an administrator, see Configure Recycle Bin Settings on TechNet.
-
In the Recycle Bin page, click the box to the right of the items or files you want to delete or restore.
-
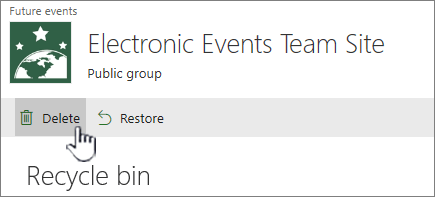
Click Delete to delete the selected files.
To delete all items from the SharePoint Online Site Recycle Bin
-
Click Recycle Bin in the Quick Launch bar on the left of the screen.

If you don't see the Recycle Bin on the Quick Launch bar, follow these steps:
-
Click Settings  , and then click Site Content.
-
The Recycle Bin is in the top right portion of the Site Content page.

Note: If you don't see a Recycle Bin The Recycle Bin might have been disabled. Talk with your farm or server administrator. If you're an administrator, see Configure Recycle Bin Settings on TechNet.
-
In the Recycle Bin page click Empty Recycle Bin to delete all items.
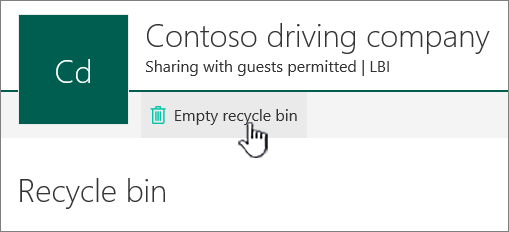
If Empty Recycle Bin isn't visible, make sure you unselect all items in the recycle bin.
To delete items from SharePoint 2016 or 2013 Site Recycle Bin
Note: The Recycle Bin shows only the items that you have deleted. You cannot view items that were deleted by other users unless you are a site collection administrator. If you do not see the Recycle Bin on your site, it could have been disabled by the server administrator.
-
Click Recycle Bin in the Quick Launch bar on the left of the screen.

If you don't see the Recycle Bin on the Quick Launch bar, follow these steps:
-
Click Settings  , and then click Site Content.
-
The Recycle Bin is in the top right portion of the Site Content page.

Notes:
-
The Recycle Bin shows only the items that you have deleted. You cannot view items that were deleted by other users unless you are a site collection administrator.
-
If you don't see a Recycle Bin The Recycle Bin might have been disabled. Talk with your farm or server administrator. If you're an administrator, see Configure Recycle Bin Settings on TechNet.
-
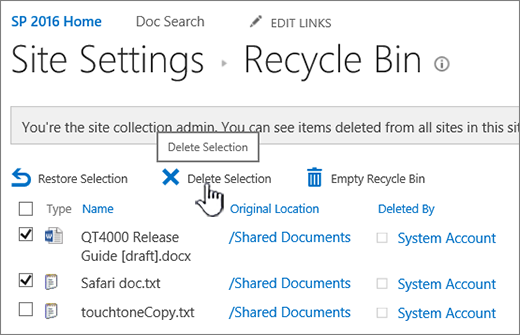
In the Recycle Bin page, click the box to the right of the items or files you want to delete or restore.
-
Click Delete Selection to delete the selected files.
-
Click OK in the confirmation dialog box.
To delete all items from the SharePoint 2016 or 2013 Site Recycle Bin
-
Click Recycle Bin in the Quick Launch bar on the left of the screen.

If you don't see the Recycle Bin on the Quick Launch bar, follow these steps:
-
Click Settings  , and then click Site Content.
-
The Recycle Bin is in the top right portion of the Site Content page.

-
In the Recycle Bin page click Empty Recycle Bin to delete all items.

To delete items from the SharePoint 2010 or 2007 Site Recycle Bin
-
Click Recycle Bin on the Quick Launch bar (you may need to scroll down).
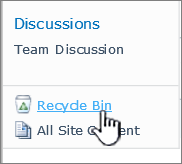
If the Recycle Bin doesn't show on the Quick Launch bar, click All Site Content, and scroll to the bottom.
Notes:
-
The Recycle Bin shows only the items that you have deleted. You cannot view items that were deleted by other users unless you are a site collection administrator.
-
If you don't see a Recycle Bin The Recycle Bin might have been disabled. Talk with your farm or server administrator. If you're an administrator, see Configure Recycle Bin Settings on TechNet.
-
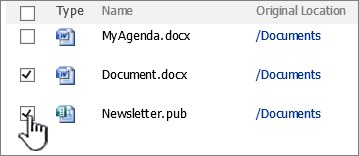
Select the check box next to the items or files.
-
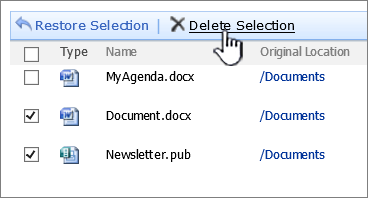
Click Delete Selection.
-
Click OK in the confirmation dialog.
-
Click Recycle Bin in the Quick Launch bar on the left of the screen.

If the Recycle Bin doesn't show on the Quick Launch bar, click All Site Content, and scroll to the bottom and click Recycle Bin.
-
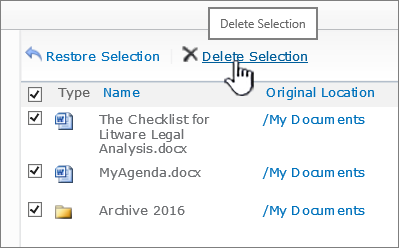
On the Recycle Bin page click the box to the left of Type at the top of the first column, and then click Delete Selection to delete all items.
-
Click OK in the confirmation dialog box.
Can I get back items I delete from the SharePoint site recycle bin?
When you open the recycle bin, you'll only see items that you've deleted. When you delete an item from a site recycle bin it automatically goes into the Second-Stage or Site Collection Recycle Bin where it remains for a set period until it's completely purged from SharePoint. If you're a site collection admin, for more information about this feature, see Restore deleted items from the site collection recycle bin.
Put the Windows recycle bin back on your desktop
While the Windows recycle bin has nothing to do with SharePoint, it is important to have it handy for retrieving local files that you delete. Here's how to put it back on your desktop:
To put the Windows 10 Recycle bin back on your desktop:
-
Select the Start  button, then select Settings
  .
.
-
Select Personalization > Themes > Desktop icon settings.
-
Select the Recycle Bin check box > Apply.
• To get to desktop icon settings in Windows 8.1, swipe in from the right edge of the screen, then select Search. Type desktop icons in the search box, and then select Show or hide common icons on the desktop.
• To get to desktop icon settings in Windows 7, select the Start button, type desktop icons in the search box, and then select Show or hide common icons on the desktop.
Leave us a comment
Was this article helpful? If so, please let us know at the bottom of this page. If it wasn't helpful, let us know what was confusing or missing. Please include your version of SharePoint, OS, and browser. We'll use your feedback to double-check the facts, add info, and update this article.





 , point to Site Settings, and then click Modify All Site Settings.
 , and then click Site Content.


 button, then select Settings
  .
. tab, and then click a slide.Depending on the width of the navigation pane, you will either see the
  and
and  named tabs or the Slides
  icon tabs.
 on the Common toolbar or press CTRL+N.