Slide masters in PowerPoint 2016 for Mac
A slide master is the top slide in a hierarchy of slides that stores information about the theme and slide layouts of a presentation, including the background, color, fonts, effects, placeholder sizes, and positioning.
Every presentation contains at least one slide master that is created automatically when you open a new presentation. The key benefit to modifying and using slide masters is that you can make universal style changes to all the slides in your presentation, including slides added later. When you use a slide master, you save time because you don't have to apply styles on more than one slide.
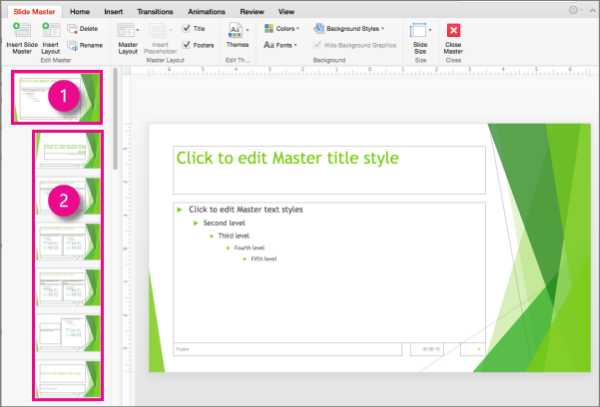
To get to Slide Master view, on the View tab, click Side Master. The master slide is the top slide in the thumbnail pane on the left side of the screen. The related slide layouts appear just below the slide master.

1 Slide master
2 Slide layouts
When you edit the slide master, all slides in your presentation that are based on that master will contain your changes. However, the majority of your changes will likely be to the slide layouts related to the master. When you modify one or more of the slide layouts beneath a slide master, you are essentially modifying the slide master. You'll see that there are several default layouts associated with any given slide master, and you probably won't use all of the layouts provided. You can choose the ones that work best to display your information.
Each slide layout is set up differently, yet all layouts that are associated with a given slide master contain the same theme (color scheme, fonts, and effects). The following image shows a single slide master with the Facet theme applied, and two of the default slide layouts. Notice how both of the layouts portray a different version of the Facet theme—using the same color scheme but a different slide arrangement. Each layout provides text boxes and footers in different locations on the slide, and different list styles and font sizes in the various text boxes.

You can change anything about a layout to suit your needs. For example, to change the font style or size of slides titles or body text on all slides in your presentation, select the slide master, select the master text you want to change, click the Home tab, and then make changes by selecting options in the Font group. These changes are applied to all of your slide layouts and any new slides that you add to your presentation.
Notes:
-
It's a good idea to edit your slide master and layouts before you start to build individual slides so that all slides that you add to your presentation will be based on your custom edits. When you change a slide master or slide layout and then go to Normal view, every slide you add after that will be based on the modified layout and will reflect the changed look of the layout. However, if there are existing slides in your presentation that are based on the old version of the layout, you'll need to reapply the layout to those slides.
-
You can override some of the slide master customizations on individual slides by using the background and text formatting features, but others (such as footers and logos) can be modified only in Slide Master view.
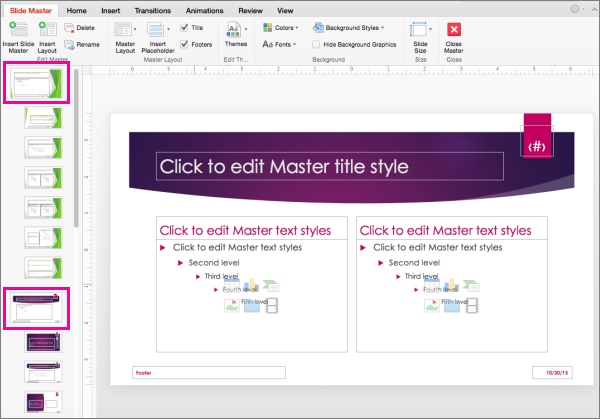
When you want your presentation to contain two or more different styles or themes (such as backgrounds, color schemes, fonts, and effects), you need to insert a slide master for each different theme. The following image shows a presentation with two slide masters in Slide Master view. Each slide master has a different theme applied to it. To add another slide master to your presentation, click Themes on the Slide Master tab, and then select the theme you want.

This comment has been removed by the author.
ReplyDeleteMicrosoft Office Tutorials: Slide Masters In Powerpoint 2016 For Mac >>>>> Download Now
ReplyDelete>>>>> Download Full
Microsoft Office Tutorials: Slide Masters In Powerpoint 2016 For Mac >>>>> Download LINK
>>>>> Download Now
Microsoft Office Tutorials: Slide Masters In Powerpoint 2016 For Mac >>>>> Download Full
>>>>> Download LINK vc