Saturday, June 30, 2018

Use queries to delete one or more records from a database

Use queries to delete one or more records from a database

This article explains how to delete data from an Microsoft Office Access 2007 database by using update and delete queries. You use an update query to delete individual fields from the records in a database, and you use a delete query when you need to remove entire records from a database, including the key value that makes the record unique. As you proceed, remember that Access also provides a number of ways to delete part or all of a record manually.

For more information about deleting records manually, see the article Delete one or more records from a database.

In this article

Understand using queries to delete data

Plan the deletion

Stop Disabled Mode from blocking a query

Delete partial records (one or more fields)

Delete entire records

Sample criteria for select queries

Understand using queries to delete data

You can use two types of queries to delete data from an Access database. The query that you use depends on the type of deletion that you need to perform.

  • When you need to delete individual fields from the records in one or more tables, you use an update query that changes the existing values to either a null value (that is, no data) or a zero-length string (a pair of double quotation marks with no space between them).

    You use an update query to delete data in individual fields because, by default, delete queries only remove entire rows. The process of using an update query to "delete" data follows these broad steps: Create a select query and ensure that it returns only the data that you want to delete. You then convert the query to an update query, using either NULL or a zero-length string as the update value, and then run the query to update the existing data.

  • When you need to remove entire records (rows), you use a delete query.

    By default, delete queries remove all of the data in each field, along with the key value that makes a record unique. When you run the query, it always removes the entire row from the table. The process follows these broad steps: Create a select query, ensure that it returns the records that you want to delete, and then convert the query to a delete query and run it to remove the data.

As you proceed, remember that if the records that you want to delete reside on the "one" side of a one-to-many relationship, you must first alter a property of the relationship before you run the query. Preparations for deleting related data, later in this article, explains how to perform that task. You must make the additional changes because by default, Access prevents you from deleting data on the "one" side of a one-to-many relationship.

If you need more information about one-to-many relationships, see the articles Database design basics and Create, edit or delete a relationship.

Also, remember that after you update or delete part or all of a record, you cannot undo your changes, so you should always back up your data before you run a delete query. See Back up your database, later in this article, for more information.

The procedures in the following sections explain how to create update queries that remove data from individual fields, and how to create delete queries that delete entire records.

Note: Typically, you use update and delete queries only when you need to change or remove large amounts of data quickly. If you want to remove a small number of records — any quantity that you feel comfortable deleting by hand — you can open the table in Datasheet view, select the fields or rows that you want to delete, and press DELETE.

For more information about other ways to delete data, see the article Delete one or more records from a database.

Top of Page

Plan the deletion

The process of using a query to delete records follows these general steps:

  • Plan the deletion. Make sure that you have the necessary permissions to delete the data, ensure that all other users have closed any objects that use the affected tables, and then back up the database.

  • Make sure that the database resides in a trusted location, or that it is digitally signed. If neither of these conditions apply, you can choose to trust the database for the current session only. Remember that, by default, Access blocks all action queries (delete, update, and make-table queries) unless you first trust the database. For information about trusting a database, see Stop Disabled Mode from blocking a query, later in this article.

  • If you want to delete data from more than one table, and those tables are related, you enable the Referential Integrity and Cascade Delete Related Records options for each relationship. This allows your query to delete data from the tables on the "one" and "many" sides of the relationship.

  • Create a select query, and then add criteria as needed until the query returns the correct set of records.

  • If you want to delete individual fields from a table, convert the select query to an update query, enter NULL or a zero-length string ("") as the update criteria, and run the query.

  • If you want to delete whole records, convert your select query to a delete query, and then run the query.

General preparations

Do the following tasks before you delete partial or full records from a database:

  • Ensure that the database is not read-only. To do so, in Windows Explorer, right-click the database file (the .accdb or .mdb file), and then click Properties on the shortcut menu. In the Properties dialog box, ensure that the Read-only check box is cleared.

  • Verify that you have the necessary permissions to delete records from the database. If you are not sure, contact your system administrator or the database designer.

  • Check with other users of the database to ensure that the deletion will not affect them adversely.

  • Ask all users of the database to close all tables, forms, queries, and reports that use the data that you want to delete. This helps avoid lock violations.

    Tip: If a large number of users connect to the database, you might need to close the database and then reopen it in exclusive mode. To do so:

    1. Click the Microsoft Office Button Office button image , and then click Open.

    2. Browse to and select the database, click the arrow next to the Open button, and then click Open Exclusive.
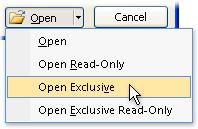
      Opening a file in Exclusive mode

  • Back up your database before you edit or delete records. Some delete operations can be reversed, but making a backup copy ensures that you can always reverse your changes.

    Back up your database

    1. Click the Microsoft Office Button Office button image , point to Manage, and then, under Manage this database, click Back Up Database.

    2. In the Save As dialog box, specify a name and location for the backup copy, and then click Save.

      Access closes the original file, creates a backup, and then reopens the original file.

      To revert to a backup, close and rename the original file so that the backup copy can use the name of the original version. Assign the name of the original version to the backup copy, and open the renamed backup copy in Access.

Preparations for deleting related data

If you need to delete data in related tables, keep this rule in mind: if the data resides on the "many" side of a one-to-many relationship, you can delete the data without having to alter the relationship. However, if the data resides on the "one" side of a one-to-many relationship, you must first alter the relationship or Access blocks the deletion.

The process of deleting related data follows these broad steps:

  • Determine which records reside on the "one" side of the relationship and which reside on the "many" side.

  • If you need to delete records on the "one" side of the relationship and the related records on the "many" side, you enable a set of rules called Referential Integrity, and you enable cascading deletes. Steps in this section explain Referential Integrity, and how to perform both tasks.

  • If you need to delete records only on the "one" side of the relationship, you first delete that relationship, and then delete the data.

    -or-

    If you need to remove data only on the "many" side of the relationship, you can create and run your delete query without having to change the relationship.

The steps in the following sections explain how to prepare related data for deletion.

Determine which records reside on the "one" and "many" sides of a relationship

  1. On the Database Tools tab, in the Show/Hide group, click Relationships.

    The Relationships tab appears and displays all of the tables in your database and also the relationships between each table and every other table. Each relationship is depicted as a line that connects tables between fields.

    The following figure shows a typical relationship. Most, if not all, of the relationships in a database have a "one" side and a "many" side. The relationship diagram denotes the "one" side with the numeral one (1) and the "many" side with the infinity () symbol.

    a relationship between two tables

    As a rule, when you delete records on the "one" side of the relationship, you also delete all of the related records on the "many" side of the relationship. However, when you delete records on the "many" side of a relationship, you typically don't delete records on the "one" side.

    Also, by default, Access enforces a set of rules called referential integrity. These rules ensure that the foreign keys in a database contain the correct values. A foreign key is a column whose values match the values in the primary key column of another table.

    Learn about the referential integrity rules

    • Rule 1: You can't enter a value in the foreign key field of a related table unless that value already exists in the primary key of the primary table. However, you can enter a null value in the foreign key field.

    • Rule 2: You can't delete an entire record from a primary table if matching records exist in a related table.

      Remember that you can work around this rule by enabling a property in the relationship between the primary and secondary tables. For more information about how to do so, see the next procedure, Edit the relationship.

    • Rule 3: You can't change a primary key value in the primary table if that record has related records.

      However, you can also work around this rule by enabling a property in the relationship between the primary and secondary tables.

      Unless you dictate otherwise, Access enforces these rules each time that you add, edit, or delete data in the database. When an action violates a rule, Access displays a message, like the one shown in the following illustration, and cancels the action.

      Message indicating that you cannot delete the Customers record

    As you proceed, remember that, although Access enables referential integrity by default in most cases, a database must first meet the following conditions:

    • The matching field from the primary table must either be a primary key or have a unique index.

    • The related fields in the primary and related table must both have the same data type.

      Note: Access provides two exceptions to this rule. An AutoNumber field can be related to a Number field if that Number field has a FieldSize property setting of Long Integer. Also, an AutoNumber field that has a FieldSize property setting of Replication ID can be related to a Number field that has a FieldSize property setting of Replication ID.

    • Both tables must belong to the same Access database.

      Note: If the tables are linked, they must be in Access format. Also, you must open the database that contains the linked tables and then enable referential integrity. You cannot enforce referential integrity rules for linked tables from databases in other formats, such as Microsoft Office Excel 2007 workbooks. For information about enabling referential integrity, see the steps in the next section.

  2. Note the names of the table fields on each side of the relationship.

  3. Open each table, and review the data in each field to verify that the fields do contain the data that you want to delete.

  4. Leave the Relationships pane open, and then go on to the steps in the next section.

Edit the relationship

Follow these steps only when you need to delete data on the "one" and "many" sides of a relationship.

  1. If you haven't done so already, open the Relationships pane.

    On the Database Tools tab, in the Show/Hide group, click Relationships.

  2. Right-click the relationship (the line) connecting the tables involved in the deletion operation, and then click Edit Relationship on the shortcut menu.

    The Edit Relationships dialog box appears.

  3. Ensure that the Enforce Referential Integrity check box is selected.

  4. Select the Cascade Delete Related Records check box.

    Note: Until you disable this property again, deleting a record on the "one" side of the relationship will delete all of the related records on the "many" side of the relationship.

  5. Click OK, close the Relationships pane, and then go on to the next set of steps.

Delete a relationship

  1. If you haven't done so already, open the Relationships pane.

    On the Database Tools tab, in the Show/Hide group, click Relationships.

  2. Note the fields involved in the relationship so that you can go restore the relationship after you delete your data.

  3. Right-click the relationship (the line) connecting the tables involved in the deletion operation, and then click Delete on the shortcut menu.

    -or-

    Select the relationship and press DELETE.

Note: To restore the relationship, follow the previous steps to open the Relationships pane, and then drag the primary key field from the "one" table and drop it on the foreign key field of the "many" table. The Edit Relationship dialog box appears. If the old relationship enforced referential integrity, select Enforce Referential Integrity, and then click Create. Otherwise, just click Create.

Top of Page

Stop Disabled Mode from blocking a query

By default, if you open a database that you have not chosen to trust or that does not reside in a trusted location, Access blocks all action queries from running.

If you try to run an action query and it seems like nothing happens, check the Access status bar for the following message:

This action or event has been blocked by Disabled Mode.

When you see that message, take the following steps:

Enable blocked content

  • On the Message Bar, click Options.

    The Microsoft Office Security Options dialog box appears.

  • Click Enable this content, and then click OK.

  • Run your query again.

If you don't see the Message Bar

  • Click the Database Tools tab, and in the Show/Hide group, click Message Bar.

For more information about Disabled mode and Access security, see the article Secure an Access 2007 database.

Delete partial records (one or more fields)

The steps in this section explain how to use an update query to delete partial records (individual fields) from tables on the "many" side of a one-to-many relationship. You can also follow these steps to delete data from tables that are not related to other data. Remember that running an update query to delete data changes your existing values to either NULL or a zero-length string (a pair of double quotation marks with no space in between), depending on the criteria that you specify. For more information about using update queries, see the article titled Create and run an update query.

Create a select query

  1. On the Create tab, in the Other group, click Query Design.

    The query designer opens, the Design tab appears, and the Show Table dialog box appears.

  2. Select the table that contains the data you want to delete, click Add, and then click Close.

    The table appears as a window in the upper section of the query design grid. The window lists all of the fields in the table. This figure shows a typical table in the designer.
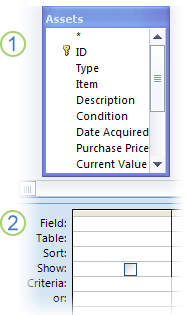
    A table in the query designer

  3. Add the fields that you want to set to NULL on the Field row of the designer. You can double-click each field or drag and drop each field.

  4. Optionally, enter criteria for one or more fields in the Criteria row of the designer.

    You use criteria to return only the records that you want to delete. Otherwise, the update query sets to NULL every record in each of the fields in your query. For more information about using criteria, see Sample criteria for select queries, later in this article.

  5. On the Design tab, in the Results group, click Run.

    Verify that the query returns the records that you want to set to NULL or a zero-length string. As needed, repeat steps 3-5 and alter your fields or criteria until the query returns only the data that you want to change.

  6. Keep the query open, and then go on to the next steps.

Convert the select query into an update query

  1. Click Design View to switch from the datasheet to the query designer.

  2. On the Design tab, in the Query Type group, click Update.

    Access changes the select query to an update query, hides the Show row in the lower section of the design grid, and adds the Update To row.

    In the Update To row for each field, enter either NULL or a zero-length string — a pair of double-quotation marks with no space between them ("").

  3. Click Run Button image .

    Access prompts you to confirm the changes.

    Be very sure that you want to change the values, and then click Yes to change the data.

Top of Page

Delete entire records

The steps in this section explain how to use a delete query to delete entire records from a table.

Create a select query

  1. On the Create tab, in the Other group, click Query Design.

    The query designer opens, the Design tab appears, and the Show Table dialog box appears.

  2. Select the table on the "one" side of the relationship, click Add, and then click Close.

    The table appears as a window in the upper section of the query design grid. The window lists all of the fields in the table. This figure shows a typical table in the designer.

    A table in the query designer

  3. Double-click the asterisk (*) to add all of the fields in the table to the design grid.

    Adding all the table fields enables the delete query to remove entire records (rows) from the table.

  4. Optionally, add a table field that allows you to enter criteria.

    For example, suppose that a customer goes out of business and you need to remove all of the pending orders for that customer. To find just those records, you add the Customer ID and Order Date fields to the design grid.

  5. If you followed the preceding step, enter your criteria in the Criteria row of the designer grid.

    You use criteria to return only the records that you want to delete. Otherwise, the delete query removes every record in the table. To continue the example from the preceding step, you enter the ID number of the customer that went out of business, and the date on which that customer's orders became invalid.

    For more information about using criteria, see Sample criteria for select queries, later in this article.

  6. If you followed the preceding step, clear the Show check box for each criteria field.

  7. On the Design tab, in the Results group, click Run.

    Verify that the query returns the records that you want to delete.

  8. Keep the query open, and then go on to the next steps.

Convert the select query into a delete query and delete data

  1. Click Design View to switch from the datasheet to the query designer.

  2. On the Design tab, in the Query Type group, click Delete.

    Access changes the select query to a delete query, hides the Show row in the lower section of the design grid, and adds the Delete row.

    Ensure that the Delete row in the * (all fields) column displays From. The word Where should appear in any columns that you use for criteria.

  3. Ensure that you want to delete the data, and then click Run Button image .

    Access prompts you to confirm the deletion.

    Click Yes to delete the data.

Top of Page

Sample criteria for select queries

The following table lists some sample criteria that you can use in select queries to ensure that you delete only the correct data. You can adapt these samples for use with your own data. Some of these examples use wildcard characters.

For more information about using wildcard characters, see the article Access wildcard character reference.

Criteria

Effect

> 234

Returns all numbers greater than 234. To find all numbers less than 234, use < 234.

>= "Cajhen"

Returns all records from Cajhen through the end of the alphabet

Between #2/2/2007# And #12/1/2007#

Returns dates from 2-Feb-2007 through 1-Dec-2007 (ANSI-89). If your database uses the ANSI-92 wildcard characters, use single quotation marks (') instead of pound signs (#). Example: Between '2/2/2007' And '12/1/2007'

Not "Germany"

Finds all records where the exact contents of the field are not exactly equal to "Germany." The criterion will return records that contain characters in addition to "Germany," such as "Germany (euro)" or "Europe (Germany)".

Not "T*"

Finds all records except those beginning with T. If your database uses the ANSI-92 wildcard character set, use the percent sign (%) instead of the asterisk (*).

Not "*t"

Finds all records that do not end with t. If your database uses the ANSI-92 wildcard character set, use the percent sign (%) instead of the asterisk (*).

In(Canada,UK)

In a list, finds all records containing Canada or UK.

Like "[A-D]*"

In a Text field, finds all records that start with the letters A through D. If your database uses the ANSI-92 wildcard character set, use the percent sign (%) instead of the asterisk (*).

Like "*ar*"

Finds all records that include the letter sequence "ar". If your database uses the ANSI-92 wildcard character set, use the percent sign (%) instead of the asterisk (*).

Like "Maison Dewe?"

Finds all records that begin with "Maison" and contain a 5-letter second string in which the first 4 letters are "Dewe" and the last letter is unknown. If your database uses the ANSI-92 wildcard character set, use the underscore (_) instead of the question mark (?).

#2/2/2007#

Finds all records for February 2, 2007. If your database uses the ANSI-92 wildcard character set, surround the date with single quotation marks instead of pound signs ('2/2/2007').

< Date() - 30

Uses the Date function to return all dates more than 30 days old.

Date()

Uses the Date function to return all records containing today's date.

Between Date() And DateAdd("M", 3, Date())

Uses the Date and the DateAdd functions to return all records between today's date and three months from today's date.

Is Null

Returns all records that contain a null (blank or undefined) value.

Is Not Null

Returns all records that contain any value (that are not null).

""

Returns all records that contain a zero-length string. You use zero-length strings when you need to add a value to a required field, but you don't yet know what the actual value is. For example, a field might require a fax number, but some of your customers might not have fax machines. In that case, instead of entering a number, you enter a pair of double quotation marks with no space between them ("").

Top of Page

Specifying a time zone for a meeting

Specifying a time zone for a meeting

Note: This article has done its job, and will be retiring soon. To prevent "Page not found" woes, we're removing links we know about. If you've created links to this page, please remove them, and together we'll keep the web connected.

Calendar meetings display times dynamically. Workspace members always see the start and end times according to the regional settings for their operating systems. For example, a meeting set for 1:00 PM on a system set for Eastern Time will automatically display as 10:00 AM for a user whose system is set for Pacific Time.

People traveling to different time zones can optionally reset their Windows regional time zones to match their current time zone and thus ensure that dynamic display times are accurate. However, many people prefer to avoid changing system settings, mostly because doing so requires them to remember to change it again when their location changes. Instead, they will mentally calculate time differences relative to their regional settings.

The Calendar tool allows you to specify a specific time zone for a meeting, ensuring that you see display times for the meeting only according to the specified time zone. For example, suppose you are located in New York (EST), but you are about to visit San Francisco (PST). On your trip you need to schedule a meeting to take place at 10:00 AM PST. You could create this meeting by setting 1:00 PM as your start time, and then remind yourself to subtract three hours when you arrive. You could additionally change your Windows regional settings to PST when you arrive. As a simpler solution, you can create the meeting with a start time of 10:00 AM PST.

  1. Create a new meeting.

  2. Select the Start and End times intended for the desired time zone.

  3. Click Time Zones.

  4. Select the time zone you want from the drop-down list.

    When you select a time zone for the Start time, the time zone for the End time adjusts to match the Start time selection.

  5. Save the meeting.

In Calendar views, the start and end times still reflect your current Windows regional settings. For example, if you set meeting to start at 10:00 AM PST and your system is set to Eastern Time, the start time for the meeting will display in Calendar views as 1:00 PM. If you open the meeting, you see the Start and End times according to the specified time zone.

Customize, save, and apply a theme in Word for Mac

Customize, save, and apply a theme in Word for Mac

Themes provide a complete design for your document, including background designs, font styles, colors, and layouts. You can customize the themes that come with Office and save them so you can use them over and over again.

  1. If you haven't already applied a theme, on the Design tab, click Themes, and then click the one you want to use.

    On the Design tab, select Themes

  2. Customize the theme any way you like by changing the colors, fonts, paragraph spacing, watermark, background colors, or page borders on the Design tab.

    Options for customizing a theme on the Design tab

  3. On the Design tab, click Themes, and then click Save Current Theme.

  4. In the Save Current Theme dialog box, type a name for your new theme and click Save.

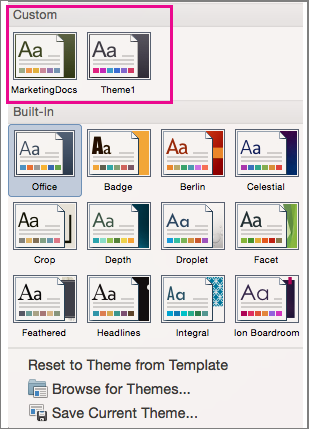
  5. To apply your theme in another document, on the Design tab, click Themes, and then select the theme from the Custom section.

    The Themes menu shows custom and built-in themes

In Office for Mac 2011, you create a custom theme in PowerPoint and then use it in Word or Excel.

To learn how to create a theme in PowerPoint, see Customize and save a theme in PowerPoint for Mac.

Note:  Themes work more effectively when text is formatted by applying styles. For more information about how to apply a style, see Customize styles in Word for Mac.

Apply a custom theme in Word or Excel

  1. Open the document that you want to apply the new theme to.

  2. On the Home tab, under Themes, click Themes, and then under Custom, click the theme that you created in PowerPoint.

    Home tab, Themes group

See also

Apply your custom theme color

Create a basic diagram

Create a basic diagram

Microsoft Office Visio provides more than 60 templates and thousands of shapes, some simple, some quite complex. This article uses the Basic Diagram template to explain what you need to get started quickly — the basics of how to open a template, put shapes in the drawing, and connect those shapes.

You can find much more information about how to use the shapes themselves in the article Shape basics. For information about using other kinds of Visio diagram templates, see the article How can I tell what each Visio template is for?. You can also learn how to use Visio by using the training courses and demos that are available on the Microsoft Office Online Web site.

  1. Start Microsoft Office Visio.

    When Visio starts, several windows appear. For now, all you need to work with is the window titled Template Categories.

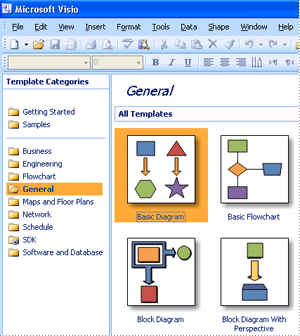
  2. In the Template Categories window, in the list of categories, click the General category.

    All the templates in the General category appear in the central window.

    Contents of the General category

  3. Double-click the template titled Basic Diagram.

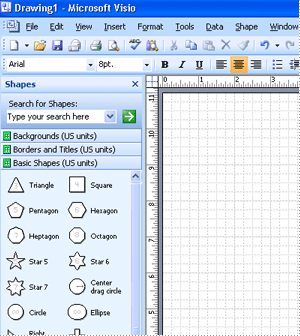
    When the Basic Diagram template opens, most of the space is taken up with a blank drawing page. Because it is important to line up the shapes when you create a diagram, the page appears with grid lines on it.

    Tip: If you want to turn the grid lines off, on the View menu, click Grid to clear the check box.

    In addition to the drawing page, a Shapes window appears with three sets of shapes:

    • Backgrounds

    • Borders and Titles

    • Basic Shapes

      Click each of these titles to open a stencil full of shapes. For now, we will work only with the Basic Shapes stencil.

      Three stencils open with the Basic template: Backgrounds, Borders and Titles, and Basic Shapes

  4. Click any shape on the Basic Shapes stencil, hold down the mouse button, and drag the shape onto your drawing page.

    When you release the mouse button, the shape is bounded by a dashed green line that has green squares Selection handle image , called selection handles, and sometimes yellow diamonds, called control handles Control handle image - yellow diamond . To learn how to use control handles, selection handles, and other important shape features, see the article Shape basics.
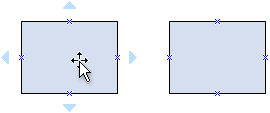
  5. Repeat step 4 to add another shape to the page.

  6. Connect the shapes together by using the AutoConnect feature:

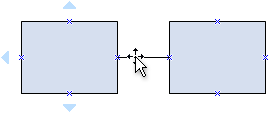
    1. Rest the pointer over the shape that you want to connect from.

      The pointer resting over the shape you want to connect from.

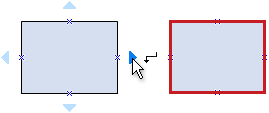
    2. Position the pointer over the pale blue triangle that is closest to the shape that you want to connect to.

      The pointer positioned over the blue triangle closest to the shape you want to connect to.

      The triangle turns dark blue, and a red box appears around the shape that you want to connect to.

      Note: If a red box does not appear around the shape that you want to connect to, the shape may be too far away. Move the shape closer and try again, or connect the shapes by using the Connector tool. For more information, see the article Add connectors between shapes in Visio.

    3. Click the blue triangle. A connector is added and glued to both shapes. The shapes stay connected even if you drag each shape to a new location on the page.

      The shape is placed on the drawing page, and a connector is added and glued to both shapes.

  7. Continue to add and connect shapes by repeating steps 4 through 6 to complete your basic diagram.

Top of Page

End of support for Office 2007

End of support for Office 2007

Support for Office 2007 ended on October 10, 2017. All of your Office 2007 apps will continue to function. However, you could expose yourself to serious and potentially harmful security risks. Upgrade to a newer version of Office so you can stay up to date with all the latest features, patches, and security updates.

Link to buy or try Office

Your browser does not support video. Install Microsoft Silverlight, Adobe Flash Player, or Internet Explorer 9.

Good presenters are using less text to make their slides more visually appealing. But there is no reason why text can't be used effectively, especially with the help of animation.

Many presenters, these days, are using less text and more videos and charts to make their slides more visually appealing.

But there is no reason why text can't be used effectively, especially with the help of animation.

You already saw how to add basic motion animations to text. But, let's say we want our text to really have a visual impact.

Before we even add animation to this slide, we can add impact by rewriting the text to use fewer words and choosing words that are more direct.

Then, we can choose font styles and sizes to turn the wall of words into organized information, which is easier to understand and remember.

Now, we can add animation to the title to give it more impact.

Select the title. Then, go to the ANIMATIONS tab and open the gallery.

Animations are divided into four categories.

Entrance animations bring an object into view on the slide, Exit animations take an object out of view on the slide, and Emphasis animations add something to an object that is already on the slide.

Motion paths let you create custom animations by moving objects around on a slide. We'll go into those in the last movie.

Let's try Zoom. This works, but it might be more effective if the words came in one after the other.

In Effect Options, for zoom, we can choose a Vanishing Point. But as far as a Sequence, there is no choice for bringing the words individually.

To get more options, click the dialog box launcher.

Now, we have three tabs and options. Let's look around.

In Animate text, there is a By word option. Let's try that.

Interesting. It looks like each word is zooming in from its own vanishing point. Let's look at that option again.

Here it says Percent delay between words. Let's see what happens when we make that 100 percent. Perfect.

In general, the best way to learn about animations is to experiment.

Start with a rough idea, and then check out the options until you find what you want. You may also find something better.

Now, let's do something with this text.

I want all of it to be on the slide, the whole time. But, add some emphasis as I talk about each line.

So, we don't want to bring the text in, or take it out, but add an Emphasis. What does Wave look like?

Interesting. I'll have to remember that one for another slide, but not for this one. What about Brush Color?

Looks like, it is brushing color over the text one letter at a time.

I think this will work except for a few things. First, I want it to go from a dark color to light.

We don't see any change now because it is brushing white over white.

So, select the text, and in the mini-toolbar, select a fairly dark blue.

Now, the text is dark until we highlight it with the animation.

The last thing we need to do is bring the text in one paragraph at a time.

That should work. Press Shift+F5. Click, and the title zooms in.

Then, as we talk about the specifics, we click to add emphasis to each line.

Animation can do a lot to add meaning to your text.

For example, we are adding white color to the text as we move through the animation sequence, which makes it appear as if we're building on the information.

Click the dialog box launcher. Click After animation and select the dark blue.

Now, it appears as if we're moving from row to row, without each line building on the previous one.

It is a subtle change, but it does have an impact on how we present our information.

The bottom line: Effective text animation reinforces the meaning of the text.

Up next, we'll do more with animating pictures and shapes.

Baseline Work fields

Baseline Work fields

The Baseline Work fields show the total planned person-hours scheduled for a task, resource, or assignment. The timephased versions of these fields show values distributed over time.

There are several categories of Baseline Work fields.

Data Type    Duration

Baseline Work (task field)

Entry Type    Calculated or entered

How Calculated    As soon as a baseline is saved, the task's total scheduled work at that point in time is copied into the Baseline Work field for the task.

Best Uses    Add the Baseline Work field to a task sheet when you want to compare baseline work amounts to scheduled or actual work for tasks.

Example    You set a baseline for your project 3 months ago, and you want to compare the baseline work for a number of tasks to currently scheduled work. You add the Baseline Work and Work fields to the Task Sheet view to analyze your progress and performance to date.

Remarks    The Baseline Work field contains "0 hours" until you set a baseline for the project. You set a baseline in the Set Baseline dialog box. This copies the current value for the Work field into the corresponding Baseline Work field.

After you set a baseline, you can still edit baseline values. However, edited baseline values do not cause any recalculation of baseline work fields.

Baseline Work (resource field)

Entry Type    Calculated or entered

How Calculated    As soon as a baseline is saved, the resource's total scheduled work at that point in time is copied into the Baseline Work field for the resource.

Best Uses    Add the Baseline Work field to a resource sheet when you want to compare your planned work amounts to the scheduled or actual work for resources.

Example    You set a baseline for your project 3 months ago, and you want to compare the baseline work for a number of resources to currently scheduled work. You add the Baseline Work, Work, and Actual Work fields to the Resource Sheet view to analyze your progress and performance to date.

Remarks    The Baseline Work field contains "0 hrs" until you set a baseline for the project. You set a baseline in the Set Baseline dialog box. This copies the current value for the Work field into the corresponding Baseline Work field.

After you set a baseline, you can still edit baseline values. However, edited baseline values do not cause any recalculation of baseline work fields.

Baseline Work (assignment field)

Entry Type    Calculated or entered

How Calculated    As soon as a baseline is saved, the assignment's total scheduled work at that point in time is copied into the Baseline Work field for the assignment.

Best Uses    Add the Baseline Work field to the sheet portion of the Task Usage or Resource Usage view when you want to compare baseline work amounts to scheduled or actual work for assignments.

Example    You set a baseline for your project 3 months ago, and you want to compare the baseline work for a number of assignments to currently scheduled work. You add the Baseline Work, Work, and Actual Work fields to the Task Usage view to analyze your progress and performance to date.

Remarks    The Baseline Work field contains "0 hrs" until you set a baseline for the project. You set a baseline in the Set Baseline dialog box. This copies the current value of the Work field into the corresponding Baseline Work field.

After you set a baseline, you can still edit baseline values. However, edited baseline values do not cause any recalculation of baseline work fields.

Baseline Work (task-timephased field)

Entry Type    Calculated or entered

How Calculated    As soon as a baseline is saved, the task's timephased scheduled work at that point in time is copied into the Baseline Work field for the task.

Best Uses    Add the Baseline Work field to the timephased portion of the Task Usage view when you want to compare timephased baseline work amounts to timephased scheduled or actual work for tasks over time.

Example    You set a baseline for your project 3 months ago, and you want to compare the baseline work for a number of tasks to the currently scheduled work distributed over time. You add the Baseline Work field to the timephased portion of the Task Usage view to analyze your progress and performance to date.

Remarks    The Baseline Work field contains "0 hrs" until you set a baseline for the project. You set a baseline in the Set Baseline dialog box. This copies the current value for the Work field into the corresponding Baseline Work field.

After you set a baseline, you can still edit any baseline values. However, edited baseline values do not cause any recalculation of baseline work fields. Edits to total baseline work values do not affect timephased baseline work values, and vice versa.

Baseline Work (resource-timephased field)

Entry Type    Calculated or entered

How Calculated    As soon as a baseline is saved, the resource's timephased scheduled work at that point in time is copied into the Baseline Work field for the resource.

Best Uses    Add the Baseline Work field to the timephased portion of the Resource Usage view when you want to compare timephased baseline work amounts to timephased scheduled or actual work for resources.

Example    You set a baseline for your project 3 months ago, and you want to compare the baseline work for a number of resources to the currently scheduled work as distributed over time. You add the Baseline Work field to the timephased portion of the Resource Usage view to analyze your progress and performance to date.

Remarks    The Baseline Work field is blank until you set a baseline for the project. You set a baseline in the Set Baseline dialog box. This copies the current value for the Work field into the corresponding Baseline Work field.

After you set a baseline, you can still edit any baseline values. However, edited baseline values do not cause any recalculation of baseline work fields. Edits to total baseline work values do not affect timephased baseline work values, and vice versa.

Baseline Work (assignment-timephased field)

Entry Type    Calculated or entered

How Calculated    As soon as a baseline is saved, the assignment's total timephased scheduled work at that point in time is copied into the Baseline Work field for the assignment.

Best Uses    Add the Baseline Work field to the timephased portion of the Task Usage or Resource Usage view when you want to compare timephased baseline work amounts to timephased scheduled or actual work for assignments.

Example    You set a baseline for your project 3 months ago, and you want to compare the baseline work for a number of assignments to the currently scheduled work distributed over time. You add the Baseline Work field to the timephased portion of the Task Usage view to analyze your progress and performance to date.

Remarks    The Baseline Work field contains "0 hrs" until you set a baseline for the project. You set a baseline in the Set Baseline dialog box. This copies the current value for the Work field into the corresponding Baseline Work field.

After you set a baseline, you can still edit any baseline values. However, edited baseline values do not cause any recalculation of baseline work fields. Edits to total baseline work values do not affect timephased baseline work values, and vice versa.

End of support for Office 2007

End of support for Office 2007

Support for Office 2007 ended on October 10, 2017. All of your Office 2007 apps will continue to function. However, you could expose yourself to serious and potentially harmful security risks. Upgrade to a newer version of Office so you can stay up to date with all the latest features, patches, and security updates.

Link to buy or try Office

Market your products and services in Business Contact Manager

Market your products and services in Business Contact Manager

In the Marketing workspace in Business Contact Manager for Outlook, you can create and launch a variety of marketing activities and track the success of each one, either individually or in combination, as part of a multi-channel marketing campaign.

Build a call list for a specific promotion, send a personalized e-mail message to the customers you choose, create brochures and flyers for direct mail, or develop your own marketing activity with the tools provided in Business Contact Manager for Outlook.

This article describes how to create and use mass e-mail and direct mail print marketing activities. You will also find details on how to analyze the success of your marketing efforts, and how to use the reports and marketing gadget in Business Contact Manager for Outlook.

For information about how to create a call list marketing activity, see Create and use Call Lists in Business Contact Manager.

What do you want to do?

Create and launch a mass e-mail or direct mail print marketing activity

Plan the activity

Create the marketing content in Outlook, Word, or Publisher

Launch a marketing activity

Track or analyze marketing activities

Top of Page

Create and launch a mass e-mail or direct mail print marketing activity

For your business to grow, you need to market it. Business Contact Manager for Outlook makes it simple to create e-mail messages for mass distribution, direct-mail promotions, and to develop other marketing activities.

Creating and launching a marketing activity is basically a three-step process of planning the activity, creating the content for it, and then launching it.

Top of Page

Plan the activity

During the planning stage, you'll create a marketing activity record by selecting a name for the activity, and specifying who among your Accounts and Business Contacts or Leads is the target audience.

Note:  The recipient list for a marketing activity can include only one record type. For example, the Recipient list can include Accounts, but not Accounts and Business Contacts. Business Contacts and Leads can be in the same list because the Lead record is based on the Business Contact record type.

  1. In the Navigation Pane, under Business Contact Manager, click Marketing.

  2. On the Ribbon, on the Home tab, in the New group, click one of the following buttons:

    • Mass E-mail Mass e-mail icon

      • Keyboard shortcut    To create a new Mass E-mail marketing activity press ALT + NE.

    • New Items, point to Marketing, and then click Direct Mail Print Direct Mail Print icon , or Other Activity.

      • Keyboard shortcut    To create a new Direct Mail Print marketing activity press ALT + NN.

  3. Type a name for the marketing activity on the form.

  4. If you want this activity to be part of a marketing campaign, in the Campaign field, type a name for the campaign or select a campaign name from the list. If the activity is not part of a marketing campaign, leave the default text, Current activities in place.

  5. In the Recipient list section, to send your message to the e-mail or business address of one of the following types of customers, click All Accounts, All Business Contacts and Leads, All Business Contacts, or All Leads.

    Or, click one of the following options:

    • Search Folder. Choose a search folder that contains a pre-filtered list of recipients, to create a custom list. The field is renamed Custom List after you select a folder.

    • Existing Marketing Activity. Choose the recipient list used for a previous activity.

    • New List. Open the Filter Business Contacts dialog box and select criteria to filter the list.

      You can also create a marketing activity from the names in a report. For information about this option, see Use reports and charts in Business Contact Manager.

  6. To edit the selected list by filtering it, click Review and Filter.

    For more information about filtering a list, see Filter records in Business Contact Manager.

  7. On the Ribbon, on the Home tab, in the Show group, click Details to open the Activity details page.

  8. If you want to, type information in the Campaign code, Budgeted cost, Start date, End date, and Comments fields.

  9. Click Save & Close to save the record, or continue on to Create the marketing content, next in this article.

    When you are ready to start the activity, click Launch, or see Launch a marketing activity later in this article.

Top of Page

Create the marketing content in Outlook, Word, or Publisher

To create the content to be distributed, you can use Outlook, Word, or Publisher to draft e-mail messages, print letters, flyers, brochures, and other marketing materials, and other types of documents, and then link them to the activity in Business Contact Manager for Outlook.

After you've created the marketing activity record and selected the recipients, as described in Plan the activity, you can link the content to the activity.

You can choose to develop the content as you plan the marketing activity and create the activity record, or you can create the content in Outlook, Publisher or Word first, and then create the record for the marketing activity. If you create the content beforehand, you'll just select the file in the marketing activity record.

  1. In the Navigation Pane, under Business Contact Manager, click Marketing.

  2. Do one of the following:

    • Create a new marketing activity record.

    • In the workspace, click the Mass E-mail, Direct Mail Print, or Other Marketing Activities tab, and then double-click a record to open it.

  3. Decide whether to create new marketing content for the activity, or to use content that's already been created.

    To create a new file

    1. In the marketing activity window, click one of the following content sources:

      • Outlook Editor.

      • Publisher Mail Merge.

      • Word Mail Merge.

    2. The program you chose will open. Use the program to create your message, which you can personalize using Mail Merge.

    3. If you selected Outlook Editor, click the Create button.

    If you selected Publisher Mail Merge or Word Mail Merge, click Create/Browse, and then click Create.

    1. Create the message, flyer, pamphlet, or brochure for distribution.

    To personalize your marketing message for each recipient, follow the instructions in the Mail Merge pane in Publisher or Word. For information about how to use mail merge, see Publisher or Word Help.

    1. Save the file, and then return to the marketing activity window.

      The default name of the file is the same as the name of the activity unless you save the file using a different name.

    To select an existing file

    1. In the marketing activity window, in the content source section, click Create/Browse, and then click Browse.

    After you've created or selected a file, an Edit command is added to the button. If you save and then reopen the activity, the button is renamed Edit/Browse. Click Edit to revise the selected file.

    1. When you are done making changes, save the file, and then return to the marketing activity window.

      You can click Edit recipient list in the Mail Merge pane in Publisher or Word, to modify your activity's recipients, as well as in Business Contact Manager for Outlook if the activity has not been launched.

  4. The file you selected is listed in the Use file field.

  5. Click Save & Close if you want to start the activity later. Otherwise, click Launch, and see Launch a marketing activity next in this article.

    If you want to track the results of this marketing activity, you must also record the name of the activity in the Initiated by field in each Account, Business Contact, Lead, or Opportunity record generated by the activity. Then, to view the results of the activity, see the Track page of the marketing activity record.

Top of Page

Launch a marketing activity

When you are ready to start one of the marketing activities you've created, all you need to do is click Launch.

  1. Open the activity record.

    How?

    1. In the Marketing workspace, click the tab, Mass E-mail, Direct Mail Print, or Other Marketing Activities, for the type of activity that you want to launch.

    2. In the List Pane, double-click the activity to open it.

      If you have a long list of activities, look for the activity under the name of the campaign. If you did not assign it to a campaign, the activity is listed under Current activities. You can also type the name of the activity in the Search box to quickly find it.

  2. Review the names in the Recipient list to be sure you've selected all the Accounts, Business Contacts and Leads whom you want to receive your mailing.

    You can also review and update the list of recipients in the Mail Merge pane in Publisher or Word.

  3. Click Launch.

    Your document opens in the program you used to create it.

  4. Do one of the following:

    If you are sending a mass e-mail message

    Make any needed changes to the document, such as personalizing your message through the Mail Merge feature. To send the message, on the Ribbon, in the Finish group, click Finish & Merge, and then click Send e-mail Messages.

    If you are creating a direct mail publication

    Make any needed changes to the document, and then follow the steps in the window to print the document, merge it to a new publication, or add it to an existing publication.

Top of Page

Track or analyze marketing activities

Whenever you launch a marketing activity, it is important to track the results. At the very least, you need to understand if the activity was worth the time or money.

To see the results of a marketing activity, you should record which Accounts, Business Contacts, Leads, and Opportunities resulted from each marketing activity. As you complete the new records, note the name of the marketing activity in the Initiated by field in each record.

In this section

Add the name of a marketing activity to Account, Business Contact, Lead, or Opportunity records

View the results of a marketing activity

Where do the tracking numbers come from?

Analyze a marketing activity or campaign

Display a marketing gadget

Use gadgets to analyze marketing activity results

Use marketing reports

Top of Page

Add the name of a marketing activity to Account, Business Contact, Lead, or Opportunity records

To effectively track the return on investment of a marketing activity, be sure to record the budgeted and actual costs of the activity.

You must also add the name of the activity to the Initiated by field of each Account, Business Contact, Lead, or Opportunity record that comes from the activity. The total number of each record type is listed in the Activity results section on the Track page of the marketing activity record.

  1. Do one of the following:

    • For Accounts or Business Contacts, in the Navigation Pane, under Business Contact Manager, click Contact Management.

    • For Leads or Opportunities, in the Navigation Pane, under Business Contact Manager, click Sales.

  2. Click the tab that contains the record that you want.

  3. In the List Pane, double-click an Account, Business Contact, Opportunity, or Lead record to open it.

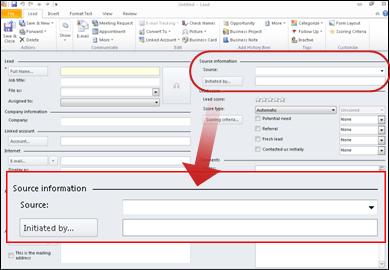
  4. In the Source information section of the record, click Initiated by.

    Screenshot showing the Source information section of the record

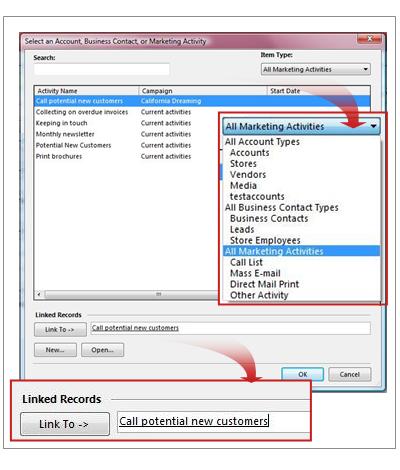
  5. In the Select an Account, Business Contact, or Marketing Activity dialog box, under Item Type, click All Marketing Activities, or click the type of marketing activity that generated the record.

    Link to a marketing activity

  6. Under Activity Name, click the name of the marketing activity.

  7. In the Linked Records section, click Link to.

    The record is linked to the marketing activity, and is included in the totals displayed on the Track page of the activity record.

  8. Click OK to close the window.

  9. Repeat this procedure for each Account, Business Contact, Lead, or Opportunity that resulted from the marketing activity.

Top of Page

View the results of a marketing activity

You have several ways to monitor your marketing activities, such as using the Track page of the activity, viewing analysis tools and gadget on the Marketing workspace, and reviewing the data in reports. The Track page will provide the most detail about activities. It is also where you can mark activities as closed, and store actual cost information.

  1. Open the Track page by first opening a marketing activity.

  2. On the Ribbon, in the Show group, click Track.

    Keyboard shortcut    To open the Track page, press ALT + H, then press 03.

  3. In the Activity information section, you can type in the actual cost of the activity, and select the check box to mark the activity as closed.

  4. In the Activity results section, you can view the number of new opportunities and contacts resulting from the activity, and click Show Report to create a detailed business report for the information in the selected field.

Top of Page

Where do the tracking numbers come from?

The data displayed on the Track page is automatically calculated, based on the information you enter about each activity:

  • Each Account, Business Contact, Lead, and Opportunity that has the selected activity name in its Initiated by field is included in the corresponding count for Initiated opportunities, Initiated accounts, and Initiated contacts fields.

  • If the activity is a call list, the Initiated Phone logs field is updated when you save changes to the call list record.

  • Expected revenue information is calculated from the sales probability percentage and the value of products and services on each Opportunity record linked to the activity.

Top of Page

Analyze a marketing activity or campaign

The Analysis tab in the Marketing workspace brings together a list of all of your marketing activities, sorted by campaign.

Note:  Details are provided for individual marketing activities only. There is no campaign-wide analysis function that incorporates all of the activities.

  1. In the Navigation Pane, under Business Contact Manager, click Marketing.

  2. In the List Pane of the workspace, click the Analysis tab.

    The tab displays each of your marketing activities organized by campaign; activities not linked to a campaign are displayed under Campaign: Current Activities.

  3. To review details for a specific activity, double-click the activity name to open the record. See View the results of a marketing activity for more information.

    Note:  When a report is open, you can use the marketing buttons on the Ribbon to initiate a new marketing activity directed to the contacts selected in the report.

Top of Page

Display a marketing gadget

Marketing gadgets are useful for giving you a quick look at how a particular marketing activity or campaign is succeeding.

To get the best information from a gadget, you'll need to keep your marketing activity data up-to-date. As you create new activity records and assign them to campaigns, that data will be displayed in the gadgets. For specific details, such as the numbers of Accounts, Business Contacts, Leads or Opportunities that came from a particular activity, you must type the activity name in the Initiated by field of each new record. For accurate financial numbers, include the budgeted and actual cost figures on the Details and Track pages for each activity.

  1. In the Navigation Pane, under Business Contact Manager, click Marketing.

  2. On the Ribbon, click the Gadgets tab.

Keyboard shortcut    To display the Gadgets tab on the Ribbon, press ALT + G.

  1. In the Add Gadgets group, click Marketing, and then click one of the following:

    • Activity Type Analysis

    • Campaign Analysis

    • Campaign Comparison

Gadget information is updated whenever new information is saved to a relevant record.

Top of Page

Use gadgets to analyze marketing activity results

The marketing gadgets available in Business Contact Manager for Outlook include:

  • Activity Type Analysis. Displays information for all marketing activities of a certain type, such as Mass E-mail.

  • Campaign Analysis. Displays information for all marketing activities under a single campaign.

  • Campaign Comparison. Displays information for all marketing campaigns.

You can configure each marketing gadget to show only the activities or campaigns you want to view, and the number of Opportunities, Accounts, Business Contacts or Leads that came from each activity or campaign, or their actual costs, budgets, or expected revenue.

Note:  Be sure that any new records created as a result of a marketing activity have the name of the activity entered in the Initiated by field.

For more information about using gadgets, see Use gadgets in Business Contact Manager.

Top of Page

Use marketing reports

You can review the results of your marketing activities in various reports in Business Contact Manager for Outlook, print them out, or export them to Excel for further analysis.

The following reports are provided by default:

  • Opportunities by Marketing Activity

  • Business Contacts by Marketing Activity

  • Accounts by Marketing Activity

  • Marketing Activities by Campaign

  • Marketing Activities by Type

Note:  To view the latest information about marketing activities in your reports, be sure that any records created as a result of a marketing activity include the name of the marketing activity in the Initiated by field.

For more information about using reports and charts, see Use reports and charts in Business Contact Manager.

Top of Page