Create WBS codes
In a nutshell, work breakdown structure (WBS) codes are outline numbers that you can apply to tasks and edit to match the specific needs of your business. Project automatically provides basic outline numbers for each task, but you can apply your own customized outline scheme to the project at any time.
The following section applies only to Microsoft Project 2016, 2013, and 2010.
What do you want to do?
Create custom WBS codes
-
Click View, and then pick a sheet view, such as the Task Sheet or Resource Sheet.
-
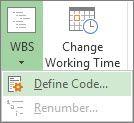
Click Project. In the Properties group, click WBS and then click Define Code.

-
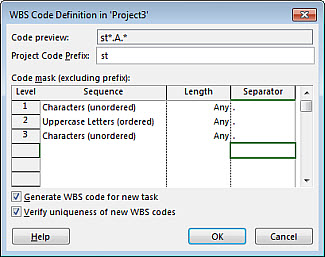
You can create a project-specific code in the Project Code Prefix box. You can use numbers, uppercase and lowercase letters, and symbols.

-
To set the code for first-level tasks, in the first row in the Sequence column, choose a character type from the drop-down list. You can choose from numbers, uppercase or lowercase letters, or a mix of numbers, letters, and other symbols.
-
In the Length column, set the number of characters for each level of the code string. Click Any to allow any number of characters for that level.
-
In the Separator column, pick a character to separate the code for one level from the code for the next level.
The default separator is a period. You can choose others or choose not to have a separator character at all.
Note: The separator character can't also be used as part of a code.
-
Set a code string for each level of indented tasks in your outline.
To specify individual codes for each level, click the next row, and complete the Sequence, Length, and Separator columns.
-
If you don't want Project to automatically assign a WBS code each time that you enter a new task, uncheck the Generate WBS code for new task check box.
-
To permit the use of the same WBS code for multiple tasks, uncheck the Verify uniqueness of new WBS codes check box.
Renumber WBS codes
When you move or delete tasks, Project doesn't automatically renumber the WBS codes in case you're using them in documents or other systems that are not linked to your Project file. This means that the codes for the remaining tasks will likely be incorrect. Here's how to renumber the WBS codes for all tasks or selected tasks:
-
Click View, and then pick a sheet view (such as the Task Sheet) that contains the tasks you want to renumber.
-
Pick the tasks you want to renumber. The first task you pick will not be renumbered.
To renumber WBS codes for all tasks, don't select any tasks.
-
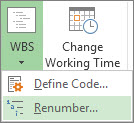
Click Project. In the Properties group, click WBS and then click Renumber.

-
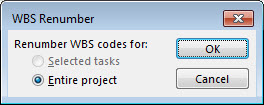
Click Selected tasks to renumber the codes for the tasks you selected.
Click Entire project to renumber the codes for all tasks in the project.

Use basic outline numbers
If you don't need the detailed structure provided by WBS codes, you can use a basic outline.
Project automatically creates an outline number for each task, based on where the task appears in the structure of the task list. For example, the first task in your task list is numbered 1. If that task has three subtasks, the subtasks are numbered 1.1, 1.2, and 1.3.
Outline numbers consist of numbers only, and you can't edit them. They change automatically when you move a task up or down in the task list and when you indent or outdent tasks.
To show outline numbers, add the Outline Number field to a table or sheet view. You can also add outline numbers directly to the task names:
-
Go to the Gantt Chart or Task Sheet.
-
Click Format, and then in the Show/Hide group, check Outline Number.
This section applies only to Microsoft Project 2007.
What do you want to do?
Learn about WBS codes
There are two types of WBS codes in Microsoft Office Project: outline numbers and custom WBS codes. Read the following sections to learn more.
Outline numbers
Outline numbers are the simplest type of WBS coding. Microsoft Office Project automatically calculates an outline number for each task, basing the numbering on the outline structure of the task list. For example, the first task in your task list is numbered 1. If that task has three subtasks, the subtasks are numbered 1.1, 1.2, and 1.3.
Outline numbers consist of numbers only (no letters), and you cannot edit them. They do, however, change automatically when you move a task up or down in the task list and when you indent or outdent tasks. For example, if a subtask currently has an outline number of 3.5.4, and if you move it up one row in the list, the outline number is automatically updated to 3.5.3. If you then outdent that same subtask, the outline number is automatically updated to 3.6.
Tip: To display outline numbers, you can add the Outline Number field to a table or sheet view, or you can choose to display the outline numbers next to the task names. To display the outline numbers next to the task names, on the Tools menu, click Options, and then click the View tab. Under Outline options, select the Show outline number check box.
Custom WBS codes
If your project would benefit from having detailed WBS codes that are made up of specific lengths, sequences, or sets of numbers and letters, you can define a single custom WBS code mask for the project. (No project can have more than a single custom code mask.) The custom WBS code is recorded in the WBS field.
As with outline numbers, each level of a custom WBS code represents an outline level in the task list. You can use a unique format for each level of the code, and each level is listed in the code according to the hierarchy of tasks, summary tasks, and subtasks.
For example, if you are planning phased projects that align with organizational directives for the upcoming fiscal year, you can create a custom WBS code mask that represents each task by using the corresponding directive, quarter, and project. Using this code, you might have a task that has a custom WBS code of CustSat.Q3.CSTools.11, indicating that it is task 11 in the Customer Support Tools Upgrade project, which starts during the third quarter and which supports the Customer Satisfaction business directive for the planned fiscal year.
Define custom WBS codes
-
On the View menu, click a sheet view, such as the Task Sheet view.
To use a view that does not appear on the View menu, click More Views, click the view that you want to use in the Views list, and then click Apply.
-
On the Project menu, point to WBS, and then click Define Code.
-
To distinguish tasks in this project from tasks in other projects, type a project-specific code prefix in the Project Code Prefix box.
This prefix helps to identify the project at the highest level of the WBS code. The prefix can be useful in identifying the subprojects within a master project, or when you are creating task dependencies across projects.
You can enter any combination of numbers, uppercase and lowercase letters, and symbols for the project code prefix.
-
To specify the code string for first-level tasks, in the first row in the Sequence column, click the type of character that you want to use for this level:
-
Click Numbers (ordered) to show a numeric WBS code for this level (for example 1, 2, and 3 for the first three summary tasks in the project).
-
Click Uppercase Letters (ordered) to show uppercase alphabetical WBS codes (for example A, B, and C for the first three summary tasks in the project).
-
Click Lowercase Letters (ordered) to show lowercase alphabetical WBS codes (for example a, b, and c for the first three summary tasks in the project).
-
Click Characters (unordered) to show any combination of numbers and uppercase and lowercase letters (for example, Arch1, Const1, and Insp1 for the first three summary tasks in the project).
Choosing this option gives you the most flexibility for entering customized WBS codes. Project displays an asterisk (*) in the WBS field until you type or enter a string of characters for this level of the WBS code.
-
-
In the Length column, type or select the number of characters for each level of the code string. You can either enter the exact number of characters or select Any to allow any number of characters for that code level.
For example, you can type 3 to make three characters the mandatory number of characters to enter in one level of the WBS code. The total length of a WBS code can be from 1 to 255 characters.
-
In the Separator column, type or select a character to separate the code string for one level from the code string for the next level.
By default, the separator character is a period. You can use a different separator character at each code level.
You can also choose not to use any separator character between code levels. In the Separator field, delete the separator character.
-
Specify one code string for each level of indented tasks in your outline.
To specify individual code strings for each level, click the next row, and complete the Sequence, Length, and Separator columns.
-
If you don't want Project to automatically assign a WBS code each time that you enter a new task, clear the Generate WBS code for new task check box.
-
To permit the use of the same WBS code for multiple tasks, clear the Verify uniqueness of new WBS codes check box.
Note:
-
The character that you use as a separator cannot also be used as part of the code. For example, if you use a hyphen as the separator, you cannot use a hyphen in the code that you use to represent a task.
-
You cannot define more than one set of WBS codes per project. If you need to show an additional organizational structure for tasks, you can use custom fields to create or apply a separate set of codes.
-
To view WBS codes, you must add the WBS field to your view.
-
To change the WBS code for a summary task and all of its subtasks, you must change the existing code, or set of asterisks, in the WBS code of the summary task to another set of characters.
For example, your WBS code for a specific subtask is Ph3.Prj5.Arch.Task3. "Task3" represents the "Develop plans" subtask, and "Arch" represents the "Architect solution" summary task. The name of the summary task is changed to "Design solution," and you need to update the code for the summary task and all of its subtasks. You modify the WBS code so that the summary task is represented by "Des," and the WBS code for the "Develop plans" subtask is automatically updated to Ph3.Prj5.Des.Task3.
Renumber WBS codes
After you move or delete tasks, their custom WBS codes may no longer be in correct sequence. Project does not automatically renumber the WBS codes, because you may be using those WBS codes in documents or other systems that are not linked to your Project file. You can renumber the WBS codes of all tasks or selected tasks:
-
On the View menu, click a sheet view that contains the tasks that you want to renumber, such as the Task Sheet.
To use a view that does not appear on the View menu, click More Views, click the view that you want to use in the Views list, and then click Apply.
-
Select the tasks that you want to renumber. (The first task in a selection of tasks is not renumbered. It is used as the reference point for renumbering the other tasks.)
To renumber WBS codes for all tasks, don't select any tasks.
-
On the Project menu, point to WBS, and then click Renumber.
-
To correct the WBS code sequence for only selected adjacent tasks, click Selected tasks.
To correct the WBS code sequence for all tasks in the project, click Entire project.
Note:
-
If your project contains subprojects, you can renumber some or all tasks in each subproject by displaying all of the subtasks. Click Show
 , and then click All Subtasks. (Project cannot renumber tasks from subprojects that are not displayed.)
 -
Renumbering subprojects that are inserted into a master project also changes the code that represents each subproject at the project level.
-
To display WBS codes, you can add a WBS column to a sheet view.
-
To change WBS codes after Project calculates them, on the Project menu, point to WBS, and then click Define Code. In the Sequences column, change the type of character of any level of the code mask. When you update a code at the summary task level, all subtasks for that summary task are automatically updated.
If you have difficulty changing your WBS codes, it may be for one of the following reasons:
-
You are trying to change a WBS code that has a code mask, after the code was calculated If you created a WBS code mask, and WBS codes were already calculated for tasks, you can change the WBS code only by redefining the levels of the code mask. After redefining levels of the code mask, you can change any level of the code mask from ordered numbers, ordered uppercase letters, ordered lowercase letters, or unordered characters to another type.
-
You are trying to change WBS codes at a lower level in the task list You cannot change the characters in the WBS code for a subtask, only for the summary task where that level of the WBS code is defined.
-
No comments:
Post a Comment