Sunday, May 31, 2020

Search for notes in onenote for windows 10

No matter where you put your notes in OneNote for Windows 10, you can find them quickly by searching. OneNote can search typed text, handwritten notes, and words that appear in inserted images.

Your browser does not support video. Install Microsoft Silverlight, Adobe Flash Player, or Internet Explorer 9.
  1. On your keyboard, press Ctrl+F, or click the magnifying glass icon near the top of the Page list.

  2. In the Search box that appears, enter a search word or phrase, and then press Enter.

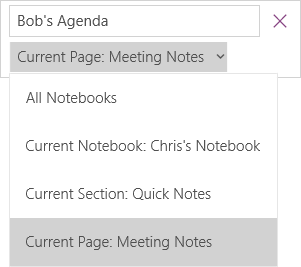
  3. Just below the Search box, click the arrow to adjust the scope of your search, if necessary. You can search All Notebooks, the Current Notebook, the Current Section, or the Current Page.

    Shows search drop down with scoping options, current page is active.

  4. If your search text was found in any of your notes, click to select any page in the list of search results that appears. OneNote will open the page you select and then highlight all occurrences of your search text on that page.

Onedrive for business is uninstalled after you upgrade to office 2016

Problem

This article contains information that applies when you use the OneDrive for Business sync client (groove.exe).

NOTE: To determine which OneDrive sync client you're using, see the Which OneDrive sync client am I using? 

Consider the following scenario:

  • You have Microsoft Office 365 Personal or Office 365 Home installed on your computer.

  • You upgrade from Microsoft Office 2013 to Office 2016.

In this scenario, you experience one of the following issues:

  • OneDrive for Business is uninstalled and can't be reinstalled.

  • If you had OneDrive for Business installed separately from Office 2013, you receive the following message when you install Office 2016:

    We need to remove some older apps

    Some older apps don't work with Office 2016. Before installing the new Office, we need to remove [list of apps].

Solution/Workaround

This is a known issue. We're working to address this issue and will continue to post more information in this article when the information becomes available.

To work around this issue, use one of the following methods, as appropriate for your situation.

Method 1: Use a custom installation of Office 2016 to extract OneDrive for Business

For more information, go to the following Microsoft Knowledge Base article: 3175950 How to install the OneDrive for Business sync client for SharePoint 2013 and later and SharePoint Online when using Office 2016 applications.

Method 2: Connect to your site library by using Explorer View, by creating a mapped network drive, or by using a web browser

Connect to your site library by using Explorer View or by creating a mapped network drive. You can also use a web browser to interact with your libraries in Microsoft SharePoint Online.

For information about how to connect to your site library by using Explorer View or about how to create a mapped network drive, go to the following Microsoft Knowledge Base articles:

More information

This issue occurs because OneDrive for Business was installed as a separate package from Microsoft Office. For example, Office 2013 Home and Student Edition was installed, and then OneDrive for Business was installed separately by using a different installer package.

Still need help? Go to Microsoft Community.

Second function

Returns the seconds of a time value. The second is given as an integer in the range 0 (zero) to 59.

Syntax

SECOND(serial_number)

Serial_number     is the time that contains the seconds you want to find. Times may be entered as text strings within quotation marks (for example, "6:45 PM"), as decimal numbers (for example, 0.78125, which represents 6:45 PM), or as results of other formulas or functions (for example, TIMEVALUE("6:45 PM")).

Remark

Time values are a portion of a date value and represented by a decimal number (for example, 12:00 PM is represented as 0.5 because it is half of a day).

Examples

Formula

Description (Result)

=SECOND("4:48:18 PM")

Seconds in the time (18)

=SECOND("4:48 PM")

Seconds in the time (0)

What to do when a malicious file is found in sharepoint online onedrive or microsoft teams

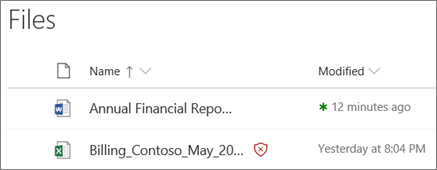
You've come across a file in SharePoint Online, OneDrive for Business, or Microsoft Teams, but you're unable to open or share it. You can see the file is there, but it's blocked and the file has a warning icon next to it:

Screenshot of files in OneDrive for Business with one detected as malicious

Delete the file (recommended)

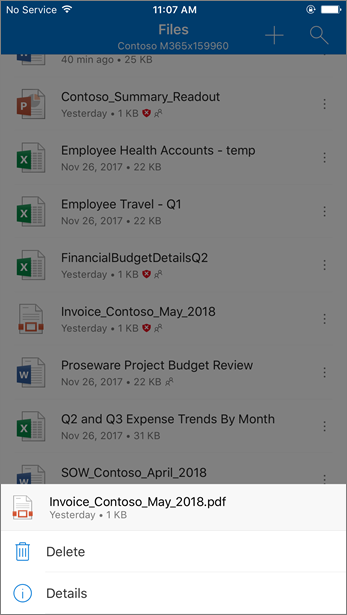
To protect yourself, your computer, and your organization, the best option is to delete the file. From the OneDrive mobile app, your only option is to delete the file.

  1. Select the file you want to delete (on the mobile app, press and hold to select it).

  2. Select Delete.

    Screenshot of deleting a blocked file from OneDrive for Business from the OneDrive mobile app

    Deleting in the OneDrive mobile app

Download the file (if your organization allows it)

If your organization allows it, you can download the file by viewing your OneDrive in a web browser. You can then clean the file by whatever means your organization recommends.

  1. Go to: https://www.office.com/signin, and sign in with the username and password you use with your work or school account.

    Notes: 

  2. Select OneDrive.

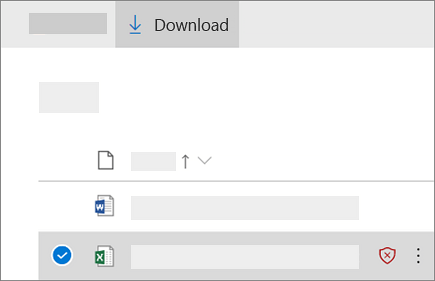
  3. Select the file you want to download, and then select Download.

    Screenshot of downloading a blocked file in OneDrive for Business

Why is a file in SharePoint, OneDrive, or Microsoft Teams blocked?

The file is blocked to help protect you, your computer, and your organization from malware.

Certain safety features are in place in Microsoft 365 such that a malicious file can be identified in SharePoint Online, OneDrive for Business, or Microsoft Teams. If a file in SharePoint, OneDrive, or Microsoft Teams is deemed malicious, that file is blocked so that no one can open it. A blocked file has a marker after its file name, like this:

Screenshot of a file in OneDrive for Business detected as malicious

Although it can be inconvenient for a file to be blocked, getting infected with malware is even worse. Cybercriminals use ransomware, technical support scams, or unwanted software to compromise users and computers. Once cybercriminals get access to user credentials or sensitive information, they can use that information to gain access to more information or other users, or even charge fraudulent fees. To learn more, see Understand the different malware types.

What can I do to avoid running into malicious files in the future?

Although cybercriminals continue to find new ways to trick people with malware, there are steps you can take to help protect you and your computer.

To learn more about how malware works and how to prevent malware infection, see Help prevent malware infection on your PC.

What do I do if I think the system made a mistake?

If your organization uses Microsoft 365 Advanced Threat Protection and a file is blocked that you think should not be, you'll need some help from a Microsoft 365 administrator who can research the issue and, potentially, unblock the file. To learn more about what Microsoft 365 administrators do, see About Microsoft 365 admin roles.

Learn more

Saturday, May 30, 2020

Participate in a q a in a live event in teams

In a Teams live event, attendees can interact with producers and presenters through a Q&A, if the organizer set it up when they organized the event.

Overview

Your browser does not support video. Install Microsoft Silverlight, Adobe Flash Player, or Internet Explorer 9.

Watch this video for an overview of moderating a Q&A in a Teams live event.

Open or close the Q&A

When a live event is created with a Q&A option, the Q&A is open by default and attendees can start asking questions even if the event hasn't started. These questions are only visible to moderators until they publish them to the event.

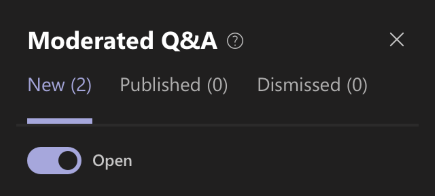
To open the Q&A, click Q&A on the right side of the screen, then click Open. Click Closed to close it.

Q&A Session is open

Ask a question

If you're an attendee and want to ask a question, just:

  1. Select Q&A Q&A button on the right side of the screen.

    Note: The Q&A panel only appears if the organizer has set it up.

  2. Type your question in the compose box, and then select Send. If you want to ask your question anonymously, select Ask anonymously.

    Q&A box

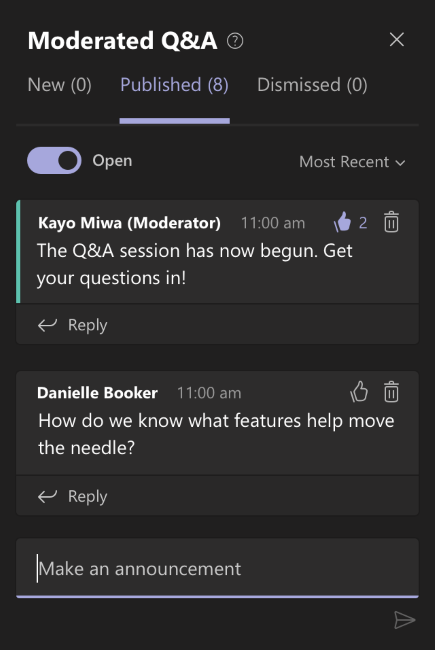
Make announcements

Type an announcement and click Send.

Q&A questions

Answer questions

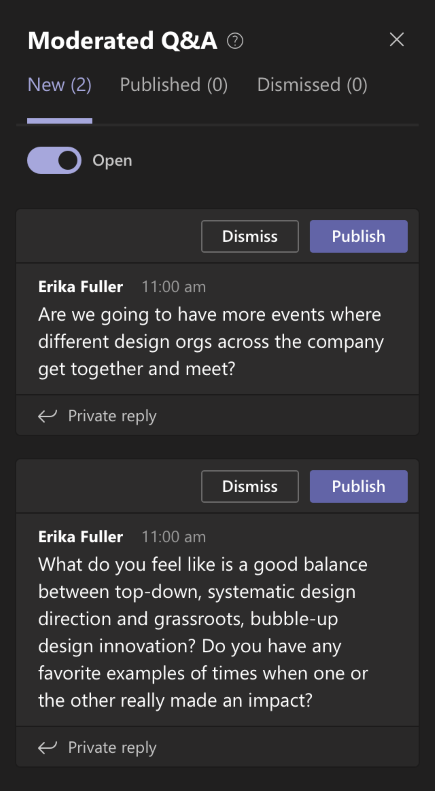
Select a question and choose Private reply to respond to it. The answer is instantly available to the person who asked the question. Select Publish to make the question and answer visible to everyone.

Q&A question menu

Want to know more?

Teams live event overview

Invite attendees

Produce a live event

Present in a live event

Certain folders may have to be excluded from antivirus scanning when you use file level antivirus software in sharepoint

This article includes information about folders that may have to be excluded from antivirus scanning in the following SharePoint applications:

  • Microsoft SharePoint Server 2019

  • Microsoft SharePoint Server 2016

  • Microsoft SharePoint Foundation 2013

  • Microsoft SharePoint Server 2013

  • Microsoft SharePoint Foundation 2010

  • Microsoft SharePoint Server 2010

  • Windows SharePoint Services 3.0

  • Microsoft Office SharePoint Server 2007

These folders may have to be excluded from antivirus scanning when you use file-level antivirus software in SharePoint. If these folders are not excluded, you may see unexpected behavior. For example, you may receive "access denied" error messages when files are uploaded.

Folders that may have to be excluded from antivirus scanning in SharePoint

Note: In the following sections, the placeholder Drive represents the letter of the drive on which you have your SharePoint application installed. Typically, this drive letter is C.

SharePoint Server 2019, SharePoint Server 2016

You may have to configure your antivirus software to exclude the following folders and subfolders from antivirus scanning:

  • Drive:\Program Files\Common Files\Microsoft Shared\Web Server Extensions

    If you do not want to exclude the whole Web Server Extensions folder from antivirus scanning, you can exclude only the following folders:

    • Drive:\Program Files\Common Files\Microsoft Shared\Web Server Extensions\16

    • Drive:\Program Files\Common Files\Microsoft Shared\Web Server Extensions\16\Logs

  • Drive:\Program Files\Microsoft Office Servers\16.0\Data\Office Server\Applications

    (This folder is used for the indexing process. If the index files are configured to be located in a different folder, you also have to exclude that location.)

  • Drive:\Windows\Microsoft.NET\Framework64\v4.0.30319\Temporary ASP.NET Files

  • Drive:\Windows\Microsoft.NET\Framework64\v4.0.30319\Config

  • Drive: \Users\ServiceAccount\AppData\Local\Temp\WebTempDir

    Note: The WebTempDir folder is a replacement for the FrontPageTempDir folder.

  • Drive:\ProgramData\Microsoft\SharePoint

  • Drive:\Users\account that the search service is running as\AppData\Local\Temp

Note: The search account creates a folder in the Gthrsvc_spsearch4 Temp folder to which it periodically must write.

  • Drive:\WINDOWS\System32\LogFiles

  • Drive:\Windows\Syswow64\LogFiles

Note: If you use a specific account for SharePoint services or application pools identities, you may also have to exclude the following folders:

  • Drive:\Users\ServiceAccount\AppData\Local\Temp

  • Drive:\Users\Default\AppData\Local\Temp

  • Any location in which you decided to store the disk-based binary large object (BLOB) cache (for example, C:\Blobcache).

You should also exclude all the virtual directory folders under Drive:\inetpub\wwwroot\wss\VirtualDirectories and all the folders under Drive:\inetpub\temp\IIS Temporary Compressed Files.

SharePoint Server 2013

You may have to configure the antivirus software to exclude the Drive:\Program Files\Microsoft Office Servers folder from antivirus scanning for SharePoint Server 2013. If you do not want to exclude the whole Microsoft Office Servers folder from antivirus scanning, you can exclude only the following folders:

  • Drive:\Program Files\Microsoft Office Servers\15.0\Data

    (This folder is used for the indexing process. If the index files are configured to be located in a different folder, you also have to exclude that location.)

  • Drive:\Program Files\Microsoft Office Servers\15.0\Logs

  • Drive:\Program Files\Microsoft Office Servers\15.0\Bin

  • Drive:\Program Files\Microsoft Office Servers\15.0\Synchronization Service

Any location in which you decided to store the disk-based binary large object (BLOB) cache (for example, C:\Blobcache).

Note If you have SharePoint Server 2013, these folders should be excluded in addition to the folders that are listed in the "SharePoint Foundation 2013" section.

SharePoint Foundation 2013

You may have to configure your antivirus software to exclude the following folders and subfolders from antivirus scanning:

  • Drive:\Program Files\Common Files\Microsoft Shared\Web Server Extensions

    If you do not want to exclude the whole Web Server Extensions folder from antivirus scanning, you can exclude only the following two folders:

    • Drive:\Program Files\Common Files\Microsoft Shared\Web Server Extensions\15\Logs

    • Drive:\Program Files\Common Files\Microsoft Shared\Web Server Extensions\15\Data\Applications

      Note: The Applications folder must be excluded only if the computer is running the SharePoint Foundation Search service. If the folder that contains the index file is located elsewhere, you must also exclude that folder.

  • Drive:\Windows\Microsoft.NET\Framework64\v4.0.30319\Temporary ASP.NET Files

  • Drive:\Windows\Microsoft.NET\Framework64\v4.0.30319\Config

  • Drive: \Users\ServiceAccount\AppData\Local\Temp\WebTempDir

    Note: The WebTempDir folder is a replacement for the FrontPageTempDir folder.

  • Drive:\ProgramData\Microsoft\SharePoint

  • Drive:\Users\account that the search service is running as\AppData\Local\Temp

    Note: The search account creates a folder in the Gthrsvc_spsearch4 Temp folder to which it periodically has to write.

  • Drive:\WINDOWS\System32\LogFiles

  • Drive:\Windows\Syswow64\LogFiles

    Note: If you use a specific account for SharePoint services or application pools identities, you may also have to exclude the following folders:

    • Drive:\Users\ServiceAccount\AppData\Local\Temp

    • Drive:\Users\Default\AppData\Local\Temp

      You should also exclude all the virtual directory folders under Drive:\inetpub\wwwroot\wss\VirtualDirectories\ and all the folders under Drive:\inetpub\temp\IIS Temporary Compressed Files\.

SharePoint Foundation 2010

You may have to configure your antivirus software to exclude the following folders and subfolders from antivirus scanning:

  • Drive:\Program Files\Common Files\Microsoft Shared\Web Server Extensions


If you do not want to exclude the whole Web Server Extensions folder from antivirus scanning, you can exclude only the following two folders:

    • Drive:\Program Files\Common Files\Microsoft Shared\Web Server Extensions\14\Logs

    • Drive:\Program Files\Common Files\Microsoft Shared\Web Server Extensions\14\Data\Applications

      Note: The Applications folder must be excluded only if the computer is running the SharePoint Foundation Search service. If the folder that contains the index file is located elsewhere, you must also exclude that folder.

  • Drive:\Windows\Microsoft.NET\Framework64\v2.0.50727\Temporary ASP.NET Files

  • Drive:\Windows\Microsoft.NET\Framework64\v2.0.50727\Config

  • Drive: \Users\ServiceAccount\AppData\Local\Temp\WebTempDir

    Note: The WebTempDir folder is a replacement for the FrontPageTempDir folder.

  • Drive:\ProgramData\Microsoft\SharePoint

  • Drive:\Users\account that the search service is running as\AppData\Local\Temp

    Note: The search account creates a folder in the Gthrsvc_spsearch4 Temp folder to which it periodically has to write.

  • Drive:\WINDOWS\system32\LogFiles

  • Drive:\Windows\Syswow64\LogFiles

    Note: If you use a specific account for SharePoint services or application pools identities, you may also have to exclude the following folders:

    • Drive:\Users\ServiceAccount\AppData\Local\Temp

    • Drive:\Users\Default\AppData\Local\Temp

      You should also exclude all the virtual directory folders under Drive:\inetpub\wwwroot\wss\VirtualDirectories\ and all the folders under Drive:\inetpub\temp\IIS Temporary Compressed Files\.

SharePoint Server 2010

You may have to configure your antivirus software to exclude the Drive:\Program Files\Microsoft Office Servers folder from antivirus scanning for SharePoint Server 2010. If you do not want to exclude the whole Microsoft Office Servers folder from antivirus scanning, you can exclude only the following folders:

  • Drive:\Program Files\Microsoft Office Servers\14.0\Data

    (This folder is used for the indexing process. If the Index files are configured to be located in a different folder, you also have to exclude that location.)

  • Drive:\Program Files\Microsoft Office Servers\14.0\Logs

  • Drive:\Program Files\Microsoft Office Servers\14.0\Bin

  • Drive:\Program Files\Microsoft Office Servers\14.0\Synchronization Service

  • Any location in which you decided to store the disk-based binary large object (BLOB) cache (for example, C:\Blobcache)

    For more information about the binary large object cache, go to the following Microsoft website:

    Disk-based BLOB caching

Note: If you have SharePoint Server 2010, these folders should be excluded in addition to the folders that are listed in the "SharePoint Foundation 2010" section.

Windows SharePoint Services 3.0

You may have to configure your antivirus software to exclude the following folders and subfolders from antivirus scanning:

  • Drive:\Program Files\Common Files\Microsoft Shared\Web Server Extensions

    If you do not want to exclude the whole Web Server Extensions folder from antivirus scanning, you can exclude only the following two folders:

    • Drive:\Program Files\Common Files\Microsoft Shared\Web Server Extensions\12\Logs

    • Drive:\Program Files\Common Files\Microsoft Shared\Web Server Extensions\12\Data\Applications

      Note: The Applications folder must be excluded only if the computer is running the Windows SharePoint Services Search service. If the folder that contains the index file is located elsewhere, you must also exclude that folder.

  • Drive:\Windows\Microsoft.NET\Framework\v2.0.50727\Temporary ASP.NET Files

  • Drive:\Windows\Microsoft.NET\Framework\v2.0.50727\Config

    Note: If you are running a 64-bit version of Windows, you should also include the following directory:

    • Drive:\Windows\Microsoft.NET\Framework64\v2.0.50727\Temporary ASP.NET Files

    • Drive:\Windows\Microsoft.NET\Framework64\v2.0.50727\Config

  • Windows Server 2003: Drive:\Documents and Settings\All Users\Application Data\Microsoft\SharePoint\Config

  • Windows Server 2008 and later versions: Drive:\ProgramData\Microsoft\SharePoint\Config

  • Drive:\Windows\Temp\WebTempDir

    Note: The WebTempDir folder is a replacement for the FrontPageTempDir folder.

  • Drive:\Documents and Settings\account that the search service is running as\Local Settings\Temp\

  • Drive:\Users\the account the search service is running as\Local\Temp\

    Note: The search account creates a folder in the "gthrsvc Temp" folder to which it periodically has to write.

  • Drive:\WINDOWS\system32\LogFiles

  • Drive:\Windows\Syswow64\LogFiles

    Note: If you use a specific account for SharePoint services or application pools identities, you may also have to exclude the following folders:

    • Drive:\Documents and Settings\ServiceAccount\Local Settings\Application Data

    • Drive:\Users\ServiceAccount\Local

    • Drive:\Documents and Settings\ServiceAccount\Local Settings\Temp

    • Drive:\Users\ServiceAccount\Local\Temp

  • Drive:\Documents and Settings\Default User\Local Settings\Temp

  • Drive:\Users\Default\AppData\Local\Temp

SharePoint Server 2007

You may have to configure your antivirus software to exclude the Drive:\Program Files\Microsoft Office Servers folder from antivirus scanning for SharePoint Server 2007. If you do not want to exclude the whole Microsoft Office Servers folder from antivirus scanning, you can exclude only the following folders:

  • Drive:\Program Files\Microsoft Office Servers\12.0\Data.

    (This folder is used for the indexing process. If the index files are configured to be located in a different folder, you also have to exclude that location.)

  • Drive:\Program Files\Microsoft Office Servers\12.0\Logs

  • Drive:\Program Files\Microsoft Office Servers\12.0\Bin

  • Any location in which you decide to store the disk-based binary large object (BLOB) cache (for example, C:\Blobcache)

    For more information about the binary large object cache, go to the following Microsoft website:

    Configure disk-based cache settings

Note: If you have SharePoint Server 2007, these folders should be excluded in addition to the folders that are listed in the "Windows SharePoint Services 3.0" section.

Note: When you install SharePoint Server 2007 or apply a hotfix to an existing installation of SharePoint Server 2007, you may have to disable the real-time option of the antivirus software. Or, you may have to exclude the Drive:\Windows\Temp folder from antivirus scanning if this is required.

More information

For more information about error messages that may occur when antivirus software scans occur in SharePoint Portal Server 2001 and in SharePoint Portal Server 2003, see the following articles in the Microsoft Knowledge Base:

910449 Troubleshooting common permissions and security-related issues in ASP.NET

Use a screen reader to build an expression in access desktop databases

Read out loud symbol with the label Screen reader content. This topic is about using a screen reader with Office

This article is for people with visual impairments who use a screen reader program with the Office products and is part of the Office Accessibility content set. For more general help, see Office Support home.

Use Access with your keyboard and a screen reader to build an expression in an Access desktop database. We have tested it with Narrator, JAWS, and NVDA, but it might work with other screen readers as long as they follow common accessibility standards and techniques. You can use expressions to accomplish many kinds of tasks in a database. For more information on expressions, see Learn to build an expression

Notes: 

In this topic

Create a calculated field in a query

By adding a calculated field to a query, you can display the results of a calculation that uses the other fields in the query.

To add a calculated field:

  1. Open the query you want to add the calculated field to in the Navigation pane.

  2. Press F6 until you hear "Status bar," followed by the currently active view.

  3. Press the Right arrow key until you hear "Design view," and press Enter. The focus returns to the first empty cell on the Field row of the query in the Design view.

  4. In the empty cell, write the equation you want displayed in the calculated field. First enter the name for the field, followed by a colon, then the expression whose result you want to display in that field. For example, to create a field called "Total" that displays the sum of fields called "Price" and "Tax", write: Total: [Price] + [Tax].

Set default values for a table field

You can use an expression to specify a default value for a field in a table – a value that Access uses for new records unless another value is provided.

  1. Open the table you want in the Navigation pane.

  2. Press F6 until you hear "Status bar," followed by the currently active view.

  3. Press the Right arrow key until you hear "Datashwet view," and press Enter. The focus returns to the table in Datasheet view.

  4. To navigate to the field you want to add a default value to, press the Right or Left arrow key until you hear "Column," followed by the name of the field you want.

  5. To open the Expression Builder for the default value of the field, press Alt+J, B, V, D.

  6. Enter the expression for the default value. For example, to add the default value of 4 for a field, enter =4.

    Note: You must start the expression with the equals sign (=).

  7. Press the Tab key until you hear "OK button," and press Enter.

Add a validation rule to a table field or record

In tables, there are two kinds of validation rules: field validation rules (which prevent users from entering bad data in a single field), and record validation rules (which prevent users from creating records that don't meet the validation rule). You use expressions for both kinds of validation rules.

To add a validation rule:

  1. Open the table you want in the Navigation pane.

  2. Press F6 until you hear "Status bar," followed by the currently active view.

  3. Press the Right arrow key until you hear "Dataset view," and press Enter. The focus returns to the table in Dataset view.

  4. Do one of the following:

    • To open the expression builder for a field validation rule, navigate to the field you want by pressing the Right or Left arrow key until you hear "Column," followed by the name of the field. Then press Alt+J, B, V, A, F.

    • To open the expression builder for a record validation rule, press Alt+J, B, V, A, R.

  5. Enter the criteria that you want. For example, to make sure that the value of a field is 10 or greater, enter the criteria > 9 in the expression builder.

    Note: Validation rule expressions are Boolean, which means that they are either True or False for any given input value. A validation rule must be True for the value or Access doesn't save the input and displays a validation message indicating the error.

  6. Press the Tab key until you hear "OK button," and press Enter.

Add a validation message to a table field or record

To make your database easier to use, you can enter custom validation messages. These replace the generic messages that Access displays when data does not match a validation rule. You can use custom validation message to provide specific information that helps the user enter the correct data.

  1. Open the table you want in the Navigation pane.

  2. Press F6 until you hear "Status bar," followed by the currently active view.

  3. Press the Right arrow key until you hear "Datasheet view," and press Enter. The focus returns to the table in Datasheet view.

  4. Do one of the following:

    • To add a field validation message, navigate to the field you want by pressing the Right or Left arrow key until you hear "Column," followed by the name of the field. Then press Alt+J, B, V, A, V.

    • To add a record validation message, press Alt+J, B, V, A, M.

  5. Enter a validation message, then press the Tab key until you hear "OK button," and press Enter. For example, to inform the user that the value of a field must be 10 or greater, enter the following validation message: The value of the field must equal 10 or higher.

See also

Use a screen reader to start Access

Keyboard shortcuts for Access

Use a screen reader to create tables in Access desktop databases

Use a screen reader to create a query in Access desktop databases

Use a screen reader to download and use a template in Access desktop databases

Technical Support for customers with disabilities

Microsoft wants to provide the best possible experience for all our customers. If you have a disability or questions related to accessibility, please contact the Microsoft Disability Answer Desk for technical assistance. The Disability Answer Desk support team is trained in using many popular assistive technologies and can offer assistance in English, Spanish, French, and American Sign Language. Please go to the Microsoft Disability Answer Desk site to find out the contact details for your region.

If you are a government, commercial, or enterprise user, please contact the enterprise Disability Answer Desk.

Work with suppliers to bring products to market faster

New product design specs, production plans, and quality requirements can easily get lost in email threads. You need one central location to store your important documentation and quickly get input from suppliers on capacity, component updates, and general feedback.

Your browser does not support video. Install Microsoft Silverlight, Adobe Flash Player, or Internet Explorer 9.

Details  

Work across the supplier chain by bringing everyone into Microsoft Teams. Discuss important updates on supplier capacity and upload product design documentation to Teams for everyone to reference. Use @mentions to ping experts for advice or to review new documents. Because documents uploaded to Teams are automatically saved to SharePoint, you can easily edit and review documents in real time with anyone. 

Keep product development and production on track by setting up tasks, resources, and budgets with Project in Teams. Use audio or video calling to discuss project timelines and share your screen to easily show and manage presentations in your meeting.

Highlights

  • Store and share supply information all in one place.

  • Communicate project timelines and assign tasks easily.

  • Keep development on track with chat, audio, or video calling.

Learn More

Share SharePoint files or folders

Friday, May 29, 2020

Remove a drop down list

If you no longer want a drop-down list in your worksheet, you can remove it.

  1. Select the cell with the drop-down list.

    If you have multiple cells with drop-down lists that you want to delete, you can use Ctrl+Left click to select them.

  2. Click Data >Data Validation.

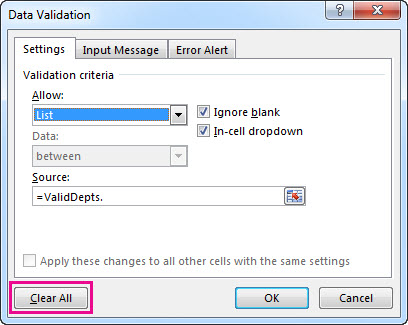
  3. On the Settings tab, click Clear All.

  4. Click OK

Click Clear All to remove a drop-down list

If you need to remove all Data Validation from a worksheet, including drop-down lists, but you don't know where they are, then you can use the Go To Special dialog. Press Ctrl+G > Special, then Data Validation > All or Same, and repeat the steps above.

If, instead of deleting it, you decide you want to change the options in your drop-down list, see Add or remove items from a drop-down list.

  1. Select the cells with the drop-down list.

  2. Click Data >Data Validation.

  3. On the Settings tab, click Clear All.

  4. Click OK.

If, instead of deleting the drop-down list, you decide you want to change the options, see Add or remove items from a drop-down list.

Need more help?

You can always ask an expert in the Excel Tech Community, get support in the Answers community, or suggest a new feature or improvement on Excel User Voice.

See Also

Create a drop-down list

Apply data validation to cells

Add a q a session to a skype meeting broadcast

You can add a question-and-answer session to your Skype Meeting Broadcast. By adding a Q&A session to your meeting, you enable attendees to participate by asking questions, posting comments, and getting replies from the moderator. Presenters and other participants can read the posts as they come in and respond to them in real time. This also allows for dynamic meeting content because a presenter can be alerted whether more elaboration or clarification is needed.

Add a Q&A session

  1. Browse to the Skype Meeting Broadcast portal.

  2. Sign in with your work or school account (e.g., seanc@contoso.com).

  3. Select the meeting or event to which you'll add the Q&A session.

  4. Click Customize.

  5. Determine where you want the Q&A session to be displayed, either to the right of the video player (click Right panel app) or underneath it (click Lower panel app).

    Screen shot showing where to choose placement of the Yammer feed
  6. In Select an app, click Q&A.

    Add Q&A app to Skype Meeting Broadcast
  7. In the upper right corner of the page, click Done.

Distribute the link to the Q&A panel to the moderators

Currently there is no automated function to distribute the link to the Q&A panel to the moderators. Use this method to provide moderators access to the Q&A moderator panel.

  1. On the Meeting details page, in the Attendee page settings section, right-click Open Q&A.

    Get the link to the Q&A panel
  2. Choose Copy shortcut to copy the link to the clipboard.

  3. Send the link to the moderators for this meeting via email.

Open the Q&A moderator panel

The Q&A moderator panel is a separate application that launches within in the browser. It can be started independently from the Skype Meeting Broadcast.

  1. On the Meeting details page, in the Attendee page settings section, click Open Q&A.

    Get the link to the Q&A panel

    Note: The organizer might send you a link to the Q&A moderator panel in email, in which case you can just click the link in the email to access the panel.

  2. The Q&A moderator panel opens as a separate application in the browser.

Make an announcement

The moderator has the option to make announcements that are visible for all attendees.

  1. In the Q&A moderator panel, type a welcome message or an announcement.

    Make an annoucement in the Q&A panel
  2. Click announce to invite attendees to use the Q&A feature.

    The announcement will be visible for all attendees that have joined the broadcast meeting.

Broadcast questions and answers to all attendees

Users can ask questions by typing a question in the Q&A meeting panel and clicking ask. The moderator has the option to make any question and answer visible to all meeting attendees.

  1. Attendee questions are visible in the Q&A moderator panel.

    Attendee asks a question shown in the Q&A moderator panel

    Click broadcast to make the question visible for all attendees.

  2. Click add an answer to include an answer to the question that will be visible to all attendees.

    Broadcast a question from an attendee
  3. Type the answer to the question, and then click broadcast to make both the question and the answer visible to all attendees.

Answer questions in private

Users can ask questions without revealing their identity by clicking ask anonymously in the Q&A panel. Attendee questions are not visible to other attendees, they can only be seen by Q&A moderators. By default, a reply from the moderator will be visible only to the attendee who asked the question (in-private question).

  1. To answer a question directly to the attendee, click reply, type the answer, and then click send.
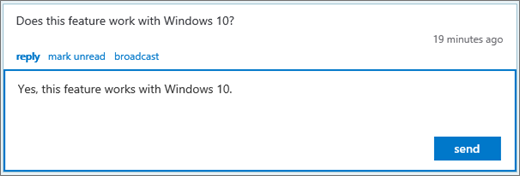
    Reply to an anonymous question from an attendee

    The answer will be visible only to the attendee.

  2. The question is marked as read and the answer is shown in the moderator overview.

Work a Q&A session with more than one moderator

If more than one moderator is fielding questions, it's important to pay careful to which questions have been read or not read. Questions that are unread can be seen by all moderators, and it's possible two moderators will pick up the same question. If a question has not been manually tagged as read, the question will remain unread until the response is sent (either private reply or broadcast). Therefore, moderators should first mark an item they want to answer as read. They can always put it back in the queue by marking it as unread.

To field questions with multiple moderators

  1. Find a question you want to answer, and click read.

  2. Select either broadcast or reply.

  3. Compose the response, and then send it.

  4. If you decide to not answer a question:

    • Click cancel the broadcast, or click reply again to close the reply message box, depending on type of response they originally selected.

    • Then click mark unread, which puts the question back in the queue.

Use moderator views

There are three moderator views you can use in the Q&A moderator panel.

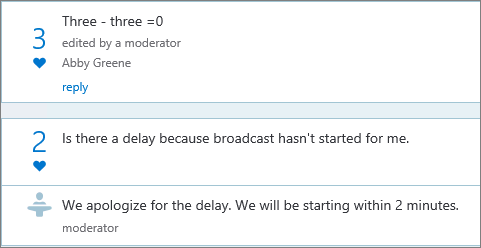
  • Top    Top broadcasted responses are based on votes by attendees and moderators. Broadcasted responses will have a heart button ( Heart icon ) that can be clicked.

    Moderator views in the Q&A panel
  • All    This view shows all questions and answers, and all announcements.

  • Unread    This view shows only the unread questions.

Designate top questions

To keep attendees from asking the same questions over and over again (and also have less questions for the moderator to screen through), the moderator can broadcast questions to the attendees without answering them. That way, attendees can see the questions that have been asked and can "like" a question by clicking the heart button ( Heart icon ) rather than by asking the question again.

  1. The moderator gauges the audience interest in a question by monitoring the number of likes.

  2. The moderator answers the top questions, or directs the top questions to the presenter.

  3. When the moderator receives an answer from the presenter, the moderator can add the response as a reply to the broadcasted question.

Close the Q&A session

At the end of the broadcast meeting, the moderator can close the Q&A session. It is also possible to temporarily close the Q&A session during the meeting and open it later.

  1. Click close qna.

    Close the Q&A session
  2. The Q&A session is currently closed but can be reopened by clicking open qna.

Export the Q&A data to a report in CSV format

All questions and answers are available for download in a CSV format. The Q&A file can be downloaded from the broadcast portal.

  1. In the Skype Meeting Broadcast portal, under Ended meetings, click on the meeting.

  2. In the reports section, click Download Q&A report.

    Click Open to open the CSV file in Microsoft Excel.

See Also

Skype Meeting Broadcast help

What is a Skype Meeting Broadcast?

Schedule a Skype Meeting Broadcast

Join a Skype Meeting Broadcast

Manage a Skype Meeting Broadcast

Use Bing Pulse in your Skype Meeting Broadcast

Record and post your Skype Meeting Broadcast

Create a custom URL for troubleshooting and support in your Skype Meeting Broadcast