Manage your potential customers or leads in Business Contact Manager
With Business Contact Manager for Outlook you can keep track of potential customers and make progress toward winning their business.
A Lead is a person, business, or organization that is potentially interested in the products or services your business offers. You can use Business Contact Manager for Outlook to manage your Leads or potential customers by keeping track of information about individual Leads. Use the scoring criteria to rate the quality of your Leads so you have a better idea of where to focus your sales efforts. You can also use Business Contact Manager for Outlook to monitor your progress or your team's progress toward turning Leads into sales.
What do you want to do?
Create Leads
A lead can come from anywhere—from a marketing activity, a referral from a current customer, or word of mouth. As a small business owner, it is important for you to capture and follow-up on each lead. If you are lucky enough to have a lot of leads, you will want to have a process to capture and track information about the lead and whether the lead turned into a sale. For example, you might want to:
-
Capture information about the potential customer in a Lead record, including information that qualifies the lead.
-
Record information about the products and services that interest the Lead in an Opportunity form.
-
Follow-up with the person and track the Lead as it develops into a business contact.
Leads are displayed in a tab on the Sales workspace. From the Sales workspace, you can view individual Lead and Opportunity records.
In this section
Create a new Lead record
Initial information about someone who might do business with you could be limited, but it's still worth capturing what you know in a Lead record.
You can enter extensive information about a lead, link other records and communication history items, and add custom fields. All of this information is stored as a Lead record.
-
In the Navigation Pane, under Business Contact Manager, click Sales.
-
On the Ribbon, on the Home tab, in the New group, click Lead.
-
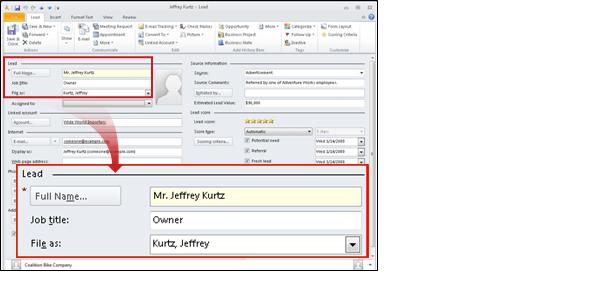
In the Lead section, in the Full Name box, type the name of your lead.
Tip: Full Name is the only information required on the Lead form.
-
Enter any other information that you have about the Lead.
A Lead record has a General page and a History page.
The General page
The General page of a Lead record is divided into sections as follows:
Lead Type the job title of the contact, and then click the filing option that you prefer in the File as field. If you want to assign an employee to follow up with the lead, click an employee's name in the Assigned to list. Only people with whom you've shared your database appear in this list. If you want to, you can click the photo icon to add a photo of the Lead by clicking the photo button.
Company information Type the name of the company that the lead represents.
Linked account If you want to associate the lead with one of your Accounts, click the Account button and select an Account from the list.
Internet, Phone numbers, and Addresses Enter the lead's contact information in these sections. In fields that include an arrow, you can enter multiple items. For example, you can enter addresses for Business, Home and Other in the Addresses section, and select the check box of the address to use for mailings.
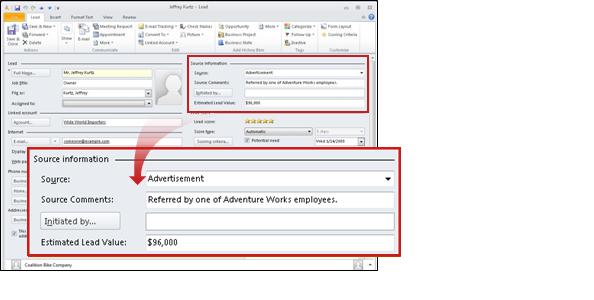
Source information Use this section to record how you found out about this lead. You can select an item from the Source list, or enter a new source. Then click Initiated by to specify the exact source. If you choose Word-of-Mouth as the Source, for example, and then click Initiated by, the dialog box that opens will list all Business Contacts, and you can select the name of the employee or customer who referred the lead to you.
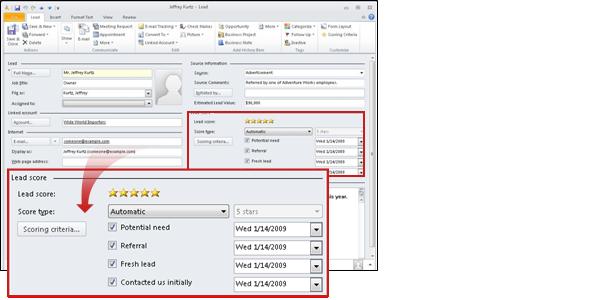
Lead score Score, or rate the lead by how likely he or she is to buy your products or services. You can manually enter a score by clicking the number of stars you want the Lead to have, or choose an automatic Score type. Automatic scoring is based on the Scoring criteria, which you can customize, or simply use the default entries.
Comments Add any additional information about the Lead in the Notes field. Click Add Time Stamp to attach the date and time that you entered the information.
The History page
To open the History page, on the Ribbon, click Show, and then click History. This page contains all the communication history items linked with this record.
To create a more detailed history about the Lead, click the New button and then link an item, such as a business note, phone log, appointment or task, to the record. For more information on communication history, see Track your communications with customers in Business Contact Manager.
-
Click Save & Close, or, if you have more Lead records to create, click Save & New to open a blank Lead form.
Create leads from e-mail messages or by importing
You can also create a Lead record from an e-mail message, or by importing records.
Create a lead from an e-mail message
You can capture the name and e-mail address of a Lead directly from an e-mail message.
-
In Microsoft Outlook, double-click the e-mail message from the contact.
-
On the Ribbon, on the Message tab, in the Business group, click Create Record.
-
Click Lead in the list. A new Lead form opens with the person's name, if known, and e-mail address already entered.
-
Fill out the form, and then click Save & Close.
Import and export Lead records
You can import Lead information from other programs, such as ACT! and Microsoft Excel. For information about importing Lead records and other data, see Import your data into Business Contact Manager.
Since Leads are a type of Business Contact record, you can export them with your Business Contact Manager for Outlook data. For information about exporting Lead records and other data, see Export your business records in Business Contact Manager.
Qualify, or score, Leads
When you qualify a Lead, you are indicating that the Lead is someone who has a use or need for your product or service. For instance, if your business sells yard care services, your Lead would need to have a yard.
Several default scoring criteria are provided on the Lead form. You can use these criteria to automatically calculate a Lead's score, customize them for your business, or you can delete them and enter your own criteria.
Use the scoring information to score all your Business Contact records, or any custom records based on the Business Contact record type. Keep in mind that all scoring criteria affect a Lead or contact's score. Marked check boxes increase a contact's automatically-calculated score, while unmarked check boxes lower the contact's score.
In this section
Score or rate your leads
Use the scoring criteria to rate your Leads on the likelihood that they will make purchases.
-
In the Navigation Pane, under Business Contact Manager, click Sales.
-
Click the Leads tab, and then double-click a record to open it.
-
On the Lead record, in the Lead score section, select a check box to indicate that the Lead meets that criterion. Since each criterion is included in the automatic scoring calculations, a marked check box will raise the Lead's score, and an unmarked check box will lower it.
-
If you want to, you can change the basis of a score by clicking Scoring Criteria. The scoring criteria are each assigned a weight of low, normal, or high. By changing the weight of each criterion, you change the extent to which it influences the total score.
Based on the amount of completed criteria and the relative importance assigned to each, Business Contact Manager for Outlook calculates the score and displays it in the number of yellow stars in the Lead score section.
-
If you want to override the automatic scoring process, you can assign a fixed score to the Lead. From the Score type list, click Manual, and then click the number of stars that you want to assign.
Customize Lead scoring criteria
Business Contact Manager for Outlook includes default scoring criteria, but you can change the criteria to better match your sales processes.
-
Click the File tab.
-
Click Business Contact Manager.
-
Click Customize, and then click Modify Scoring Criteria.
Tip: You can also customize the Lead scoring criteria by opening a Lead record, and in the Lead score section, clicking Scoring criteria.
-
To edit a criterion, select it, and then click Edit. Change the item's description, importance, or both, and then click OK.
-
To create a new criterion, click Add. Type a description, select the importance, and then click OK.
-
To delete a criterion, select it, and then click Delete.
Assign Leads
Business Contact Manager for Outlook stores your business data in a database. You can share that business data with co-workers so that they have the necessary information to serve your customers. You can assign a Lead to anyone with whom you have shared the database.
-
In the Navigation Pane, under Business Contact Manager, click Sales.
-
Click the Leads tab, and then select the Lead or Leads that you want to assign.
How do I select more than one record?
To select records that are adjacent to each other, press the SHIFT key, and then click first and last records of the group that you want to add. To select nonadjacent records, press the CTRL key, and then click the individual records. To select all records, click one, and then press CTRL+A
-
On the Ribbon, in the Actions group, click Assign to and then select the person you want to work with the Lead.
Edit more than one Lead at a time
It's easy to simultaneously edit several Lead records, for example, to update several manual scores, or to identify all the Leads from a specific source.
-
In the Navigation Pane, under Business Contact Manager, click Sales.
-
Click the Leads tab, and then click the records you want to change.
How do I select more than one record?
To select records that are adjacent to each other, press the SHIFT key, and then click the first and last records of the group that you want to add. To select nonadjacent records, press the CTRL key, and then click the individual records. To select all records, click one, and then press CTRL+A.
-
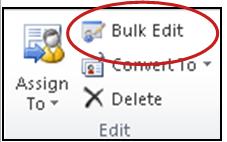
On the Ribbon, on the Home tab, in the Edit group, click Bulk Edit.
-
Click the field that you want to edit in the Select the field list.
-
Enter the new value that you want in the field, or click Clear the value to delete the field's entry in each of the selected records.
-
Click OK to complete the bulk edit and close the dialog box.
Convert a Lead into a Business Contact
In any set of Leads, some will not result in sales, and will be deleted; others will prove to be valuable. You can convert these valuable Leads to Business Contacts. Business Contact records are used for contacts with whom you have an ongoing business relationship.
-
In the Navigation Pane, under Business Contact Manager, click Sales.
-
In the workspace, select the Leads tab, and then double-click a Lead record to open it.
-
On the Ribbon, in the Edit group, click Convert To and then click Business Contact.
-
Edit the Business Contact record as needed, and then click Save & Close.
Note: Business Contact forms are very similar to Lead forms, but they have additional pages: Details and User-defined fields. For more information about filling out a Business Contact form, see Use Business Contacts in Business Contact Manager.
Create reports from Lead records
Leads reports are built into Business Contact Manager for Outlook, and they are easily modified to meet your needs.
-
In the Navigation Pane, under Business Contact Manager, click one of the following folders to display the workspace:
-
Contact Management.
-
Sales.
-
Marketing.
-
Project Management.
-
-
To view one of the default Lead reports, on the Ribbon, click the Reports tab. In the Contact Managementgroup, click Leads, and then select a report:
-
Leads by Assigned To .
-
Leads by Assigned To and Rating .
-
Leads by Score.
-
-
To create a new report, open a default report. Click the options in the Layout or Sort and Filter group to change the report's appearance and the data displayed.
-
Click Save As and type a name for the report. The report is saved to the Leads category. To open it, click Saved Reports, click Leads in the list, click the report name in the dialog box, and then click Open.
For more information on creating and customizing reports, see Use reports and charts in Business Contact Manager.
No comments:
Post a Comment