Print a document in Word for Mac
Before you print, you can preview your document and specify which pages you want to print.
Preview and print your document
-
On the File menu, click Print.
-
To preview each page, click the arrows at the bottom of the preview.

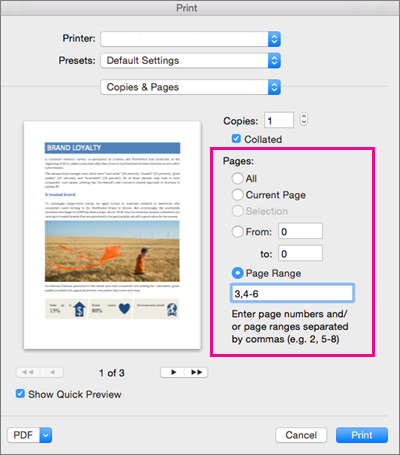
If you don't see the preview, below Presets, select Copies & Pages and check the box next to Show Quick Preview.
-
Choose the number of copies, and any other options you want, and click the Print button.
Print specific pages
-
On the File menu, click Print.
-
To print only certain pages, under Pages, do one of the following:
-
To print the page shown in the Quick Preview, select Current Page.
-
To print consecutive pages like 1 -3, select From and enter the first and last page numbers in the From and To boxes.
-
To print individual pages and a range of pages (like page 3, and pages 4-6) at the same time, select Page Range, and enter the page numbers and ranges separated by commas (e.g. 3, 4-6).
-
Print on both sides of the paper
The easiest way to produce double-sided publications is to print them on a printer that supports duplex printing. To find out whether your printer supports duplex (also referred to as double-sided or two-sided) printing, you can check your printer manual or consult your printer manufacturer, or you can do the following:
-
On the File menu, click Print.
-
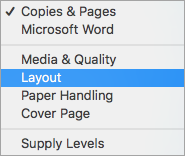
Click Copies & Pages, and then click Layout.
-
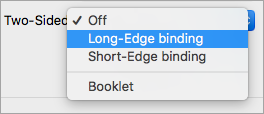
Click Two-Sided, and then select Long-Edge binding (to flip pages on the long end) or Short-Edge binding (to flip pages on the short end).
If your printer doesn't offer automatic duplex printing, you can follow these steps to manually print on both sides of the paper.
-
On the File menu, click Print.
-
Click Copies & Pages, and then click Microsoft Word.
-
Click Odd pages only.
-
After the odd pages are printed, flip the stack of pages over, reinsert the stack into the printer, repeat steps 1 and 2, and then click Even pages only.
Depending on the printer model, you might have to rotate and reorder the pages to print the other side of the stack.
Print only odd or even pages
-
On the File menu, click Print.
-
Click Copies & Pages, and then click Microsoft Word.
-
Click Odd pages only or Even pages only.
Print in reverse order
If your printer stacks the output back-to-front, you can still have your pages print in the correct order. Follow these steps to print a document that begins with the last page.
-
On the Word menu, click Preferences.
-
Under Output and Sharing, click Print.
-
Under Print options, select the Reverse print order check box.
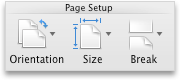
Change the page orientation for a document
-
On the Layout tab, click Orientation, and then click Portrait or Landscape.
-
On the File menu, click Print.
Change the orientation for specific pages
-
Select all the text on the pages you want to change.
Tip: To change the orientation for all pages after the cursor, instead of selecting text, click where you want to start the new page orientation. On the Format menu, click Document, click Page Setup, select the orientation you want, and then click OK. Next to Apply to, click This point forward.
-
On the Format menu, click Document.
-
Click Page Setup at the bottom of the dialog box.
-
Next to Orientation, click the orientation you want, and then click OK.
-
Next to Apply to, click Selected text, and then click OK.
-
On the File menu, click Print.
Change the orientation for a specific section
Important: To change the orientation for a specific section, your document must be divided by section breaks. Learn how to add section breaks.
-
To display nonprinting characters, such as paragraph markers (¶), click Show all nonprinting characters
 on the Home tab.
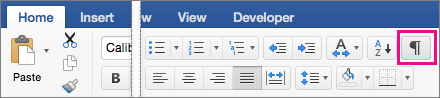
-
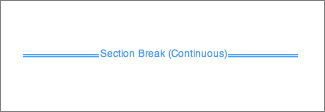
Double-click the section break that follows the section you want to change.
Section breaks look like this:
-
Click Page Setup.
-
Next to Orientation, click the orientation you want, and then click OK.
-
Next to Apply to, click This section, and then click OK.
-
On the File menu, click Print.
See also
Print the background when you print a document
Preview before you print
-
On the File menu, click Print.
-
Click Preview.
Print a document
-
On the File menu, click Print.
-
On the Printer pop-up menu, select the printer that you want.
-
Select the options that you want, such as the number of pages or which pages you want to print, and then click Print.
Tip: If you don't see other print options in the Print dialog box, click the blue downward facing arrow to the right of the Printer pop-up menu.
Print specific pages or sections
-
On the File menu, click Print.
-
On the Printer pop-up menu, select the printer that you want.
-
Click Page Range, and then in the Page Range box, do one of the following:
To print
Do this
Nonadjacent pages
Type the page numbers with commas between numbers or with a hyphen between the starting and ending numbers in the range.
For example, to print pages 2, 4, 5, 6, and 8, type 2,4-6,8.
A whole section
Type an s followed by the section number.
For example, to print section 3, type s3.
Nonadjacent sections
Type an s followed by the section number, type a comma, and then type an s followed by the next section number.
For example, to print sections 3 and 5, type s3,s5.
A range of pages across sections
Type the range in the following format: p ns n-p ns n, where p is in front of the page number and s is in front of the section number.
For example, to print from page 2 in section 3 through page 3 in section 5, type p2s3-p3s5.
A range of pages in a section
Type the range in the following format: p ns n-p ns n, where p is in front of the page number and s is in front of the section number.
For example, to print pages 5 through 7 in section 3, type p5s3-p7s3.
-
Click Print.
Print on both sides of the paper (duplex printing)
The easiest way to produce double-sided publications is to print them on a printer that supports duplex printing. You can usually learn whether your printer supports duplex printing either by looking at the information that was included with the printer or by looking at the printer's properties. Some printers offer the option of automatically printing on both sides of a sheet of paper (automatic duplex printing). Other printers provide instructions so that you can manually reinsert pages to print the second side (manual duplex printing). Some printers do not offer duplex printing at all.
Tip: If your printer supports duplex printing and you are having trouble printing duplex, on the Copies & Pages pop-up menu, click Layout. Then, on the Two-Sided pop-up menu, make sure that Off is not selected.
If your printer doesn't offer automatic duplex printing, you can follow these steps to manually print on both sides of the paper.
-
On the File menu, click Print.
-
On the Printer pop-up menu, select the printer that you want.
-
On the Copies & Pages pop-up menu, click Microsoft Word.
-
Click Odd pages only.
-
After the odd pages are printed, flip the stack of pages over, reinsert the stack into the printer, repeat steps 1 through 3, and then click Even pages only.
Depending on the printer model, you might have to rotate and reorder the pages to print the other side of the stack.
Print only odd or even pages
-
On the File menu, click Print.
-
On the Printer pop-up menu, select the printer that you want.
-
On the Copies & Pages pop-up menu, click Microsoft Word.
-
Click Odd pages only or Even pages only.
Print in reverse order
If your printer stacks the output back-to-front, you can still have your pages print in the correct order. Follow these steps to print a document that begins with the last page.
-
On the Word menu, click Preferences.
-
Under Output and Sharing, click Print.
-
Under Printing options, select the Reverse print order check box.
Change the page orientation for a document
-
On the View menu, click Print Layout.
-
On the Layout tab, under Page Setup, click Orientation, and then click Portrait or Landscape.
-
On the File menu, click Print.
Change the orientation for specific pages
-
On the View menu, click Print Layout.
-
Select all the text on the pages that you want to change.
-
On the Format menu, click Document.
-
Click Page Setup.
-
Under Orientation, click the orientation that you want, and then click OK.
-
On the Apply to pop-up menu, click Selected text, and then click OK.
As necessary, Word inserts section break before and after the text that you selected and changes the orientation for those sections.
-
On the File menu, click Print.
Note: To change the orientation for all pages after the cursor, instead of selecting text, click in the document to set the cursor position. On the Format menu, click Document, click Page Setup, select the orientation that you want, and then on the Apply to pop-up menu, click This point forward.
Change the orientation for a specific section
Important: To change the orientation for a specific section, the document must have section breaks.
-
On the View menu, click Print Layout.
-
To display nonprinting characters, such as paragraph markers (¶), click Show all nonprinting characters
on the Standard toolbar. -
Double-click the section break that follows the section that you want to change.
-
Click Page Setup.
-
Under Orientation, click the orientation that you want, and then click OK.
-
On the Apply to pop-up menu, click This section, and then click OK.
As necessary, Word inserts section breaks before and after the sections that you selected and changes the orientation for those sections.
-
On the File menu, click Print.
Note: To change the orientation for all pages after the cursor, instead of selecting text, click in the document to set the cursor position. On the Format menu, click Document, click Page Setup, select the orientation that you want, and then on the Apply to pop-up menu, click This point forward.
See also
Print the background when you print a document
Nice blog. A new technology in a duplex printer Flip on Long Edge vs Flip on Short Edge. Such a good information share with us. This is very nice. If you want to Flip on Long Edge vs Flip on Short Edge. Than visit my website Flip on Long Edge vs Flip on Short Edge
ReplyDeleteMicrosoft Office Tutorials: Print A Document In Word For Mac >>>>> Download Now
ReplyDelete>>>>> Download Full
Microsoft Office Tutorials: Print A Document In Word For Mac >>>>> Download LINK
>>>>> Download Now
Microsoft Office Tutorials: Print A Document In Word For Mac >>>>> Download Full
>>>>> Download LINK 34