Choose the right view for the task in PowerPoint
You can view your PowerPoint slides in a variety of ways depending on the task at hand. Some views are helpful when you're creating your presentation, and some are most helpful for delivering your presentation.
You can find the different PowerPoint view options on the View tab, as shown below.

You can also find the most frequently used views on the task bar at the bottom right of the slide window, as shown below.

Note: To change the default view in PowerPoint, see Change the default view.
Views for creating your presentation
Normal view
You can get to Normal view from the task bar  at the bottom of the slide window, or from the View tab on the ribbon.
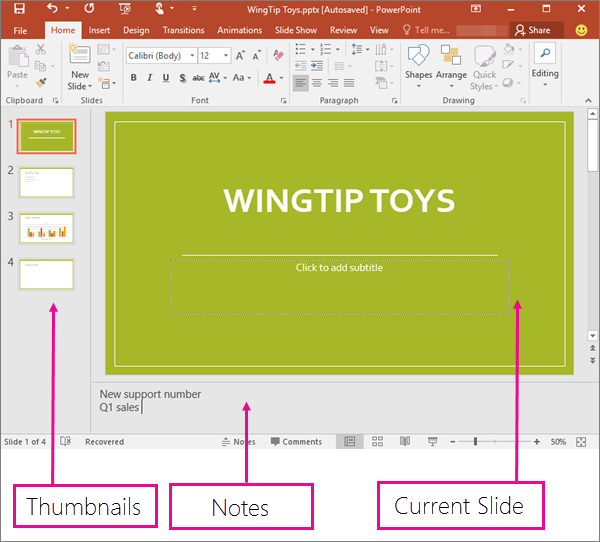
Normal view is the editing mode where you'll work most frequently to create your slides. Below, Normal view displays slide thumbnails on the left, a large window showing the current slide, and a section below the current slide where you can type your speaker notes for that slide.
Slide Sorter view
You can get to Slide Sorter view from the task bar  at the bottom of the slide window, or from the View tab on the ribbon.
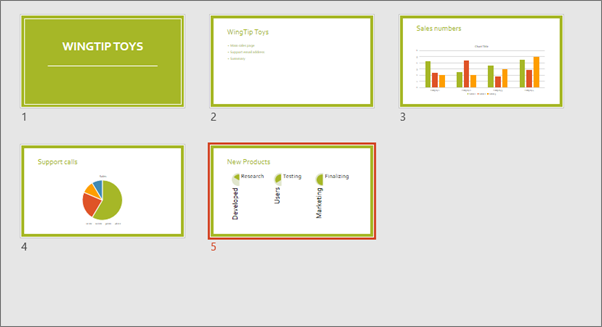
Slide Sorter view (below) displays all the slides in your presentation in horizontally sequenced, thumbnails. Slide show view is helpful if you need to reorganize your slides—you can just click and drag your slides to a new location, or add sections to organize your slides into meaningful groups.
For more information about sections, see Add or remove sections in a PowerPoint presentation.
Notes Page view
You can show or hide your speakers notes with the Notes button  at the bottom of the slide window, or you can get to Notes Page view from the View tab on the ribbon.
The Notes pane is located beneath the slide window. You can print your notes or include the notes in a presentation that you send to the audience, or just use them as cues for yourself while you're presenting.

For more information about notes, see Add speaker notes to your slides.
Outline view
You can get to Outline view from the View tab on the ribbon. (In PowerPoint 2013 and later, you can no longer get to Outline view from Normal view. You have to get to it from the View tab.)
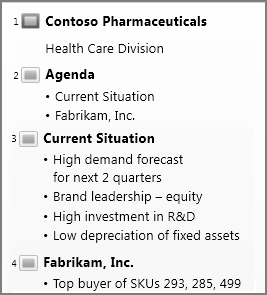
Use Outline view to create an outline or story board for your presentation. It displays only the text on your slides, not pictures or other graphical items.
Master views
To get to a master view, on the View tab, in the Master Views group, choose the master view that you want.
Master views include, Slide, Handout, and Notes. The key benefit to working in a master view is that you can make universal style changes to every slide, notes page, or handout associated with your presentation.
For more information about working with masters, see:
Views for delivering and viewing a presentation
Slide Show view
You can get to SlideShow view from the task bar  at the bottom of the slide window.
Use Slide Show view to deliver your presentation to your audience. Slide Show view occupies the full computer screen, exactly the way your presentation will look on a big screen when your audience sees it.
Presenter view
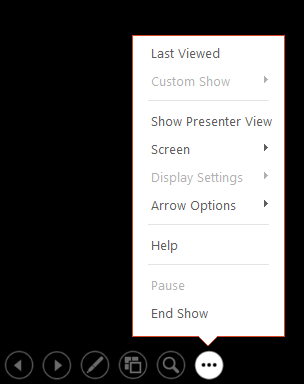
To get to Presenter view, in Slide Show view, in the lower left corner of the screen, click  , and then click Show Presenter View (as shown below).
Use Presenter view to view your notes while delivering your presentation. In Presenter view, your audience cannot see your notes.
For more information about using Presenter view, see View your speaker notes as you deliver your slide show.
Reading view
You can get to Reading view from the task bar  at the bottom of the slide window.
Most people reviewing a PowerPoint presentation without a presenter will want to use Reading view. It displays the presentation in a full screen like Slide Show view, and it includes a few simple controls to make it easy to flip through the slides.
Views for creating your presentation
There are several views in PowerPoint that can help you create a professional presentation.
Normal view
Normal view is the main editing view, where you write and design your presentations. Normal view has four working areas:
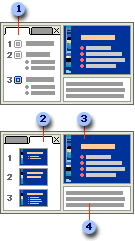
1: Outline tab This is a great place to start writing your content — to capture your ideas, plan how you want to present them, and move slides and text around. The Outline tab shows your slide text in outline form.
Note: To print a hard copy of an outline of your presentation, with only the text (as it appears in Outline view) and none of the graphics or animation, first Click the File tab.
Then, click Print, click Full Page Slides under Other Settings, click Outline, and then click Print at the top.
2: Slides tab View the slides in your presentation as thumbnail-sized images while you edit. The thumbnails make it easy for you to navigate through your presentation and to see the effects of any design changes. You can also easily rearrange, add, or delete slides here.
3: Slide pane In the upper-right section of the PowerPoint window, the Slide pane displays a large view of the current slide. With the current slide shown in this view, you can add text and insert pictures, tables, SmartArt graphics, charts, drawing objects, text boxes, movies, sounds, hyperlinks, and animations.
4: Notes pane In the Notes pane, below the Slide pane, you can type notes that apply to the current slide. Later, you can print your notes and refer to them when you give your presentation. You can also print notes to give to your audience or include the notes in a presentation that you send to the audience or post on a Web page.
You can switch between the Slides and Outline tabs. To enlarge or hide the pane that contains the Outline and Slides tabs, see Show or hide the Outline or Slides tab.
Note: To view the ruler or gridlines in Normal view, on the View tab, in the Show group, select either the Ruler or Gridlines check box.
Slide Sorter view
Slide Sorter view gives you a view of your slides in thumbnail form. This view makes it easy for you to sort and organize the sequence of your slides as you create your presentation, and then also as you prepare your presentation for printing.
You can add sections in Slide Sorter view as well, and sort slides into different categories or sections. You can get to Slide Sorter view from the task bar at the bottom of the slide window, or from the View tab on the ribbon.

Notes Page view
The Notes pane is located under the Slide pane. You can type notes that apply to the current slide. Later, you can print your notes and refer to them when you give your presentation. You can also print notes to give to your audience or include the notes in a presentation that you send to the audience or post on a Web page.
When you want to view and work with your notes in full page format, on the View tab, in the Presentation Views group, click Notes Page.
Master views
The master views include, Slide, Handout, and Notes view. They are the main slides that store information about the presentation, including background, color, fonts, effects, placeholder sizes and positions. The key benefit to working in a master view is that on the slide master, notes master, or handout master, you can make universal style changes to every slide, notes page, or handout associated with your presentation.
For more information about working with masters, see What is a slide master? and Create and customize a slide master.
Views for delivering your presentation
Slide Show view
Use Slide Show view to deliver your presentation to your audience. Slide Show view occupies the full computer screen, exactly the way your presentation will look on a big screen when your audience sees it. You can see how your graphics, timings, movies, animated effects, and transition effects will look during the actual presentation.
To exit Slide Show view, press ESC.
Presenter view
Presenter view is a key slide show-based view that you can use while delivering your presentation. By using two monitors, you can run other programs and view speaker notes that your audience cannot see.
To use Presenter view, make sure that your computer has multiple monitor capabilities, turn on multiple monitor support, and turn on Presenter view.
For more information about using Presenter view, see View your speaker notes privately while delivering a presentation on multiple monitors.
Reading view
Use reading view to deliver your presentation not to an audience (via a large screen, for example), but instead to someone viewing your presentation on their own computer. Or, use Reading view on your own computer when you want to view a presentation not in full-screen Slide Show view, but in a window with simple controls that make the presentation easy to review. You can always switch from Reading view to one of the other views if you want to change the presentation.
Views for preparing and printing your presentation
To help you save paper and ink, you'll want to prepare your print job before you print. PowerPoint provides views and settings to help you specify what you want to print (slides, handouts, or notes pages) and how you want those jobs to print (in color, grayscale, black and white, with frames, and more).
For more detailed information about printing and print preview, see Print your PowerPoint slides or handouts.
Slide Sorter view
Slide Sorter view gives you a view of your slides in thumbnail form. This view makes it easy for you to sort and organize the sequence of your slides as you prepare to print your slides. You can get to Slide Sorter view from the task bar at the bottom of the slide window, or from the View tab on the ribbon.

Print Preview
Print Preview lets you specify settings for what you want to print — handouts, notes pages, and outline, or slides. Click File > Print, and then choose options under Settings.
Views for creating your presentation
There are several views in PowerPoint that can help you to create a professional presentation.
Normal view
Normal view is the main editing view, where you write and design your presentations. Normal view has four working areas:

1: Outline tab This is a great place to start writing your content — to capture your ideas, plan how you want to present them, and move slides and text around. The Outline tab shows your slide text in outline form.
Note: To print a hard copy of an outline of your presentation, with only the text (as it appears in Outline view) and none of the graphics or animation, click the Microsoft Office button  , click Print, select Outline view under Print What, and then click OK.
2: Slides tab This is a great place to view the slides in your presentation as thumbnail-sized images while you edit. The thumbnails make it easy for you to navigate through your presentation and to see the effects of any design changes. You can also easily rearrange, add, or delete slides here.
3: Slide pane In the upper-right section of the PowerPoint window, the Slide pane displays a large view of the current slide. With the current slide shown in this view, you can add text and insert pictures, tables, SmartArt graphics, charts, drawing objects, text boxes, movies, sounds, hyperlinks, and animations.
4: Notes pane In the Notes pane, below the Slide pane, you can type notes that apply to the current slide. Later, you can print your notes and refer to them when you give your presentation. You can also print notes to hand out to your audience or include the notes in a presentation that you send to the audience or post on a Web page.
You can switch between the Slides and Outline tabs. To enlarge or hide the pane that contains the Outline and Slides tabs, see Show or hide the Outline or Slides tab.
Note: To view the ruler or gridlines in Normal view, on the View tab, in the Show/Hide group, select either the Ruler or Gridlines check box.
Slide Sorter view
Slide Sorter view provides you with a view of your slides in thumbnail form. This view makes it easy for you to sort and organize the sequence of your slides as you create your presentation, and then also as you prepare your presentation for printing.
You can get to Slide Sorter view from the task bar at the bottom of the slide window, or from the View tab on the ribbon.

Notes Page view
The Notes pane is located just below the Slide pane. You can type notes that apply to the current slide. Later, you can print your notes and refer to them when you give your presentation. You can also print notes to hand out to your audience or include the notes in a presentation that you send to the audience or post on a Web page.
When you want to view and work with your notes in full page format, on the View tab, in the Presentation Views group, click Notes Page.
Master views
The master views include Slide, Handout, and Notes view. They are the main slides that store information about the presentation, including background, color, fonts, effects, placeholder sizes and positions. The key benefit to working in a master view is that on the slide master, notes master, or handout master, you can make universal style changes to every slide, notes page, or handout associated with your presentation.
For more information about working with masters, see What is a slide master? and Create and customize a slide master.
Views for delivering your presentation
Slide Show view
Use Slide Show view to deliver your presentation to your audience. Slide Show view takes up the full computer screen, like an actual presentation. In this view, you see your presentation the way your audience will. You can see how your graphics, timings, movies, animated effects, and transition effects will look during the actual presentation.
To exit Slide Show view, press ESC.
Note: To exit a presentation while you are in Slide Show view, press ESC.
Presenter view
A key Slide Show-based view that you can use while delivering your presentation is called Presenter view. By using two monitors, you can run other programs and view speaker notes that your audience cannot see.
To use Presenter view, make sure that your computer has multiple monitor capabilities, turn on multiple monitor support, and turn on Presenter view.
For more information about using Presenter view, see View your speaker notes privately while delivering a presentation on multiple monitors.
Views for preparing and printing a presentation
To help you save paper and ink, you'll want to prepare your print job before you print. PowerPoint provides views and settings to help you specify what you want to print (slides, handouts, or notes pages) and how you want those jobs to print (in color, grayscale, black and white, with frames, and more).
Slide Sorter view
Slide Sorter view provides you with a view of your slides in thumbnail form. This view makes it easy for you to sort and organize the sequence of your slides as you prepare to print your slides. You can get to Slide Sorter view from the task bar at the bottom of the slide window, or from the View tab on the ribbon.

Print Preview
Print Preview allows you to specify settings for what you want to print — handouts, notes pages, and outline, or slides, before you print. Click the Microsoft Office button  , point to Print, click Print Preview, and then select an option under Print What.
No comments:
Post a Comment