Import data from Excel, SQL Server, SharePoint sites, and other external sources
You can quickly import and display data directly on your shapes, using Microsoft Office Visio Professional 2007. The first step is to connect to the data source and import data into your drawing. The second step is to link the imported data to shapes.
For information on how to add data to your shapes without importing the data, see Add data to shapes.
In this article
Step 1: Import your data
In this first step, you use the Data Selector Wizard to import your data into the External Data window.
The data that appears in the External Data window is a snapshot of your source data at the time of import. You can update the data in your drawing to match the changes in your source data. However, you cannot refresh your data source by changing the data in your drawing. See Refresh imported data.
-
On the Data menu, click Link Data to Shapes.
-
On the first page of the Data Selector Wizard, choose which of the following types of data sources you want to use:
-
Microsoft Office Excel workbook
-
Microsoft Office Access database
-
Microsoft Windows SharePoint Services list
-
Microsoft SQL Server database
-
Other OLEDB or ODBC data source
-
Previously created connection
-
-
Complete the remainder of the wizard.
Note: If you choose an option other than an Excel workbook, Access database, or SharePoint list on the first page of the wizard, you may be temporarily diverted to the Data Connection Wizard in the course of completing the Data Selector Wizard.
Specific help is available for most wizard pages. To access Help, press F1 or click the Help button.
After you click Finish on the last page of the Data Connection Wizard, the External Data window appears with your imported data shown in a grid.
Step 2: Link rows of data to shapes in your drawing
There are three ways to link rows of data to shapes in your drawing: You can link rows to existing shapes one at a time, you can link the rows to shapes automatically, or you can create shapes from the data.
Link rows to existing shapes one at a time
This approach is best for existing drawings with relatively few shapes.
-
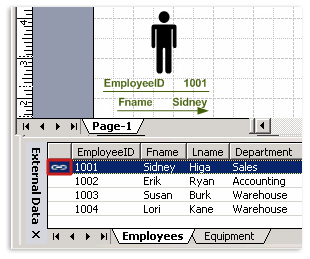
Drag a row from the External Data window onto a shape in your drawing.
Your data appears in the shape, and a link icon appears to the left of the row in the External Data window.

Notes:
-
You can link a single row to multiple shapes, but you cannot link multiple rows to a single shape.
-
To change or enhance the appearance of the shapes and data, see Enhance your data with data graphics.
-
To display the External Data window, on the View menu, click External Data Window.
-
Link rows to existing shapes automatically
This approach is best for existing drawings with a large number of shapes. This works only if the shapes have data already in them that you can match to data in the data source.
-
On the Data menu, click Automatically Link.
-
Follow the steps in the Automatic Link Wizard.
Your data will appear in your shapes. To change or enhance the appearance of the shapes and data, see Enhance your data with data graphics.
Specific help is available for most wizard pages. To access Help, press F1 or click the Help icon.
Create shapes from your data
This approach is best if your drawing doesn't already have shapes, and you don't need to use specific shapes.
-
Click a shape in the Shapes window.
-
Drag a row or set of rows from the External Data window onto a blank space in your drawing.
One instance of the shape that you click appears for each row that you drag onto the drawing.
No comments:
Post a Comment