Sunday, April 30, 2017

Print a presentation in black and white or grayscale

Print a presentation in black and white or grayscale

You can print your entire presentation — the slides, outline, notes pages, and audience handouts — in color, grayscale, or pure black and white. Most often, however, you will probably choose to print in either black and white or grayscale.

A Green Idea... Green Idea   

Before printing handouts or slides, consider placing the presentation in a shared location. Just prior to the delivery time, advise viewers of the location and those who require hard copies, can print and bring them to the presentation delivery meeting. This can help to conserve paper and printer ink.

And, if you want to print your notes pages, consider viewing your notes in Presenter View. You can view your notes electronically as you deliver your presentation on a second monitor. For more information, see View your speaker notes privately while delivering a presentation on multiple monitors.

In this article

Overview of printing in black and white or grayscale

Set the properties for printing in black and white

Set the properties for printing in grayscale

Print a presentation in black and white or grayscale

Overview of printing in black and white or grayscale

Most presentations are designed to be shown in color, but slides and handouts are typically printed in black and white or shades of gray (grayscale). When you print in grayscale, you get an image that contains variations of gray tones between black and white.

When you choose to print, Microsoft Office PowerPoint 2007 sets the colors in your presentation to match your selected printer's capabilities.

To check what the printout will look like, view it in print preview before you print it. With print preview, you can see how your slides, notes, and handouts will look in pure black and white or in grayscale, and you can adjust the appearance of the objects before you print them.

You can also make certain changes when you preview before printing. You can select:

  • What you want to print: the presentation, handouts, notes pages, or just the outline

  • A layout for handouts

  • Orientation (portrait or landscape) for handouts, notes pages, or an outline

  • Header and footer options

In a presentation, grayscale and black-and-white objects appear on the screen and in print as listed in the table.

Object

In grayscale/
pure black

and white

Text

Black/Black

Text shadows

Grayscale/Hidden

Embossing

Grayscale/Hidden

Fills

Grayscale/White

Frame

Black/Black

Pattern fills

Grayscale/White

Lines

Black/Black

Object shadows

Grayscale/Black

Bitmaps

Grayscale/Grayscale

Slide backgrounds

White/White

Charts

Grayscale/Grayscale

Note: Bitmaps, clip art, and charts show and are printed in grayscale, even when you set the printer properties to print in pure black and white.

Top of Page

Set the properties for printing in black and white

  1. On the View tab, in the Color/Grayscale group, click Pure Black and White.

  2. At the top of the PowerPoint window, on the Ribbon, which is a part of the Microsoft Office Fluent user interface , click the Black and White tab.

  3. On the Black and White tab, in the Setting group, click the settings that you want.

Note: You can apply different grayscale or black-and-white settings to different objects (and to the background) on the same slide. Select the object for which you want to set grayscale or black-and-white settings, and then set the properties on the View menu. Do not make a selection when you want to specify the grayscale and black-and-white settings for the background, and then set the properties on the View menu.

Top of Page

Set the properties for printing in grayscale

  1. On the View tab, in the Color/Grayscale group, click Grayscale.

  2. At the top of the PowerPoint window, on the Ribbon, click the Grayscale tab.

  3. On the Grayscale tab, in the Setting group, click the settings that you want.

Note: You can apply different grayscale or black-and-white settings to different objects (and to the background) on the same slide. Select the object for which you want to set grayscale or black-and-white settings, and then set the properties on the View tab. If you want to set the properties for the slide background, do not select any object on the slide.

Top of Page

Print a presentation in black and white or grayscale

  1. Click the Microsoft Office Button Office button image , click the arrow next to Print, and then click Print Preview.

  2. In the Print group, click the arrow under Options, point to Color/Grayscale, and then click either Pure Black and White or Grayscale.

    • Grayscale     This setting prints the handout in grayscale. Some colors, such as a background fill, are shown in white to heighten their legibility. (Sometimes, this looks the same as Pure Black and White.)

    • Pure Black and White     This setting prints the handout with no gray fills.

  3. In the Print group, click Print.

    Notes: 

    • To change the properties for printing in grayscale or black and white, see Set the properties for printing in black and white or Set the properties for printing in grayscale.

    • You can apply different grayscale or black-and-white settings to different objects on the same slide.

    • This process does not change the colors or design in the original color presentation.

    • When you print in grayscale or black and white, the background may not be printed if it interferes with the slide contrast.

Top of Page

Join a group in Outlook

Join a group in Outlook

When you join a group, you gain access to the group mailbox, calendar, OneNote notebook, and team site. Permissions are taken care of automatically so you don't need to worry about missing any meetings or conversations.

You can use Office 365 Groups in Outlook 2016, Outlook on the web, Outlook 2016 for Mac, Outlook mobile, and the Outlook Groups mobile app. For instructions, pick your version of Outlook below.

Search for a group to join
  1. On the Home tab, select Browse Groups.

    Browse Groups button on the groups ribbon
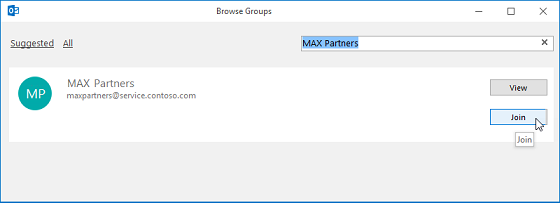
  2. Enter a group name in the search box or scroll the list to find the one you want.

  3. Click Join.

    Search for a group

    If the group is private, a request will be sent to the group's admin, who can accept or decline the request.

Join a group from an email
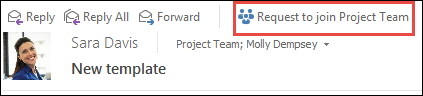
  1. If you receive an email message from a group that you're not a member of and decide to join the group, select Join on the group header in the right corner of the reading pane.

    If the group is private, you'll see Request to Join instead, and will be asked to provide a reason for joining.

    Request to join a group from an email

  2. Wait for your request to go through, or for the group's admin to add you if you're trying to join a private group.

  3. Once you've joined the group, you'll see detailed membership status as well as a shortcut to navigate to the group's inbox.

Go to a group that you were added to as a member
  1. When you're added to a group, you receive an email notification. Open the email and click Go to the group link.

    Join a group in Outlook

  2. Use the options on the ribbon to start a conversation, change your membership status, and so on.

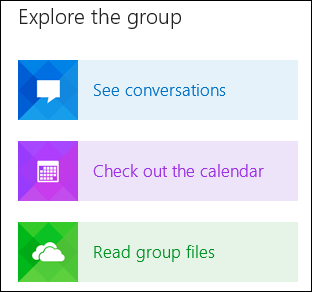
  3. You can also go to the Explore the group section in your email notification to view the conversations as well as the group's calendar and files.

    Explore a group in Outlook

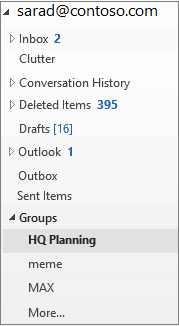
    All the groups that you've created or were invited to are on the left nav bar under Groups. You can access any of them by just clicking the group name. Then, you can participate in the conversations or use the options on the ribbon to access the files, calendar, notebook, and other information.

    Select a group on the left Nav

Join a group
  1. Open Outlook on the web.

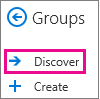
  2. In the navigation pane, under Groups, select Discover. (If you don't see Discover, click More at the bottom of your groups list. Once all of your groups are displayed you should see the Discover link.)

    Discover button on the navigation pane in Outlook on the web

  3. All available groups will be listed in alphabetical order. Select the one you want and click Join. If the group is public, you'll see a confirmation message and become a member right away. If the group is private, type a reason why you want to join > Send.

    Tips: 

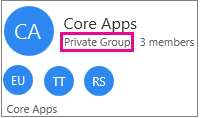
    • How do you know at a glance whether a group is private? It's noted at the top of the group card, as in this example.

    • Sample group card with "private group" highlighted

    Once you've joined a group you'll receive a welcome message that contains important information and links to help you get started. If the group is public, you'll get the message right away. If the group is private, you'll get the welcome message after you've been approved by group owner.

Invite others to join a group
  1. Open Outlook on the web.

  2. On the left navigation pane, select the group you want to invite others to join. You can only invite people from your school or organization. If you want to invite a guest user from outside your organization, you'll have to use the add/remove process. See Add guests to a group for instructions.

  3. Do one of the following:

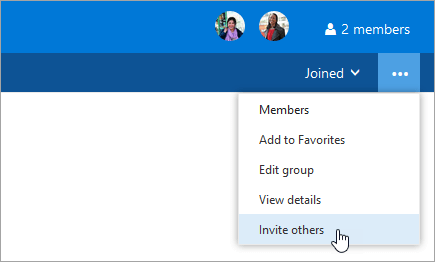
    • On the menu bar, select More group actions The More group actions icon. > Invite others.

      A screenshot of the Invite others button on the Group settings menu.

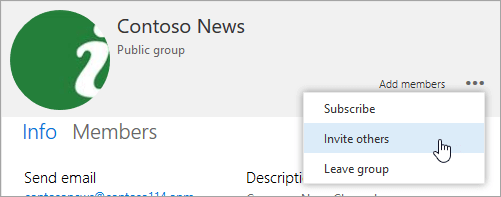
    • At the top of the page, select the name of the group, and select More actions More actions icon. > Invite others.

      A screenshot of the Invite others button on the Group card.

      Note: Don't see Invite others on your screen? This is a new feature that's rolling out to Office 365 customers worldwide. If you don't see it on your screen, the feature hasn't made it to your account yet. You should receive it soon.

  4. Do one of the following:

    • Select Copy to copy a link to the group to your clipboard. Paste the link into a message to share it with others.

    • Select Email to open a compose window with a link to join the group.

For instructions about joining a group from Outlook mobile, see Use Groups in the Outlook mobile app.

See Also

Create a group in Outlook

Have a group conversation in Outlook

Schedule a meeting on a group calendar

Share group files in Outlook 2016

Share group files

Leave or unsubscribe from a group in Outlook

Set or clear a print area on a worksheet

Set or clear a print area on a worksheet

If you print a specific selection on a worksheet frequently, you can define a print area that includes just that selection. A print area is one or more ranges of cells that you designate to print when you don't want to print the entire worksheet. When you print a worksheet after defining a print area, only the print area is printed. You can add cells to expand the print area as needed, and you can clear the print area to print the entire worksheet.

A worksheet can have multiple print areas. Each print area will print as a separate page.

Note:  The screen shots in this article were taken in Excel 2013. If you have a different version your view might be slightly different, but unless otherwise noted, the functionality is the same.

What do you want to do?

Set one or more print areas

Add cells to an existing print area

Clear a print area

Set one or more print areas

  1. On the worksheet, select the cells that you want to define as the print area.

    Tip: To set multiple print areas, hold down the Ctrl key and click the areas you want to print. Each print area prints on its own page.

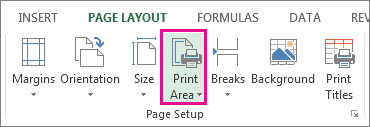
  2. On the Page Layout tab, in the Page Setup group, click Print Area, and then click Set Print Area.

    Set Print Area

Note: The print area that you set is saved when you save the workbook.

To see all the print areas to make sure they're the ones you want, click View > Page Break Preview in the Workbook Views group. When you save your workbook, the print area is saved too.

Top of Page

Add cells to an existing print area

You can enlarge the print area by adding adjacent cells. If you add cells that aren't adjacent to the print area, Excel creates a new print area for those cells.

  1. On the worksheet, select the cells that you want to add to the existing print area.

    Note: If the cells that you want to add are not adjacent to the existing print area, an additional print area is created. Each print area in a worksheet is printed as a separate page. Only adjacent cells can be added to an existing print area.

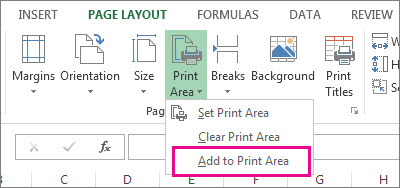
  2. On the Page Layout tab, in the Page Setup group, click Print Area, and then click Add to Print Area.

    Add to Print Area

When you save your workbook, the print area is saved as well.

Top of Page

Clear a print area

Note: If your worksheet contains multiple print areas, clearing a print area removes all the print areas on your worksheet.

  1. Click anywhere on the worksheet for which you want to clear the print area.

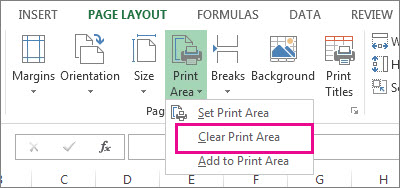
  2. On the Page Layout tab, in the Page Setup group, click Clear Print Area.

    Clear print area

Top of Page

Need more help?

You can always ask an expert in the Excel Tech Community, get support in the Answers community, or suggest a new feature or improvement on Excel User Voice.

Encrypt messages by using S/MIME in Outlook Web App

Encrypt messages by using S/MIME in Outlook Web App

Want to add a padlock to your email messages? You can use S/MIME in Outlook Web App to increase the security of messages. A digitally encrypted message can only be opened by recipients who have the correct key. A digital signature assures recipients that the message hasn't been tampered with.

Note:  S/MIME may not be available for your account.

In this article

Setting up to use S/MIME encryption

Encrypt and digitally sign outgoing messages

How do I encrypt or digitally sign all messages?

How do I encrypt individual messages?

How do I digitally sign individual messages?

Reading encrypted and digitally signed messages

How do I read an encrypted message?

How do I verify the signature of a digitally signed message?

What else do I need to know?

Setting up to use S/MIME encryption

  1. Get a certificate.

    The first step to use S/MIME is to obtain a certificate, also called a digital ID, from your organization's administrator. Your certificate may be stored on a smart card, or may be a file that you store on your computer. Follow the instructions provided by your administrator to use your certificate.

  2. Install the S/MIME control.

    1. If you do not have the S/MIME control installed, and receive an encrypted or digitally signed message, you'll be prompted to install the control when you open the message. Alternatively, if you do not have the S/MIME control installed, you can create a new message and select more options extended menu > Message options and select Encrypt this message (S/MIME). You will then be prompted to install the S/MIME control.

    2. When you're prompted to run or save the file, select Run.

    3. You may be prompted again to verify that you want to run the software. Select Run to continue the installation.

Note:  You will have to close and reopen Outlook Web App before you can use the S/MIME control.

Top of Page

Encrypt and digitally sign outgoing messages

How do I encrypt or digitally sign all messages?

After you've installed the S/MIME control, you can go to the gear menu Settings icon > S/MIME settings where you will find two options that you can select to digitally encrypt or digitally sign every message you send.

  • Select Encrypt contents and attachment of all messages I send to automatically encrypt all outgoing messages.

  • Select Add a digital signature to all messages I send to digitally sign all outgoing messages.

Note:  All outgoing messages include new messages, replies, and forwards.

How do I encrypt individual messages?

To add or remove digital encryption from an individual message that you're composing:

  1. Go to the top of the message and select more options extended menu > Message options.

  2. Select or deselect Encrypt this message (S/MIME).

If you encrypt an outgoing message and Outlook Web App can't verify that all recipients can decrypt the message, you'll see a notice warning you which recipients may not be able to read the encrypted message. You can then send the message anyway, remove those recipients, or retry to check again.

How do I digitally sign individual messages?

To add or remove a digital signature from a message that you're composing:

  1. Go to the top of the message and select more options extended menu > Message options.

  2. Select or deselect Digitally sign this message (S/MIME).

If your certificate is stored on a smartcard, you will be prompted to insert the smartcard to digitally sign the message. Your smartcard may also require a PIN to access the certificate.

Top of Page

Reading encrypted and digitally signed messages

How do I read an encrypted message?

A key icon Icon for S/MIME encryption in the message list or reading pane indicates an encrypted message.

If you normally use Conversation view, you will have to open the message in a new window to read it. There will be a link on the message to make this easier.

When you receive an encrypted message, Outlook Web App will check whether the S/MIME control is installed and whether there is a certificate available on your computer. If the S/MIME control is installed and there is a certificate available, the message will be decrypted when you open it. If your certificate is stored on a smartcard, you will be prompted to insert the smartcard to read the message. Your smartcard may also require a PIN to access the certificate.

How do I verify the signature of a digitally signed message?

A ribbon icon Icon for S/MIME digital signature in the message list or reading pane indicates a digitally signed message.
If you normally use Conversation view, you will have to open the message in a new window to read it. Information about the digital signature will be at the top of the message, along with a link that you can select to learn more about the digital signature.

Top of Page

What else do I need to know?

  • Internet Explorer 9 or later is required to send and receive encrypted messages. It is also required to digitally sign messages that you send, and to verify digital signatures on messages that you receive.

  • S/MIME message encryption is supported only on messages sent to and from recipients in your organization's address list. If you send an encrypted message to someone outside your organization, they will not be able to decrypt and read the message.

  • S/MIME digital signatures are only fully supported for recipients inside your organization. Recipients can only verify the digital signature if they're using an email client that supports S/MIME and have installed the S/MIME control.

  • If you send a digitally signed message to a recipient outside your organization, they will be able to read the message. Depending on the email client they're using, they may or may not see and be able to verify the digital signature.

  • Encrypted messages can be read only by intended recipients who have a certificate. If you try to send an encrypted message to a recipient who doesn't have a certificate, Outlook Web App will warn you that the recipient can't decrypt S/MIME encrypted messages.

  • If at least one recipient of an encrypted message has a certificate, Outlook Web App will send the message to all recipients. If none of the intended recipients has a certificate, Outlook Web App won't let you send the message in encrypted form.

  • A digitally signed message reassures the recipient that the message hasn't been tampered with and verifies the identity of the sender. Digitally signed messages can be sent to anyone. However, the recipient must be using an email application that supports S/MIME and have installed the S/MIME control to verify the digital signature. Outlook and Outlook Web App both support S/MIME.

  • The S/MIME control is necessary to verify the signatures of digitally signed messages, but a certificate is not. If you receive a message that's been encrypted or digitally signed and you haven't installed the S/MIME control, you'll see a warning in the message header notifying you that the S/MIME control isn't available. The message will direct you to the S/MIME options page where you can install this control.

Top of Page

Apply or remove strikethrough text formatting

Apply or remove strikethrough text formatting

You can use this procedure to apply strikethrough formatting to text in a document. You can follow the same steps to remove strikethrough formatting.

Note: If you're looking for information about using tracked changes and comments, see Track changes in Word.

Apply or remove single-line strikethrough formatting

  1. Select the text that you want to format.

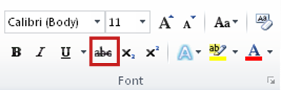
  2. On the Home tab, in the Font group, click Strikethrough.

    Strikethrough on the Home tab

Apply or remove double-line strikethrough formatting

  1. Select the text that you want to format.

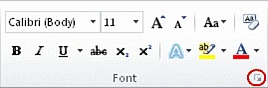
  2. On the Home tab, click the Font Dialog Box Launcher, and then click the Font tab.

    font dialog box launcher

  3. Select the Double strikethrough check box.

    To remove double-like strikethrough formatting, select the text, and then click Strikethrough twice in the Font group on the Home tab.

    Strikethrough on the Home tab

Database Properties for View shape (Join Criteria)

Database Properties for View shape (Join Criteria)

Col 1

Lists all columns in Entity shapes that exist in the current diagram.

Col 2

Lists all columns in Entity shapes that exist in the current diagram.

Add

Click to specify that the data in the columns you've selected―in Col 1 and Col 2―will be used to create a view. Make sure you select columns that have common data (such as customer numbers), or else your view won't have any data to join.

Remove

Click to delete the join criteria you selected under Criteria.

Criteria

Shows the join criteria you created for the current diagram.

Create a UML statechart diagram

Create a UML statechart diagram

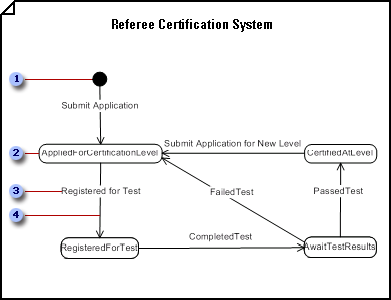
Statechart diagram showing the transitions an object undergoes as it responds to outside events

Callout 1 The initial state is the state of an object before any events in the diagram have acted upon it.

Callout 2 A state represents an instant in the life of an object. Double-click a State shape to add a name and list its internal actions and activities.

Callout 3 TransitionsTransitions indicate that, in response to an event, an object will go from one state to another and perform an action.

Callout 4 The event which triggers the transition is named in the transition string. Double-click a transition to label it with a string that, in addition to an event signature, can also include a guard condition, an action expression, and more.

  1. Open the UML model that contains the class or use case that includes behavior you want to represent in a statechart diagram.

  2. On the File menu, point to New, point to Software, and then click UML Model Diagram.

  3. In the tree view, right-click the icon representing the class or use case that includes behavior you want to represent in a statechart diagram. Point to New and click Statechart Diagram.

    A blank page appears, and the UML Statechart stencil becomes the top-most stencil. The workspace displays 'Statechart' as a watermark. An icon representing the diagram is added to the tree view.

    Note: If the tree view is not visible, on the UML menu, point to View, and then click Model Explorer.

  4. Drag State shapes onto the drawing page to represent the sequence of states an object goes through.

    Work with state shapes in UML statechart and activity diagrams

  5. Drag a Composite State shape onto the page to represent concurrent, mutually exclusive, or nested substates.

    Work with composite state shapes in UML statechart diagrams

  6. Connect states to other states using Transition shapes to indicate that an object in one state will enter the second state in response to an event.

    Work with transition shapes in UML statechart and activity diagrams

    Tip: Use the arc-shaped Transition shape to indicate that an object stays in the same state in response to an event. Connect both ends of the transition to connection points Connection point image - blue X on the same state shape.

  7. Connect Transition shapes to Transition (Join) and Transition (Fork) shapes to represent the forking of one state into multiple states or the synchronization of multiple states into one state.

  8. Use Shallow History or Deep History shapes to indicate that an object resumes a state it last held within a region.

    Work with composite state shapes in UML statechart diagrams

  9. Double-click any shape to open its UML Properties dialog box and add a name, actions, activities, events, and other properties.

  10. Save the diagram.