Friday, October 1, 2021

Connected experiences in office

Microsoft 365 has a number of helpful features that are backed by cloud-based services, which we call "connected experiences", that provide essential functionality for those features. These include:

Experiences that analyze your content

These are experiences that use your Office content to provide design recommendations, editing suggestions, data insights, and similar features. PowerPoint Designer, Dictate, and Translator are examples of these kind of experiences. 

If you ask us to translate your text into another language, for example, we have to send the text to our automated translator service which automatically translates your text into the language requested and returns it to you.

Note: For a more complete list of these connected experiences see Connected experiences in Office.

Experiences that download online content

These are experiences that allow you to search and download online content including templates, images, 3D models, Office help, videos, and reference materials to enhance your documents. Excel's rich data types or Outlook's weather info are examples of these kinds of experiences.

In order to provide you with the weather forecast for the next couple of days, for example, Outlook connects to Bing to retrieve the relevant weather data.

Note: For a more complete list of these connected experiences see Connected experiences in Office.

Controlling these experiences

Office includes these connected experiences.  If you'd like to turn these experiences off, go to any Microsoft 365 application - such as Word, Excel, or PowerPoint - and go to File > Account > Manage Settings (In Outlook it's under Office Account). There you can disable or enable, either category (or both).  

For more information see: Account Privacy Settings.

In addition, there is a setting that allows you turn off these connected experiences, and which will also turn off other connected experiences, such as document co-authoring and online file storage. Note that if you use this setting to turn off connected experiences, some Office service functionality will remain available, such as synching your mailbox in Outlook, as well as a small number of services that are essential to how Office functions and cannot be disabled, for example, the licensing service that confirms that you are properly licensed to use Office. On the Mac these essential services also includes OneNote syncing to OneDrive. Required service data about these services is collected and sent to Microsoft, regardless of any other settings that you have configured.

See Also

Access web apps throttles and limits

Each Access Services application in Microsoft 365 and SharePoint Online creates a corresponding SQL database that is subject to resource consumption limits. These limits are per database and apply whether using the web user interface or direct ODBC connection.

Important    Access Services 2010 and Access Services 2013 are being removed from the next release of SharePoint. We recommend you do not create new web apps, and migrate your existing apps to an alternative platform, such as Microsoft Power Apps.

Access web app limits

Limit

Maximum value

Notes

Maximum query performance level

5 DTUs

This limit is calculated as a number of Database Transaction Units or DTUs, which is a blended measure of CPU, memory, and I/O (data and transaction log I/O).

If your query exceeds the resource consumption limits, you'll receive SQL error 10928.

Maximum Access app database storage size

1 GB

1 GB is the limit for the database storage.

If the app exceeds the size limit, you'll receive SQL error 40544.

How to avoid being throttled

If queries are being throttled, there may be some ways that you can reduce the amount of resources consumed without reducing the amount of data that your Access web app is accessing. Here are some general tips to reduce resource consumption:

Add a dropped capital letter

Also called a drop cap, this formatting style is often used to mark the opening paragraph of a publication.

  1. Click anywhere in the paragraph you want to change.

  2. On the Text Box Tools Format tab, click Drop Cap, and then select the drop cap format you want.

To create a custom drop cap:

  1. Click anywhere in the paragraph you want to change.

  2. On the Text Box Tools Format tab, click Drop Cap.

  3. Select Custom Drop Cap.

  4. In the Select letter position and size section:

    1. Choose Dropped to have the drop cap drop below the first line in the paragraph, Up to have the drop cap rise above the first line in the paragraph, or Lines to specify how many lines the drop cap should drop or rise.

    2. In Size of letters, choose how may lines high the drop cap should be for any of the three placement option.

    3. In Number of letters, choose how many of the first letters of the paragraph should be formatted as drop caps.

  5. In the Select letter appearance section:

    1. Clear the Use current font check-box to select a different font for the drop cap.

    2. Clear the Use current font style check-box to select a different font style, such as bold or italic, for the drop cap.

    3. Clear the Use current color check-box to select a different color for the drop cap.

Note: When you create a custom drop cap, the custom style is added to the available drop caps list and you can use this style to create other drop caps in the current publication.

Allowedits property

Applies to

Form Object

You can use the AllowEdits property to specify whether a user can edit saved records when using a form. Read/write Boolean.

expression.AllowEdits

expression Required. An expression that returns one of the objects in the Applies To list.

Setting

The AllowEdits property uses the following settings.

Setting

Visual Basic

Description

Yes

True

(Default) The user can edit saved records.

No

False

The user can't edit saved records.


You can set the AllowEdits property by using the form's property sheet, a macro, or Visual Basic for Applications (VBA) code.

Remarks

You can use the AllowEdits property to prevent changes to existing data displayed by a form. If you want to prevent changes to data in a specific control, use the Enabled or Locked property.

If you want to prevent changes to existing records (make a form read-only), set the AllowAdditions, AllowDeletions, and AllowEdits properties to No. You can also make records read-only by setting the RecordsetType property to Snapshot.

Changing a field value programmatically causes the current record to be editable, regardless of the AllowEdits property setting. If you want to prevent the user from making changes to a record (AllowEdits is No) that you need to edit programmatically, save the record after any programmatic changes; the AllowEdits property setting will be honored once again after any unsaved changes to the current record are saved.

Note: When the Data Mode argument of the OpenForm action is set, Microsoft Office Access 2007 will override a number of form property settings. If the Data Mode argument of the OpenForm action is set to Edit, Access will open the form with the following property settings:

  • AllowEdits — Yes

  • AllowDeletions — Yes

  • AllowAdditions — Yes

  • DataEntry — No

To prevent the OpenForm action from overriding any of these existing property settings, omit the Data Mode argument setting so that Access will use the property settings defined by the form.

Example

The following example examines the ControlType property for all controls on a form. For each label and text box control, the procedure toggles the SpecialEffect property for those controls. When the label controls' SpecialEffect property is set to Shadowed and the text box controls' SpecialEffect property is set to Normal and the AllowAdditions, AllowDeletions, and AllowEdits properties are all set to True, the intCanEdit variable is toggled to allow editing of the underlying data.

Sub ToggleControl(frm As Form)
Dim ctl As Control
Dim intI As Integer, intCanEdit As Integer
Const conTransparent = 0
Const conWhite = 16777215
For Each ctl in frm.Controls
With ctl
Select Case .ControlType
Case acLabel
If .SpecialEffect = acEffectShadow Then
.SpecialEffect = acEffectNormal
.BorderStyle = conTransparent
intCanEdit = True
Else
.SpecialEffect = acEffectShadow
intCanEdit = False
End If
Case acTextBox
If .SpecialEffect = acEffectNormal Then
.SpecialEffect = acEffectSunken
.BackColor = conWhite
Else
.SpecialEffect = acEffectNormal
.BackColor = frm.Detail.BackColor
End If
End Select
End With
Next ctl
If intCanEdit = IFalse Then
With frm
.AllowAdditions = False
.AllowDeletions = False
.AllowEdits = False
End With
Else
With frm
.AllowAdditions = True
.AllowDeletions = True
.AllowEdits = True
End With
End If
End Sub

Normsinv function

Returns the inverse of the standard normal cumulative distribution. The distribution has a mean of zero and a standard deviation of one.

Important: This function has been replaced with one or more new functions that may provide improved accuracy and whose names better reflect their usage. Although this function is still available for backward compatibility, you should consider using the new functions from now on, because this function may not be available in future versions of Excel.

For more information about the new function, see NORM.S.INV function.

Syntax

NORMSINV(probability)

The NORMSINV function syntax has the following argument:

  • Probability     Required. A probability corresponding to the normal distribution.

Remarks

  • If Probability is nonnumeric, NORMSINV returns the #VALUE! error value.

  • If Probability <= 0 or if Probability >= 1, NORMSINV returns the #NUM! error value.

Given a value for Probability, NORMSINV seeks that value z such that NORMSDIST(z) = probability. Thus, precision of NORMSINV depends on precision of NORMSDIST. NORMSINV uses an iterative search technique. If the search has not converged after 100 iterations, the function returns the #N/A error value.

Example

Copy the example data in the following table, and paste it in cell A1 of a new Excel worksheet. For formulas to show results, select them, press F2, and then press Enter. If you need to, you can adjust the column widths to see all the data.

Formula

Description

Result

=NORMSINV(0.9088)

Inverse of the standard normal cumulative distribution, with a probability of 0.9088.

1.3334

Top of Page

Embed or link to a file in word

If you have an object in one file that you'd like to put into another, such as a doc or a dynamic chart, embed or link to it.

Link or Embed a file

To insert a copy of your file into another, embed or link to it.

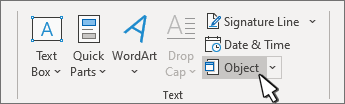
  1. Go to Insert > Object.

    Object button

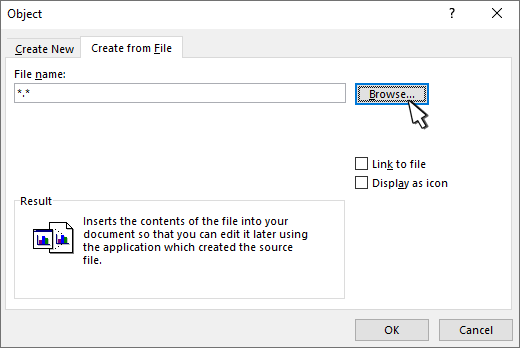
  2. Select Create from File.

  3. Select Browse and choose the file you want to use.

    Create from file panel

  4. Select Insert.

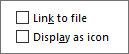
  5. Choose Display as icon to embed, or Link to file for a link.

    Link to file, display as icon options

  6. Select OK

Share a document with no sign in necessary

When you want someone to contribute to your sign-up sheet or school project, share a link to the document in your OneDrive. When you choose Get a link and set the permission to Edit, anyone who gets the link can edit the doc without having to sign in.

Tip: If you're sharing a private document, read on for a more private way to share.

  1. With the document open in Word for the web, Excel for the web, PowerPoint for the web, or OneNote for the web click Share.

    (If you're starting from your OneDrive, right-click the document, and then click Share.)

  2. Click Get a link, choose Edit (or another option if you don't want people to edit), and then click Create link.
    Create an Edit link

  3. Copy the link and send it out.

When people click the link, they go to the document. They start editing by clicking Edit in Browser. If you happen to be in the document at the same time, you'll see them listed as Guest.

Co-authoring with Guest

They'll be able to work in the browser without signing in, but if they want certain features, like inserting a picture or using their Office desktop program, they'll need to sign in with a Microsoft account.

Stop sharing a document

When you no longer want people editing your doc, click Share again. Under Shared with, click Anyone with this edit link, and then click Remove link.

Select the edit link

Sharing private docs

When you're working with someone on sensitive information like finances, you want to be careful about who can edit the document. Instead of sharing a link, invite people to sign in with their Microsoft account to view or edit the document.

  1. With the document open in Word for the web, Excel for the web, PowerPoint for the web, or OneNote for the web, click Share and type the person's email address in the To box.

  2. Click Recipients can edit and then set the second drop-down list to Recipients need to sign in with a Microsoft account.

    Screenshot of Share dialog box showing the "Recipients need to sign in with a Microsoft account" option

More information

For more information about sharing in OneDrive, see Share files and folders and change permissions.