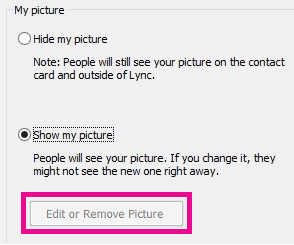
This topic describes the My Picture options window, which is where you tell Lync what photo, if any, you want to display with your contact information.
Show my picture
Most often, this setting will be enabled by default. If you are satisfied with your current picture, you don't need to make any changes to the settings on this window.
Hide my picture
You can hide your picture from other Lync users. Your contacts will see a blank representation instead of your picture.
-
To hide your picture, click Hide my picture, then click OK.
Selecting Hide my picture removes your photo from your Lync display, but it may not prevent your picture from displaying in programs outside of Lync. To remove the picture from other programs as well:
-
Click Edit or Remove Picture.
-
On the Microsoft 365 sign-in page or SharePoint window, click the Delete (x) icon or Remove picture.
-
Click OK.
Important: Microsoft Outlook 2013 doesn't always detect that you have removed your picture. This is a known issue that we plan to address in a later release. In the meantime, here's how to help ensure your picture won't continue to display in Outlook:
-
In Outlook 2013, click File, and then click Options.
-
In Outlook Options, click People, and then, under Online status and photographs, clear the Show user photographs when available (requires restarting Outlook) check box.
-
Close Outlook, and then open it again.
-
Change my picture
If your company's policy allows it, you may change your picture by following these steps.
Use a picture from your computer or an external drive
-
On the My Picture Options window, click Edit or Remove Picture.
Notes:
-
If the Edit or Remove Picture button is unavailable (grayed out),
-

-
the cause is one of the following:
-
The Hide my picture option, above Edit or Remove Picture, is selected. Click Show my picture.
-
You don't have the Microsoft 365 service upgrade yet. Without the upgrade, you can change your Lync picture, but only from the Microsoft 365 portal. To find out if you have the upgrade, sign in to the Microsoft 365 portal, and look at the header. If it's white and includes the terms Home, Outlook, and Team Site, you have Microsoft 365 pre-upgrade. See Change your Lync picture with a Microsoft 365 pre-upgrade account.
-
If you have the Microsoft 365 service upgrade (the Microsoft 365 portal header is blue and includes the terms Outlook, Calendar, and People) and the Show my picture option is selected, your company has likely disabled the option for changing your picture. Contact your workplace technical support to verify or learn more.
-
-
On the Microsoft 365 sign-in page, type your Microsoft 365 user name and/or password as needed, and click Sign in.
-
Click Browse, and go the picture you want to use. Any size and resolution is fine.
-
Click the file, and then click Save.
Notes:
-
After you have changed your picture, it might take some time before the new one appears.
-
Your Lync picture also appears in other Office programs that show pictures, including Outlook.
-
No comments:
Post a Comment