Export an Excel table to SharePoint
You can export data from an Excel table to a SharePoint list. When you export the list, Excel will create a new SharePoint list on the site. You can then work with the data on the site, just like you would for any other SharePoint list.
Note: Exporting a table as a list does not create a data connection to the SharePoint list. If you were to update the table in Excel after exporting it, the updates will not be reflected in the SharePoint list.
To export a table in an Excel spreadsheet to a list on a SharePoint site, you need:
-
A SharePoint site where you are creating the list.
-
Permissions to create lists on the site. If you are not sure, contact your SharePoint site administrator.
To view the list in datasheet view on the SharePoint site you need:
-
Excel or Access. These programs are required for using the datasheet view on the SharePoint site.
Note: Datasheet view is not supported in 64-bit version of Microsoft Office. It is recommended that you install 32-bit version of Office in order to be able to use Datasheet view in a list on a SharePoint site.
Export a table to a SharePoint list
-
Click inside the table.
-
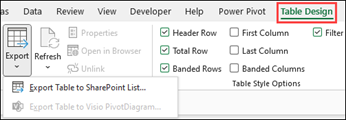
Click Design > Export > Export Table to SharePoint List.

-
In the Address box, type the address, or URL of the SharePoint site.
Important: Type everything that's in your Web address before the "/default.aspx". For example, if the address is http://contoso/default.aspx, type http://contoso. If the address is http://contoso/teams/accounting/sitepages/home.aspx, type http://contoso/teams/accounting.

-
In the Name box, type a unique name for the list.
-
Optionally, enter a description in the Description box.
-
Click Next.
Note: You may be asked to enter your Office365 credentials, or organizational domain credentials, or both.
-
Review the information given in Columns and Data Types and then click Finish.
-
Click OK.
A message indicating that your table is published, along with the Uniform Resource Locator (URL) appears. Click on the URL to go to the list. Add the URL as a favorite in your browser.
Note: Another way to open the list is to go the SharePoint site, click the gear icon on the upper-right corner, and click Site Contents.
Supported data types
Some Excel data types cannot be exported to a list on the SharePoint site. When unsupported data types are exported, these data types are converted to data types that are compatible with SharePoint lists. For example, formulas that you create in Excel are converted to values in a SharePoint list. After the data is converted, you can create formulas for the columns on the SharePoint site.
When you export an Excel table to a SharePoint site, each column in a SharePoint list is assigned one of the following data types:
-
Text (single line)
-
Text (multiple lines)
-
Currency
-
Date/time
-
Number
-
Hyperlink (URL)
If a column has cells with different data types, Excel applies a data type that can be used for all of the cells in the column. For example, if a column contains numbers and text, the data type in the SharePoint list will be text.
No comments:
Post a Comment