Add connectors between shapes in Visio
Visio makes it easy to connect shapes in your drawing. You can use AutoConnect to connect shapes as you add them, and you can connect existing shapes by using the Connector tool.
Types of connections
There are two types of connections that a connector can have to a shape: a point connection or a dynamic connection. A point connection keeps a connector glued to a specific point on the shape, even if that shape is moved or rotated. A dynamic connection allows a connector to change its location on a shape so that, as a shape is moved or rotated, the connector moves to the connection point on the shape that is nearest to the connector's point of origin.
In the following diagram, shape A has a point connection to shape C, and wherever C is moved, the connector from A stays connected to the same point on C. In contrast, shape B has a dynamic connection to C, and the connector from B moves to whichever connection point on C is closest.
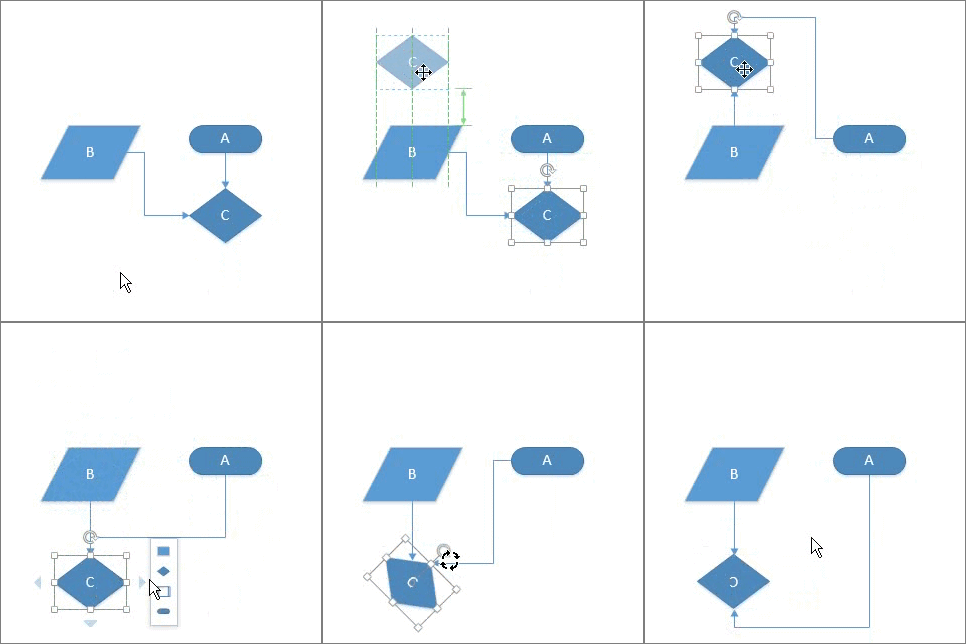
You can have either type of connection on either end of a connector. If you use AutoConnect to connect shapes, both ends will have a dynamic connection. If you manually select where a connector is attached to a shape, you can specify the type of connection.
Automatically connect a shape when you add it
One way to connect shapes is to let Visio connect them automatically when you add shapes to a drawing. This is especially convenient when you are creating a flowchart.
Use the following procedure to add a shape to your drawing that Visio automatically connects to an existing shape.
Note: To use the following procedure, be sure that AutoConnect is active. On the View tab, in the Visual Aids group, verify that AutoConnect is selected.
To add a shape and automatically connect it to an existing shape
-
Drag a shape from the Shapes window to the page, if there are no shapes on the page yet.
-
Hold the pointer over the starting shape until AutoConnect arrows appear around the shape.
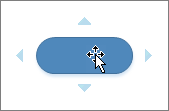
If you don't see the AutoConnect arrows, check the View tab to see whether AutoConnect is selected.
-
Hold the pointer over the arrow in the direction you want to add a shape.
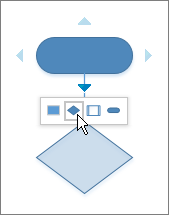
A mini toolbar appears that contains the first four Quick Shapes that are currently in the Quick Shapes stencil. When you point at a shape on the toolbar, Visio displays a preview of that shape on the page.
-
Click the shape you want to add.
-
If you want to continue, point to an AutoConnect arrow on a newly added shape to add another shape that will also be automatically connected.
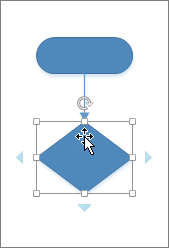
Note: If you want a different shape from those presented on the mini toolbar, drag the shape you want from the Shapes window into position on the page. To connect the shape, use the method described in the next section.
Connect shapes that are already on the page
Of course, you can connect shapes that are already in your drawing, either by using AutoConnect or by using the Connector tool.
When you connect shapes, you can do so with two types of connections: a point connection or a dynamic connection. For more information about these types of connections, see Types of connections, above.
To create a point connection, to keep the connector glued to a specific point on a shape, drag from a connection point on the first shape to a connection point on the second shape. The connector endpoints turn green when the shapes are connected.
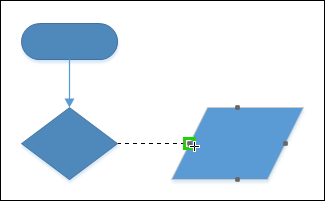
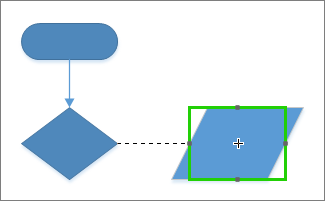
To create a dynamic connection, to allow the connector to move automatically to nearer points on a shape, position the Connector tool over the center of the first shape until a green box appears around the shape. Hold down the mouse button and drag to the center of the second shape. When a green box appears around the second shape, release the mouse button.
Connect existing shapes by using AutoConnect
-
Hold the pointer over a shape until AutoConnect arrows appear around the shape.

-
Click and drag from the AutoConnect arrow to another shape, and drop the endpoint of the connector onto the middle of the shape for a dynamic connection, or onto a specific connection point on the shape for a point connection.
A preview of a shape appears when you hold the pointer over the AutoConnect arrow, but you can ignore the shape; it will disappear as you drag the connector to its destination.
Connect shapes by using the Connector tool
-
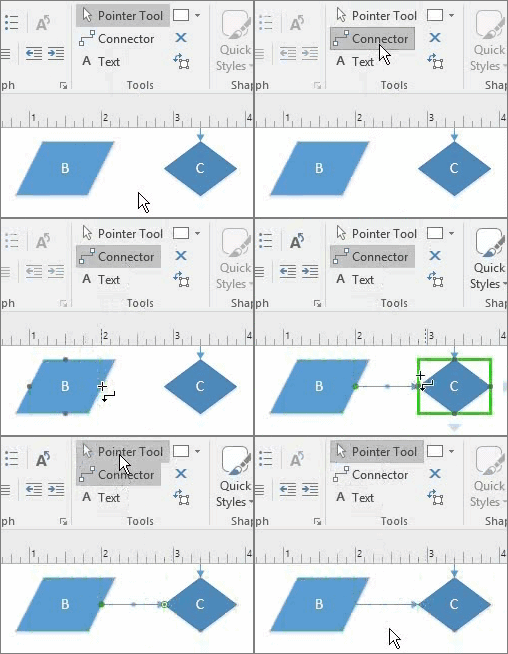
On the Home tab, in the Tools group, click Connector.
-
Click a shape and drag a connector to another shape.
-
When you're done, click Pointer Tool on the Home tab in the Tools group.
Quick Tasks
| Task | Action |
| Change the connector type to right-angle, straight, or curved. | Right-click the connector and then click the connector type in the shortcut menu: right-angle, straight, or curved. |
| Align and space the shapes so the connectors are neat. | Select all the shapes you want to align and then, on the Home tab, in the Arrange group, click Align > Auto Align or Position > Auto Space. You can select multiple shapes by pressing the Ctrl key while you click muliple shapes, or by using one of the Select options in the Editing group on the Home tab. |
| Change a connection from dynamic to point, or from point to dynamic. | Select the connector, and then drag the connector end point away from the shape. Then drop the connector on a specific point for a point connection, or on the middle of the shape for a dynamic connection. |
Turn AutoConnect on or off
You can activate and deactivate AutoConnect in all Visio drawings or in only the active drawing.
Turn AutoConnect on or off in the active diagram
-
On the View tab, in the Visual Aids group, select or clear AutoConnect.

Note: If the AutoConnect check box is not available, check whether AutoConnect has been turned off for all diagrams by performing the following procedure.
Turn AutoConnect on or off in all diagrams
-
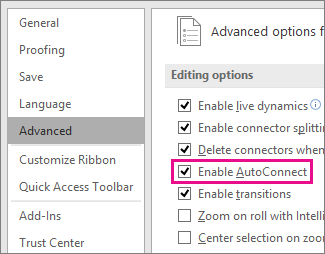
Click the File tab, and then click Options.
-
In Visio Options, click Advanced.
-
Under Editing options, select Enable AutoConnect to activate AutoConnect. Clear the AutoConnect check box to deactivate AutoConnect.
-
Click OK.
See also
Add arrows, points, or other line ends to a connector
Use the Connection Point tool to add, move, or delete connection points
Automatically connect a shape when you add it
One way to connect shapes is to let Visio connect them automatically when you add shapes to a drawing. This is especially convenient when you are creating a flowchart.
Use the following procedure to add a shape to your drawing that Visio automatically connects to an existing shape.
-
Drag a starting shape from the Shapes window to the page, if there are no shapes on the page yet.
-
Hold the pointer over the starting shape until blue AutoConnect arrows appear around the shape.
-
Hold the pointer over the arrow in the direction you want to add a shape.
A mini toolbar appears that contains the first four Quick Shapes that are currently in the Quick Shapes stencil. A Live Preview of the shape that is selected in the stencil appears on the page.
-
Move the pointer over the four shapes in the mini toolbar to see a live preview of each shape on the page.
-
Click the shape you want to add.
If you want a different shape, move the pointer away from the AutoConnect arrow and the previews will disappear. You can then drag the shape you want from the Shapes window.
Quick Tasks
| Task | Action |
| Change the Quick Shapes for a stencil. | Open the stencil and drag the Quick Shapes into the order you want. You can drag shapes into and out of the Quick Shapes area. |
| Change which shapes appear on the mini toolbar. | In the Quick Shapes stencil, select a shape in the group of Quick Shapes you want to appear on the mini toolbar. The group with the selected shapes appears on the toolbar. Alternatively, you can drag the stencil that contains the shapes you want to appear first and drop it just below the Quick Shapes title bar. You can change the order of other stencils by dragging them higher or lower in the Shapes window; they appear in the Quick Shapes stencil in the same order. |
Connect shapes that are already on the page
You can connect shapes that are already in your drawing, either by using AutoConnect or by using the Connector tool.
Connect shapes by using AutoConnect
-
Hold the pointer over a shape until blue AutoConnect arrows appear around the shape.
-
Click and drag from the AutoConnect arrow to another shape, and drop the endpoint of the connector onto the middle of the shape for a dynamic connection, or onto a specific connection point for a point connection.
A Live Preview of a shape appears when you hold the pointer over the blue arrow, but you can ignore the shape; it will disappear when the pointer moves away.
Connect shapes by using the Connector tool
-
On the Home tab, in the Tools group, click Connector.
-
Click a shape and drag a connector to another shape.
To keep the connector glued to a specific point on a shape, drag from a connection point on the first shape to a connection point on the second shape. The connector endpoints turn red when the shapes are connected. This is called a point connection.
To allow the connector to move around the shape when the shape is moved, position the Connector tool over the center of the first shape until a red box appears around the shape. Hold down the mouse button and drag to the center of the second shape. When a red box appears around the second shape, release the mouse button. This is called a dynamic connection.
Quick Tasks
| Task | Action |
| Change the connector type to right-angle, straight, or curved. | Right-click the connector and then click the connector type in the shortcut menu. |
| Align and space the shapes so the connectors are neat. | Select all the shapes you want to align and then, on the Home tab, click Auto Align & Space. You can select multiple shapes by pressing the CTRL key while you click them all, or by using one of the Select options. |
| Change a connection from dynamic to point, or from point to dynamic. | Select the connector, and then drag the connector end point away from the shape. Then drop the connector on a specific point for a point connection, or on the middle of the shape for a dynamic connection. |
Turn AutoConnect on or off
You can turn the AutoConnect feature on or off in all Visio drawings or in only the active drawing.
Turn AutoConnect on or off in the active diagram
-
On the View tab, in the Visual Aids group, select or clear the AutoConnect check box.
If the AutoConnect check box is not available, check whether AutoConnect has been turned off for all diagrams by performing the following steps.
Turn AutoConnect on or off in all diagrams
-
Click the File > Options.
-
Click the Advanced category.
-
Under Editing options, select the Enable AutoConnect check box to turn on AutoConnect. Clear the check box to turn off AutoConnect.
See also
Connect shapes using AutoConnect
One way to connect shapes is to let Visio connect them automatically when you add shapes to a drawing. This is especially convenient when you are creating a flowchart.
Use the following procedure to add a shape to your drawing that Visio automatically connects to an existing shape.
Use AutoConnect while dragging shapes onto the page
-
Drag a shape from a stencil onto the drawing page and position it near another shape.
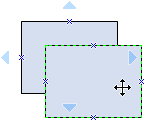
-
While still holding down the mouse button, move the pointer over one of the blue triangles. The triangle turns dark blue.
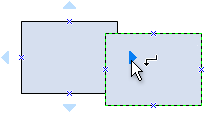
-
Release the mouse button. The shape is placed on the drawing page, and a connector is added and glued to both shapes.
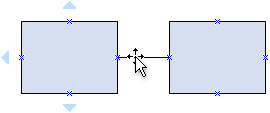
Tip: If you don't like dragging shapes, you can achieve the same result by first selecting a shape in the stencil, resting the pointer over a shape in your drawing, and then clicking one of the blue triangles that appear near that shape.
Use AutoConnect with shapes already on the page
-
Rest the pointer over the shape that you want to connect from.
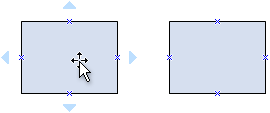
-
Position the pointer over the blue triangle that is closest to the shape that you want to connect to.
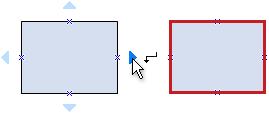
The triangle turns dark blue, and a red box appears around the shape that you want to connect to.
Note: If a red box does not appear around the shape that you want to connect to, the shape may be too far away. Move the shape closer and try again, or use the Connector tool.
-
Click the blue triangle. A connector is added and glued to both shapes.

Enable or disable AutoConnect
You can enable or disable the AutoConnect feature in all Visio drawings, or in only the current drawing. For all drawings:
-
On the Tools menu, click Options.
-
Click the General tab.
-
Under Drawing window options, select the Enable AutoConnect check box.
For the current drawing only:
-
On the Standard toolbar, click the AutoConnect tool.
Note: If clicking the AutoConnect tool does not enable AutoConnect, make sure the Enable AutoConnect check box is selected in the Options dialog box.
Connect shapes using the Connector tool
One of the most flexible ways to add and glue a connector is to draw it by using the Connector tool  on the Standard toolbar.
-
Click the Connector tool
 on the Standard toolbar.
 -
Do one of the following:
-
To keep the connector glued to a specific point on a shape, drag from a connection point
 on the first shape to a connection point on the second shape. The connector endpoints turn red when the shapes are connected. This is called a point-to-point connection. With a point-to-point connection, the connector stays glued to the same connection points when you move one of the shapes.
 -
To allow the connector to move to the closest available connection point, position the Connector tool over the center of the first shape until a red box appears around the shape. Hold down the mouse button and drag to the center of the second shape. When a red box appears around the second shape, release the mouse button. This is called a shape-to-shape connection. With a shape-to-shape connection, the connector stays glued to each shape by moving to the closest available connection points when you move either one of the shapes. If no connection points are present, the connector moves to the closest sides.
Note: You can also create connections between shapes where one end of the connector is connected to a connection point and the other end of the connector is connected to the shape (and vice versa).
-
-
Click the Pointer tool
 on the Standard toolbar to return to normal editing.
Notes:
-
To add a connector from one shape to multiple shapes, you need to add multiple connectors; there is no "branching" connector shape.
-
If you are trying to create a point-to-point connection and having a difficult time gluing a connector exactly where you want it, try different snap and glue settings:
-
On the Tools menu, click Snap & Glue, and then on the General tab, select the options that you want.
If you glue to shape geometry, a shape handle, or a shape vertex, a connection point is automatically added if one didn't already exist.
-
Online Visio Alternative are the best. Creately is a very useful diagramming tool which can illustrate any idea in graphical from. And its standalone versions are available on Mac/Windows and even linux. Its great Visio for Mac alternative
ReplyDelete