Run a macro
There are several ways to run a macro in Microsoft Excel. A macro is an action or a set of actions that you can use to automate tasks. Macros are recorded in the Visual Basic for Applications programming language. You can always run a macro by clicking the Macros command on the ribbon. Depending on how a macro is assigned to run, you might also be able to run it by pressing a CTRL combination shortcut key, by clicking a button on the Quick Access Toolbar or in a custom group on the ribbon. or by clicking an area on an object, graphic, or control. In addition, you can run a macro automatically when you open a workbook.
Note: When you set the macro security level in Excel to Disable all macros without notification, Excel will run only those macros that are digitally signed or stored in a trusted location, such as the Excel startup folder on your computer. If the macro that you want to run is not digitally signed or located in a trusted location, you can temporarily change the security level that enables all macros.
Before you run macros
You need to change a few settings in Excel before you can run macros:
-
If the Developer tab is not available, display it. For more information, see Show the Developer tab.
-
To set the security level temporarily to enable all macros, do the following:
-
On the Developer tab, in the Code group, click Macro Security.

-
In the Macro Settings category, under Macro Settings, click Enable all macros (not recommended; potentially dangerous code can run), and then click OK.
Note: To help prevent potentially dangerous code from running, we recommend that you return to any one of the settings that disable all macros after you finish working with macros.
-
Run a macro
-
Open the workbook that contains the macro.
-
On the Developer tab, in the Code group, click Macros.

-
In the Macro name box, click the macro that you want to run.
-
Do one of the following:
-
You can also press CTRL+F8 to run the macro. To stop the macro, press ESC.
-
To run a macro from a Microsoft Visual Basic for Applications (VBA) module, click Edit, and then on the Run menu, click Run Sub/UserForm, or press F5.
-
Run a macro by pressing a CTRL combination shortcut key
-
On the Developer tab, in the Code group, click Macros.

-
In the Macro name box, click the macro that you want to assign to a Ctrl combination shortcut key.
-
Click Options.
The Macro Options dialog box appears.
-
In the Shortcut key box, type any lowercase letter or uppercase letter that you want to use with the Ctrl key.
Note: The shortcut key will override any equivalent default Excel shortcut key while the workbook that contains the macro is open.
For a list of Ctrl combination shortcut keys that are already assigned in Excel, see the article Excel shortcut and function keys.
-
In the Description box, type a description of the macro.
-
Click OK to save your changes, and then click Cancel to close the Macro dialog box.
Run a macro by clicking a button on the Quick Access Toolbar
To run a macro from a button on the Quick Access toolbar, you first have to add the button to the toolbar. To do that, see Assign a macro to a button.
Run a macro by clicking a button in a custom group on the ribbon
You can create a custom group that appears on a tab in the ribbon, and then assign a macro to a button in that group. For example, you can add a custom group named "My Macros" to the Developer tab, and then add a macro (that appears as a button) to the new group. To do that, see Assign a macro to a button.
Run a macro by clicking an area on a graphic object
Run a macro by clicking an area on a graphic object
You can create a hotspot on a graphic that users can click to run a macro.
-
In the worksheet, insert a graphic object, such as a picture, clip art, shape, or SmartArt.
To learn about inserting a graphic object, see Add, change, or delete shapes.
-
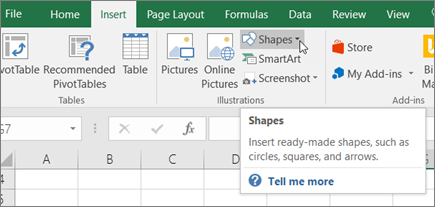
To create a hotspot on the existing object, clickInsert > Shapes, select the shape that you want to use, and then draw that shape on the existing object.

-
Right-click the hotspot that you created, and then click Assign Macro.
-
Do one of the following:
-
To assign an existing macro to the graphic object, double-click the macro or enter its name in the Macro name box.
-
To record a new macro to assign to the selected graphic object, click Record, type a name for the macro in the Record Macro dialog box, and then click OK to begin recording your macro. When you finish recording the macro, click Stop Recording
 on the Developer tab in the Code group.
Tip: You can also click Stop Recording
 on the left side of the status bar.
 -
To edit an existing macro, click the name of the macro in the Macro name box, and then click Edit.
-
-
Click OK.
-
In the worksheet, select the hotspot. This displays the Drawing Tools, adding a Format tab.
-
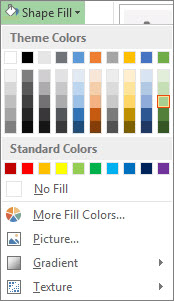
On the Format tab, in the Shape Styles group, click the arrow next to Shape Fill, and then click No Fill.

-
Click the arrow next to Shape Outline, and then click No Outline.
Configure a macro to run automatically upon opening a workbook
If you record a macro and save it with the name Auto_Open, the macro will run whenever you open the workbook that contains the macro. Another way to automatically run a macro when you open a workbook is to write a VBA procedure in the Open event of the workbook by using the Visual Basic Editor. The Open event is a built-in workbook event that runs its macro code every time you open the workbook.
Create an Auto_Open macro
-
If you want to save the macro with a particular workbook, open that workbook first.
-
On the Developer tab, in the Code group, click Record Macro.
-
In the Macro name box, type Auto_Open.
-
In the Store macro in list, select the workbook where you want to store the macro.
Tip: If you want a macro to be available whenever you use Excel, select Personal Macro Workbook. When you select Personal Macro Workbook, Excel creates a hidden personal macro workbook (Personal.xlsb), if it does not already exist, and saves the macro in this workbook. In Windows Vista, this workbook is saved in the C:\Users\user name\AppData\Local\Microsoft\Excel\XLStart folder. If you can't find it there, it may have been saved in the Roaming subfolder instead of Local. In Microsoft Windows XP, this workbook is saved in the C:\Documents and Settings\user name\Application Data\Microsoft\Excel\XLStart folder. Workbooks in the XLStart folder are opened automatically whenever Excel starts. If you want a macro in the personal macro workbook to be run automatically in another workbook, you must also save that workbook in the XLStart folder so that both workbooks are opened when Excel starts.
-
Click OK, and then perform the actions that you want to record.
-
On the Developer tab, in the Code group, click Stop Recording
 .
.Tip: You can also click Stop Recording on the left side of the status bar.

Notes:
-
If you chose to save the macro in This Workbook or New Workbook in step 6, save or move the workbook into one of the XLStart folders.
-
Recording an Auto_Open macro has the following limitations:
-
If the workbook where you save the Auto_Open macro already contains a VBA procedure in its Open event, the VBA procedure for the Open event will override all actions in the Auto_Open macro.
-
An Auto_Open macro is ignored when a workbook is opened programmatically by using the Open method.
-
An Auto_Open macro runs before any other workbooks open. Therefore, if you record actions that you want Excel to perform on the default Book1 workbook or on a workbook that is loaded from the XLStart folder, the Auto_Open macro will fail when you restart Excel, because the macro runs before the default and startup workbooks open.
If you encounter these limitations, instead of recording an Auto_Open macro, you must create a VBA procedure for the Open event as described in the next section of this article.
-
-
If you want Excel to start without running an Auto_Open macro, hold down the SHIFT key when you start Excel.
Create a VBA procedure for the Open event of a workbook
The following example uses the Open event to run a macro when you open the workbook.
-
Save and close any open workbooks.
-
Open the workbook where you want to add the macro, or create a new workbook.
-
On the Developer tab, in the Code group, click Visual Basic.
-
In the Project Explorer window, right-click the ThisWorkbook object, and then click View Code.
Tip: If the Project Explorer window is not visible, on the View menu, click Project Explorer.
-
In the Object list above the Code window, select Workbook.
This automatically creates an empty procedure for the Open event, such as this:
Private Sub Workbook_Open()
End Sub -
Add the following lines of code to the procedure:
Private Sub Workbook_Open()
MsgBox Date
Worksheets("Sheet1").Range("A1").Value = Date
End Sub -
Switch to Excel and save the workbook as a macro-enabled workbook (.xlsm).
-
Close and reopen the workbook. When you open the file again, Excel runs the Workbook_Open procedure, which displays today's date in a message box.
-
Click OK in the message box.
Note: The cell A1 on Sheet1 also contains the date as a result of running the Workbook_Open procedure.
Need more help?
You can always ask an expert in the Excel Tech Community, get support in the Answers community, or suggest a new feature or improvement on Excel User Voice
No comments:
Post a Comment