Insert pictures
Pictures can be inserted (or copied) into Office documents from your computer or from online.
Office no longer provides clip art in its apps, but it helps you search online for pictures to insert in your files. On the Insert tab of the Ribbon, you can use the Clip Art or Online Pictures button.
In Office 2016 and Office 2013, in addition to inserting pictures from your computer, you may also insert pictures from web pages and from Bing.com or OneDrive.
Tip: Inserting pictures from a scanner is no longer available in Office 2013 and Office 2016. However, in Office 2013, you can scan images into OneNote and then copy and paste them into other Office programs. For scanning help in Office 2016, see How can I Insert scanned images into OneNote 2016 for Windows?
Insert a picture from your computer
Note: The following steps apply to Word, Outlook, Excel, PowerPoint, Publisher, and OneNote.
-
Click the location in your document or email message where you want to insert a picture.
-
On the Insert tab, click Pictures.

Note: In Outlook, you will not see the Insert tab and Pictures icon until you've opened and clicked in the body of a new email message.
-
Browse to the picture you want to insert, select it, and then click Insert.
To add multiple pictures, press and hold Ctrl while you select pictures, and then click Insert.
Notes:
-
The picture is embedded in your document. If your picture has a large file size and makes your document too large, you can reduce the size of your document by linking to the picture instead of embedding it. In the Insert Picture dialog box, click the arrow next to Insert, and then click Link to File.
-
In Outlook, you can also choose to attach a picture by clicking Insert > Attach File. With this option, the picture will not appear in the body of your email message.
-
Insert a picture from another source
Insert a picture from an online source
Note: The following steps apply to Word, Outlook, Excel, PowerPoint, Publisher, and OneNote.
If you don't have the perfect picture on your computer, try inserting one from an online source, such as Bing.
Note that Office.com Clip Art, available in earlier versions of Office, has been replaced by Bing Images. Follow the steps below to find clip art on the web from Bing.
-
Click the location in your document or email message where you want to insert a picture.
-
On the Insert tab, click Online Pictures.

Note: In Outlook, you won't see the Insert tab and Online Pictures icon until you've opened and clicked in the body of a new email message.
-
In the search box, type a word or phrase that describes the image you want, and then press Enter. Include the words clip art in your search phrase if you specifically are looking for illustrations like that.

Note: When you search for clip art and pictures with Bing, you're responsible for respecting copyright, and the license filter in Bing can help you choose which images to use.
-
In the list of results, select the picture you want, and then click Insert.
Insert a picture from a web page
-
Open your document.
-
From a web page, right-click the picture you want, and then choose Copy or Copy image.
-
In your document, right-click where you want to insert the picture, and then select an option under Paste Options.
Replace a picture
-
Right-click the picture, and then click Change Picture.
-
Locate a new picture, and then click Insert.
Note: This option is not available for older Word files saved in the .doc file format. For this option to be active, your file must have the .docx extension.
In Office 2010, in addition to inserting pictures from your computer, you may also insert pictures from web pages and from online sources such as Bing.com.
Insert a picture from your computer
Note: The following steps apply to Word, Outlook, Excel, PowerPoint, Publisher, and OneNote.
-
Click the location in your document or email message where you want to insert a picture.
-
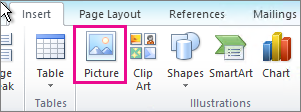
On the Insert tab, click Picture.

Note: In Outlook, you will not see the Insert tab and Picture icon until you've opened and clicked in the body of a new email message.
-
Browse to the picture you want to insert, select it, and then click Insert.
To add multiple pictures, press and hold Ctrl while you select pictures, and then click Insert.
Notes:
-
The picture is embedded in your document. If your picture has a large file size and makes your document too large, you can reduce the size of your document by linking to the picture instead of embedding it. In the Insert Picture dialog box, click the arrow next to Insert, and then click Link to File.
-
In Outlook, you can also choose to attach a picture by clicking Insert > Attach File. With this option, the picture will not appear in the body of your email message.
-
Insert a picture from another source
Insert clip art
Note: The following steps apply to Word, Outlook, Excel, PowerPoint, and Publisher.
-
Click the location in your document or email message where you want to insert a picture.
-
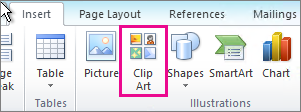
On the Insert tab, click Clip Art.

Note: In Outlook, you will not see the Insert tab and Clip Art icon until you've opened and clicked in the body of a new email message.
-
In the Clip Art pane, in the Search for box, type a word or phrase that describes the picture you're looking for, and then click Go.
-
When you search for clip art and pictures online, you'll be directed to Bing. You're responsible for respecting copyright, and the license filter in Bing can help you choose which images to use.
-
In the list of results, double-click an item to insert it.
Insert a picture from a web page
-
Open your document.
-
From a web page, right-click the picture you want, and then choose Copy or Copy image.
-
In your document, right-click where you want to insert the picture, and then select an option under Paste Options.
Replace a picture
-
Right-click the picture, and then click Change Picture.
-
Locate a new picture, and then click Insert.
Note: This option is not available for older Word files saved in the .doc file format. For this option to be active, your file must have the .docx extension.
In Office 2007, you can insert pictures from different places, such as your computer, clip art, or a webpage, into an Office document in Word, Excel, or Outlook.
Insert a picture from your computer
-
Click where you want to insert a picture in your document.
-
On the Insert tab, in the Illustrations group, click Picture.

-
In the Insert Picture box, browse to the location of the picture on your computer, select the picture, and then click Insert.
Note: To add multiple pictures, press and hold CTRL while you selecting the pictures, and then click Insert.
The original picture is embedded in your document. If your picture has a large file size and makes your document too large, you can reduce the size of your document by linking to the picture instead of embedding it. In the Insert Picture dialog box, click the arrow next to Insert, and then click Link to File.
Insert a picture from another source
Insert clip art
-
On the Insert tab, in the Illustrations group, click Clip Art.

-
In the Clip Art pane, in the Search for box, type a word or phrase that describes the picture you're looking for, and then click Go.
When you search for clip art and pictures online, you'll be directed to Bing. You're responsible for respecting copyright, and the license filter in Bing can help you choose which images to use.
-
In the list of results, click an item to insert it.
Insert a picture from a web page
-
Open your document.
-
From a webpage, right-click the picture you want, and then click Copy or Copy image.
-
In your document, right-click where you want to insert the picture, and then click Paste.
What happened to the From Scanner option for adding pictures in Word?
The From Scanner or Camera option for adding pictures to a document is not available in Word 2007. Instead, you can add pictures from your camera or scanner by downloading the pictures to your computer first and then copying them from your computer into Word.
After you download a picture to your computer, do the following:
-
On the Insert tab, in the Illustrations group, click Picture.
-
Locate the picture that you want to add to your document, and then click Insert.
Format pictures
Now that you've added a picture to your Office document, you might want to explore the ways you can format pictures. This list should get you started:
See also
Insert pictures in Office for Mac
Send feedback
Have feedback or product requests? Please submit your comments here to help us improve Office.
No comments:
Post a Comment