Create a drop-down list
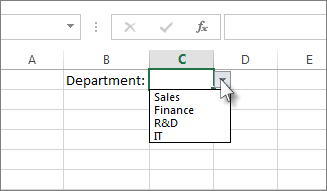
You can provide a more efficient worksheet by using drop-down lists in cells where people can make a Yes or No choice, pick a date from a calendar, or pick from another list you create. Watch this quick video to see how it's done.

-
On a new worksheet, type the entries that you want to appear in your drop-down list. The entries should be in a single column or row without any blank cells, like this:
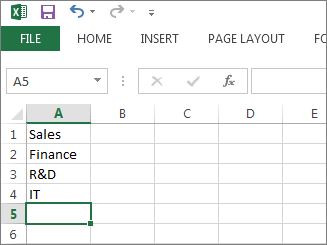
Tip: Now is a good time to Sort your data in the order you want it to appear in your drop-down list.
-
Select all of your entries, right-click, and then click Define Name.
-
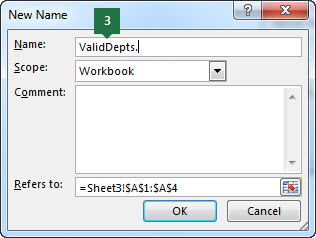
In the Name box, type a name for your entries, for example, ValidDepts., and then click OK. Be sure your name doesn't have any spaces in it. This name won't show up in your list, but you need to name it so you can link it to your drop-down list.
-
Click in the cell in the worksheet where you want the drop-down list.
-
Click Data >Data Validation.
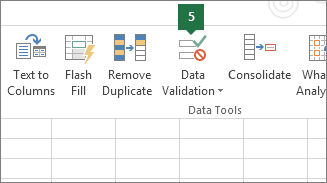
Tips: Can't click Data Validation? Here are a few reasons why that might happen.
-
Drop-down lists can't be added to tables that are linked to a SharePoint site. Unlink the table or remove the table formatting, and then try step 5 again.
-
The worksheet might be protected or shared. Remove the protection or stop sharing the worksheet, and then try step 5 again.
-
-
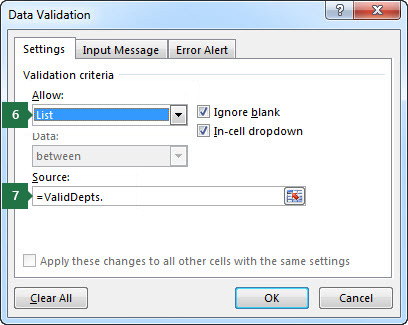
On the Settings tab, in the Allow box, click List.
-
In the Source box, type and equal sign (=), immediately followed by the name you gave your list in step 3. For example, =ValidDepts..
-
Check the In-cell dropdown box.
-
If it's OK for people to leave the cell empty, check the Ignore blank box.
-
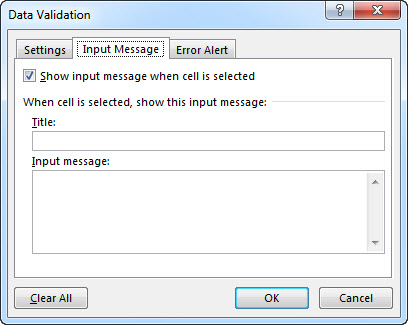
Click the Input Message tab.
-
If you want a message to pop up when the cell is clicked, check the Show input message when cell is selected box, and type a title and message in the boxes (up to 225 characters). If you don't want a message to show up, clear the check box.
-
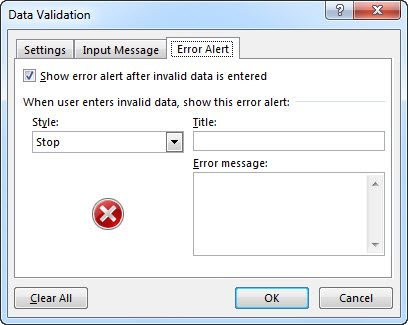
Click the Error Alert tab.
-
Check the Show error alert after invalid data is entered box, pick an option from the Style box, and type a title and message. If you don't want a message to show up, clear the check box.
Not sure which option to pick in the Style box?
-
To show a message that doesn't stop people from entering data that isn't in the drop-down list, click Information or Warning. Information will show a message with this icon
 and Warning will show a message with this icon
  .
. -
To stop people from entering data that isn't in the drop-down list, click Stop.
Note: If you don't add a title or text, the title defaults to "Microsoft Excel" and the message to: "The value you entered is not valid. A user has restricted values that can be entered into this cell."
-
Learn about drop-down lists
Build your knowledge of drop-down lists with LinkedIn Learning. Learn how to control how users enter data into workbooks, ensuring that data is consistent and accurate. You can control dates, times, even the length of the text they enter, or simply provide a list of acceptable choices to eliminate any possible mistakes.
Working with your drop-down list
After you create your drop-down list, make sure it works the way you want. For example, you might want to check to see if the cell is wide enough to show all your entries.
If the list of entries for your drop-down list is on another worksheet and you want to prevent users from seeing it or making changes, consider hiding and protecting that worksheet. For more information about how to protect a worksheet, see Lock cells to protect them.
If you decide you want to change the options in your drop-down list, see Add or remove items from a drop-down list.
To delete a drop-down list, see Remove a drop-down list.
To see a video about how to work with drop-down lists, see Create and manage drop-down lists.
Download our examples
You can download an example workbook with multiple data validation examples like the one in this article. You can follow along, or create your own data validation scenarios. Download Excel data validation examples
See also
Apply Data Validation to cells
Video: Create and manage drop-down lists
Microsoft Office Tutorials: Create A Drop-Down List >>>>> Download Now
ReplyDelete>>>>> Download Full
Microsoft Office Tutorials: Create A Drop-Down List >>>>> Download LINK
>>>>> Download Now
Microsoft Office Tutorials: Create A Drop-Down List >>>>> Download Full
>>>>> Download LINK VZ