Check spelling and grammar in Office 2010 and later
All Office programs can check the spelling and grammar of your files. You can check spelling and grammar all at once by running the spelling and grammar checker, or you can check spelling and grammar automatically and make corrections as you work. You can also turn the automatic spelling and grammar off as needed.
Notes: This article covers Office 2010 and later.
-
For Office 2007, see Check spelling and grammar in Office 2007.
-
For Office for Mac, see Check spelling and grammar in Office for Mac.
Run the spelling and grammar checker
-
Open the spelling and grammar checker:
-
In most Office programs, click the Review tab, and then click Spelling in the Proofing group.
-
In Access, click the Home tab, and then click Spelling in the Records group.
-
In InfoPath, click the Home tab, and then click Spelling in the Editing group.
-
In OneNote, click the Review tab, and then click Spelling in the Spelling group.
-
-
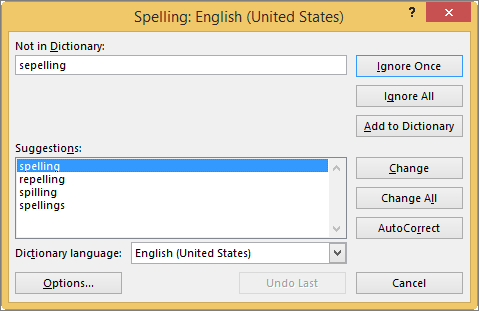
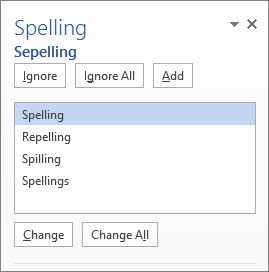
A dialog box or task pane appears with the first misspelled word found by the spelling checker. Options and buttons will vary slightly depending on whether you are using the task pane or dialog box.


-
Fix each error by doing one of the following:
-
To use one of the suggested words, select the word and click Change.
-
To change the word yourself, edit the word directly in the document or in the Not in Dictionary box.
-
To add the word to the default dictionary so that Office stops flagging it as misspelled, click Add or Add to Dictionary.
Note: If the Add or Add to Dictionary option is not available, make sure you have a default custom dictionary selected in the Custom Dictionaries dialog box. See Change the custom dictionary to which the spelling checker adds words to learn how to select a default custom dictionary.
-
To ignore the word and move to the next flagged word, click Ignore or Ignore Once.
-
To ignore all instances of the flagged word and move on to the next one, click Ignore All.
-
Show errors automatically while you work
Most Office programs automatically check for potential spelling and grammatical errors as you type, so you don't need to do anything to show errors while you work. However, if you'd rather wait to check spelling and grammar until you're done writing, you can turn off the automatic spelling and grammar checker.
Notes:
-
Automatic spelling and grammar checking is not available in Access, Excel, or Project.
-
Automatic grammar checking is available only in Outlook, Word, PowerPoint 2013, and PowerPoint 2016.
Office marks potential spelling errors with a red squiggly line:

Potential grammatical errors are marked with a blue squiggly line:

If spelling or grammatical errors aren't marked, automatic checking might be turned off. You can turn on the automatic spelling and grammar checker.
When you see a spelling or grammatical error, right-click or press and hold the word or phrase and choose one of the options to fix the error.
Turn the automatic spelling and grammar checker on or off
If you don't want Word to mark potential errors with squiggly lines while you are working, you can turn automatic spelling and grammar checking off:
-
Open the spelling and grammar options:
-
In OneNote, PowerPoint, Publisher, Visio, and Word: On the File menu, click Options, and then click Proofing.
-
In InfoPath: On the Home tab, click the arrow next to or under Spelling, and then click Spelling Options.
-
In Outlook: On the File menu, click Options, and click Mail, and then click Spelling and Autocorrect.
-
-
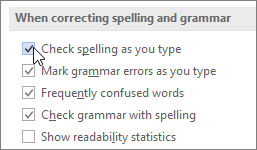
Select or clear the Check spelling as you type check box. In some programs, you may also select or clear the Mark grammar errors as you type check box.

Note: In Word, you can turn the spelling checker on or off for the document you're working with or for all new documents. Select an option in the Exceptions for list, and then select or clear the Hide spelling errors in this document only and Hide grammar errors in this document only check boxes.
Turn grammar checking off entirely
If you don't want Word to check grammar at all (either when running a spell check or automatically as you type), you can turn it off:
-
Open the spelling and grammar options:
-
In OneNote, PowerPoint, Publisher, Visio, and Word: On the File menu, click Options, and then click Proofing.
-
In InfoPath: On the Home tab, click the arrow next to or under Spelling, and then click Spelling Options.
-
In Outlook: On the File menu, click Options, and click Mail, and then click Spelling and Autocorrect.
-
-
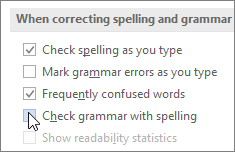
Clear the Mark grammar errors as you type and Check grammar with spelling check boxes.

Note: Not every Office program will have both of these options. Simply clear any grammar check box to have Word stop checking grammar.
Recheck spelling and grammar that you previously ignored
In Word, Outlook, PowerPoint 2013, and PowerPoint 2016, you can force a recheck of the words and grammar that you previously skipped by doing the following:
-
Open the document or item that you want to check.
-
On the File menu, click Options, and then:
-
In Word: Click Proofing, and then under When correcting spelling and grammar in Word, click Recheck Document.
-
In PowerPoint: Click Proofing, and then under When correcting spelling and grammar in PowerPoint, click Recheck Document.
-
In Outlook: Click Mail, click Spelling and Autocorrect, and then under When correcting spelling and grammar in Outlook, click Recheck E-mail (even if you want to check a calendar item).
-
-
Click Yes when you see the warning message about resetting the spelling and grammar checker.
-
Click OK in the dialog box to get back to the document, and then run the spelling and grammar checker again.
See also
If the spelling and grammar checker doesn't work as you expected or you want to customize the results, see the following related articles:
If you have feedback or suggestions about the spelling and grammar feature, please post them here.
No comments:
Post a Comment