Add a server-side script as a data source
In Microsoft SharePoint Designer 2010, you can add a server-side script such as REST or RSS as a data source, test the data source connection, and then display the information returned by the server-side script by creating a Data View on your site. This topic demonstrates through an example of how you can use a server-side script in a data connection to create rich data views.
Important: If your site resides on a server running SharePoint Foundation 2010, the default settings on the server require that your server administrator first edit the Web.config file on the server before you can connect to a server-side script, as described in the section Test the data source connection. If your site resides on a server running Microsoft SharePoint Server 2010, you can connect to a server-side script without making any changes on the server.
In this topic, you will create a connection using an RSS feed from MSN Weather as the data source. You will also test the connection and create a data view out of the connection to display a brief weather report in your Web page.
In this article
What is a server-side script?
A server-side script is a small program that resides on the server and that runs in response to certain actions in the browser. Server-side scripts can be written in a variety of languages, including Perl, PHP, and Microsoft ASP.NET. Unlike client-side scripts such as JavaScript, server-side scripts are run on the server before the Web page appears in the browser. Some examples of server-side script applications include shopping carts, dynamic menus, and surveys.
To create a Data View that displays the data provided by a server-side script, the script must retrieve data in the form of XML. You can connect to server-side scripts that are written in a variety of languages and by using a variety of methods, including ASP.NET, PHP, and AJAX. However, the script must send the resulting data in the form of XML. One common server-side script that returns XML is an RSS Feed.
If you want to add a connection to an RSS Feed that is a server-side script and not an XML file (for example, an RSS Feed that has a URL ending in .aspx or .php), the connection should be included in the Server-side Scripts category in the Data Source Library. An RSS Feed that is an XML file (for example, an RSS Feed that has a URL ending in .xml) can be added to either the Server-side Script category or the XML Files category.
To add a server-side script as a data source, you must know the URL of the script and the details of any required URL parameters.
Step 1: Add a server-side script to the Data Source Library
Given below are the steps to create a server-side script for the MSN Weather RSS feed.
-
Click Data Sources in the Navigation Pane.
-
On the Data Connections tab, in the New group, click REST Service Connection.
-
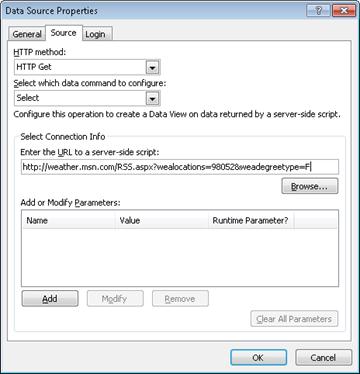
In the Data Source Properties dialog box, on the Source tab, verify that the HTTP method is HTTP Get.
-
The HTTP Get method appends any parameter names and values to the URL.
-
The HTTP Post method sends any parameter names and values to the URL in the body of the request.
-
-
In the Select which data command to configure list, there are four options:
-
The Select command retrieves information by using the server-side script. You can then display the information on your site by creating a Data View.
-
The Insert, Update, and Delete commands also retrieve information by using the server-side script. However, you cannot create a Data View that displays or modifies information that is retrieved by using these commands. You can only use a Data View to display information that is retrieved by using the Select command.
For this example, click the Select command because we want to retrieve specific information from the MSN Weather site.
-
-
Under Select Connection Info, in the Enter the URL to a server-side script box, type the URL for the script or RSS Feed to which you want to connect.
For this example, use the following URL:
http://weather.msn.com/RSS.aspx?wealocations=98052&weadegreetype=F

Some server-side scripts require additional information that is passed from the browser to the server in the form of parameters. The URL that you used above passes two parameters—the location in Zip code form and the units for the temperature (F = Fahrenheit and C = Celsius). It is necessary to use a valid zip code, so in this example, we used 98052, the zip code for Redmond, WA. The URL indicates F at the end of the string to display the temperature in Fahrenheit.
The URL in this example uses parameters automatically, so we don't have to add or modify anything. But if your server-side script requires parameters, do any of the following:
-
To add a parameter, click Add and then, in the Parameter dialog box, type a name and default value for the parameter.
Note: If the parameter is set at run time by using a Web Part connection, select the The value of this parameter can be set via a Web Part Connection check box.
-
To modify an existing parameter, click the parameter in the list, click Modify, and then, in the Parameter dialog box, modify the name or default value for the parameter.
-
To remove an existing parameter, click the parameter in the list, and then click Remove.
-
-
In the Data Source Properties dialog box, click the General tab, and enter a meaningful name such as MSN Weather for the connection.
-
Click OK.
The server-side script now appears in the Data Sources list.
Step 2: Create a data view of the server-side script
Now that you have added a server-side script to your Data Sources list, you can create a Data View that displays the results of the server-side script.
Tips:
-
You can create a data view quickly by clicking the pushpin icon next to Data Sources in the Navigation Pane—this displays the data sources list below the Navigation Pane. Then drag a data source from the list and drop it in your ASPX page and the data view displays.
-
For more information on creating data views, see the See Also section.
When you create a Data View, the result is a default view of the data in which the first five fields in your data source appear in each row in a basic table. If the first five fields appear with the corresponding data, the data source is configured properly.
Data Views are based on Microsoft ASP.NET technology. To create a Data View, you must start with an ASP.NET page (.aspx file).
-
Click the File tab and click New Item, and then click More Pages, click ASPX, and finally click Create.
-
On the New ASPX page dialog box, enter a unique name for the page, and click OK.
-
Click Yes to confirm to open the page in advanced mode.
A new page with a FORM tag opens.
-
Click the Insert tab, and in the Data Views & Forms group, click Data View, and in the dropdown list that appears, select the RSS script data connection you created in the previous step.
The Data View displays in the page.
Note: If the Data Source Details task pane displays data from the data source, the data source connection is working properly. If the data view does not display, then skip to Troubleshooting the data source connection.
For this example, we will keep the description field, and remove all other fields in the Data View.
-
Click inside the data view.
The Data View Tools contextual ribbon appears.
-
On the Options tab, in the Fields group, click Add/Remove Columns.
-
On the Edit Columns dialog box, in the Displayed columns list, remove all fields except description and click OK.
-
Click anywhere in the Data View and then click the arrow in the upper-right corner
 to show the Common xsl:value-of Tasks list.
 -
In the Format as drop-down list, click Rich Text.
-
If the Confirm dialog box appears, click Yes.
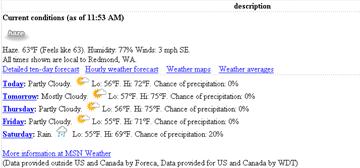
The Data View looks similar to the following image:
 Fig. 1 Data View created from the MSN Weather data connection
You can now customize the page as necessary.
Troubleshooting the data source connection
If the Data Source Details task pane does not display data from the data source, but instead the task pane either is blank or displays an error message, the data source connection is not working properly. This issue may occur if your server is running Windows SharePoint Services, the server is behind a proxy server or firewall, and the proxy server settings are not specified in the Web.config file for the virtual server.
To resolve this issue, contact your server administrator and ask him or her to perform the following procedure. The server administrator must edit the Web.config file to include the proxy server settings for the virtual server where your site resides. In a server farm environment, the server administrator must edit the Web.config file for each virtual server in every front-end Web server in the server farm.
Note: Changing the default proxy server setting enables server-to-server communication but does not in any way affect inbound connections or access permissions to your server.
Configure the Web.config file on the server
To configure the Web.config file, follow these steps on the server running SharePoint Foundation 2010:
-
Start a text editor such as Notepad.
-
Locate and open the Web.config file for the virtual server where you want to allow users to create connections to XML Web service and server-side script data sources.
The Web.config folder is located in the content area of your server — for example, the default path is \Inetpub\wwwroot\wss\VirtualDirectories\80.
-
Copy and paste the following lines into the Web.config file anywhere at the level directly below the <configuration> node.
<system.net>
<defaultProxy>
<proxy autoDetect="true" />
</defaultProxy>
</system.net>
-
Save the Web.config file, and then exit the text editor.
-
Reset Microsoft Internet Information Services (IIS) to apply your changes. Alternatively, you can reset after the next step to apply your changes to multiple virtual servers at one time. To reset IIS, open a command line window and type iisreset at the command prompt.
Note: Repeat steps 1 through 5 for each virtual server where you want to allow users to create connections to XML Web service and server-side script data sources.
-
Create the Data View again. For more information, refer to the previous section Step 2: Create a data view of the server-side script.
This post is so usefull and informative.Keep updating with more information...
ReplyDeletePython Classes In Mumbai
Python Training In Ahmedabad
Python Training In Kochi
Python Training In Trivandrum
Python Training In Kolkata
Microsoft Office Tutorials: Add A Server-Side Script As A Data Source >>>>> Download Now
ReplyDelete>>>>> Download Full
Microsoft Office Tutorials: Add A Server-Side Script As A Data Source >>>>> Download LINK
>>>>> Download Now
Microsoft Office Tutorials: Add A Server-Side Script As A Data Source >>>>> Download Full
>>>>> Download LINK md